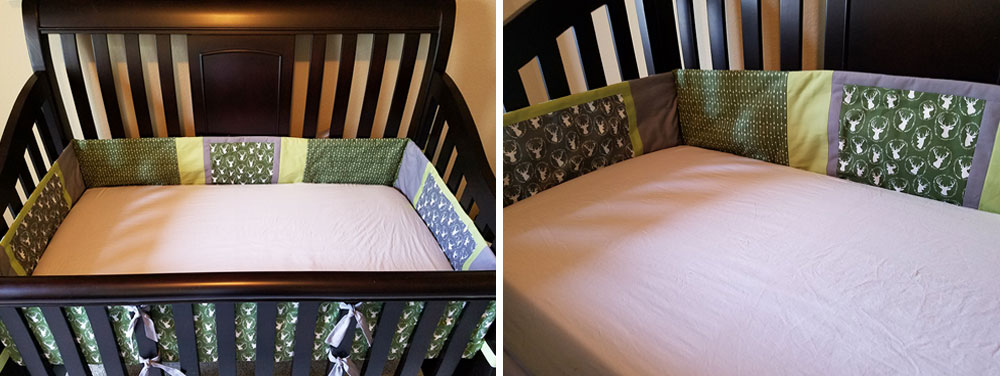
A crib bumper pad is the perfect addition to any nursery décor. It will keep your baby cozy and comfortable in the crib, protecting him or her from the hard sides of the crib walls. Plus, you can select fabric to match your nursery décor! This pattern makes pads to fit a standard crib with inside dimensions of 28” by 52”.
Supplies Needed:
- 2¼ yards main fabric color
- 1¼ yards accent fabric #1
- 1 yard accent fabric #2
- ¾ yard accent fabric #3
- ½ yard accent fabric #4
- 13”x164” of low to medium loft batting – can be pieced together if necessary to form needed length
Cutting Directions:
- From the main fabric, cut two 11” squares, two 13”x29” rectangles, two 13”x21” rectangles and four 13”x17” rectangles.
- From accent fabric #1, cut four 2”x11” strips, four 2”x13” strips, four 7”x13” rectangles, and 16 2½”x21” strips.
- From accent fabric #2, cut four 5”x13” rectangles, four 2”x11” strips, four 2”x17” strips and 16 2½”x21”strips.
- From accent fabric #3, cut four 13”x17” rectangles.
- From accent fabric #4, cut two 11”x15” rectangles.
Sewing Instructions:
Use ½” seam allowances
Refer to long and short panel fabric layout for reference – download here
Step 1: With right sides together, align two 2”x11” accent fabric #1 strips with the sides of the 11” square of main fabric, stitch in place and then press.
Step 2: With right sides together, align two 2”x13” accent fabric #1 strips with the top and bottom of the 11” square from the previous step. Stitch in place and then press.
Step 3: With right sides together, align one 5”x13” accent fabric #2 rectangles with the right side of the “framed” fabric panel from the previous step. Stitch in place and then press.
Step 4: With right sides together, align the remaining 5”x13” accent fabric #2 rectangle with the opposite (left) side of the “framed” fabric panel, stitch in place and then press.
Step 5: With right sides together, align one 13”x17” accent fabric #3 rectangle with the right side of the long panel being created. Stitch in place and then press.
Step 6: With right sides together, align another 13”x17” accent fabric #3 rectangle with the left side of the long panel being created. Stitch in place and then press.
Step 7: One long side of the inner crib bumper pad has now been stitched. Repeat the above six steps to create another long side.
Step 8: With right sides together, align two 2”x11” accent fabric #2 strips with the sides of one of the 11”x15” accent fabric #4 rectangles. Stitch in place and then press.
Step 9: With right sides together, align two 2”x17” accent fabric #2 strips with the top and bottom of the 11”x15” accent fabric #4 rectangles from the previous step. Stitch in place and then press.
Step 10: With right sides together, align one 7”x13” accent fabric #1 rectangle with the right side of the panel being created. Stitch in place and then press.
Step 11: With right sides together, align another 7”x13” accent fabric #1 rectangles with the left side of the panel being created. Stith in place and then press.
Step 12: One short side of the inner crib bumper pad has now been stitched. Repeat the above four steps to create another short side.
Step 13: With right sides together, stitch short and long panels together, alternating one long, one short, one long, and one short to create one long panel.
Step 14: With right sides together, align two 2½”x21” accent fabric #1 strips. Stitch both long ends and one short end. Clip corners and then turn right side out and press. Along the remaining raw edge, turn under and press ½”, then topstitch the opening closed approximately ¼” from the folded edge.
Step 15: One tie strap has been created. Repeat with the remaining 2½”x21” accent fabric #1 strips as well as the accent fabric #2 strips to create 16 tie straps.
Step 16: Fold four accent fabric #1 tie strips in half and press. Along the short edges of one 13”x21” main fabric rectangle, align the folded edge of the tie strips with the raw fabric rectangle edge 1½” from the upper and lower edge. Pin all four ties in place.
Step 17: With right sides together, align one 13”x17” main fabric rectangle with the right side of the 13”x21” main fabric rectangle from the previous step. Stitch in place and then press.
Step 18: With right sides together, align another 13”x17” main fabric rectangle with the left side of the 13”x21” main fabric rectangle, stitch in place and then press.
Step 19: One long side out the outer crib bumper pad has been created. Repeat the above three steps to create another long side.
Step 20: Fold four accent fabric #2 tie strips in half and press. Along the short edges of one 13”x29” main fabric rectangle, align the folded edge of the tie strips with the raw fabric rectangle edge 1½” from the upper and lower edges. Pin all four ties in place.
Step 21: Repeat with the remaining four accent fabric #2 tie strips and the remaining 13”x29” main fabric rectangle. Both short sides of the outer crib bumper pad have been created.
Step 22: With right sides together, stitch short and long panels together, alternating one long, one short, one long, and one short to create one long panel.
Step 23: With right sides together, align the inner bumper pad panel with the outer bumper pad panel. Lay the batting on top, aligning all edges. Stitch the upper and lower edges, beginning and ending ½” from each edge.
Step 24: Turn right side out and press.
Step 25: Along one open raw edge, turn edge under ½” towards the wrong side and press.
Step 26: Ensure that the bumper pad isn’t twisted and then insert the remaining raw edge into the folded edge by ½”. Stitch approximately ¼” from the folded edge to secure.
Step 27: Press entire bumper pad and then topstitch the upper and lower edge if desired.

Now simply insert the bumper pad around your crib mattress and tie the ties to the crib slats. (Or wrap up and gift it to a new mom!)
What do you think of this project? Leave us a comment or share with us on Facebook!

Amazing. If my little one was still in a crib I would make this. Better then the ones you can buy in the store.
ALL the "experts" say DO NOT USE BUMPER PADS IN CRIBS WHERE BABIES SLEEP...so why are you and others still presenting this as something to make for a baby's room??!!
The (American Academy of Pediatrics (AAP) has concerns for the safety of Crib Bumper Pads. Be Safe - do your research to know if it is safe for your baby.
Please, please, please, research this before publishing.. The present thinking is that cot bumpers overheat small babies, who can't as yet roll over, if they get hot, and are NOT recommended, fearing Cot-death syndrome.
Love it
love