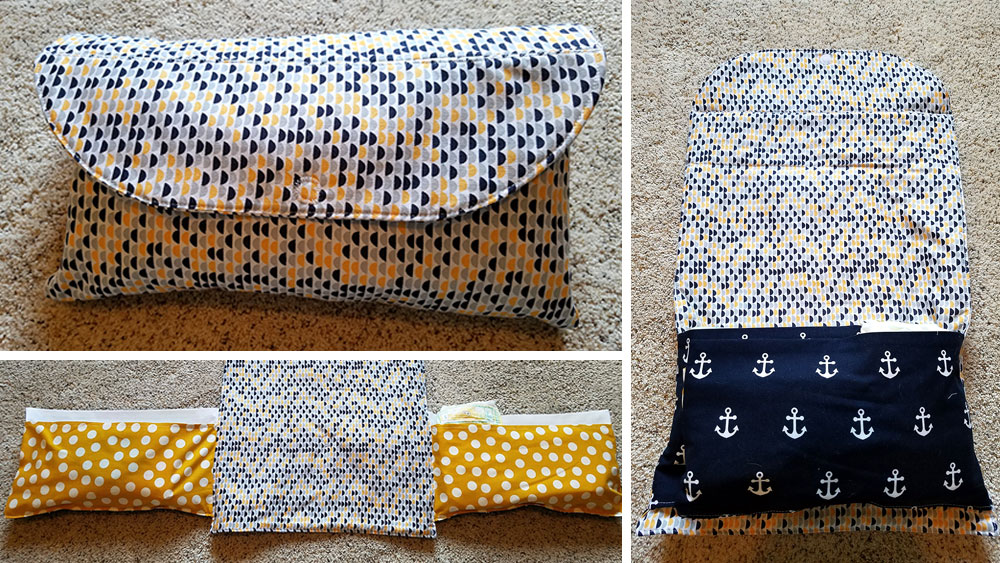
This handy little diaper clutch is an essential for busy moms on the go. Simply fill the pocket flaps with diapers and wipes and toss in your diaper bag to keep everything organized and within reach. Unfolded, the clutch can also double as a changing pad when needed. It makes a fantastic baby shower gift as well!
Supplies Needed:
- 21” of main fabric
- 21” of low to medium loft batting
- 9” of contrast fabric #1
- 8” of contrast fabric #2
- 9” of pocket lining fabric
- 1 sew-on or sticky-back Velcro
- Diaper clutch flap pattern piece (click here to download)
Cutting Directions:
- From the main fabric, cut two 15”x22” rectangles and two diaper clutch flap pattern pieces.
- From the batting, cut one 15”x22” rectangle and one diaper clutch flap pattern piece.
- From the contrast fabric #1, cut two 13”x8” rectangles for the outside of the pockets.
- From the contrast fabric #2, cut two 13”x7” rectangles for the inside of the pockets.
- From the pocket lining fabric, cut two 13”x8” rectangles.
Sewing Directions:
Use ½” seam allowances. Click here to download a PDF of the instructions.Step 1: Along the upper long edge of one inside pocket rectangle, double fold and press a ¼” hem; stitch.
Step 2: With right sides facing up on each, align the lower raw edge and sides of the hemmed inside pocket rectangle with the lower edge and sides of the pocket lining rectangle. Pin in place. Then, with right sides together, place the outer pocket rectangle on top of the lining fabric rectangle (the inner pocket rectangles will be sandwiched between), aligning all edges, and pin in place. Stitch the upper, lower, and right hand side.
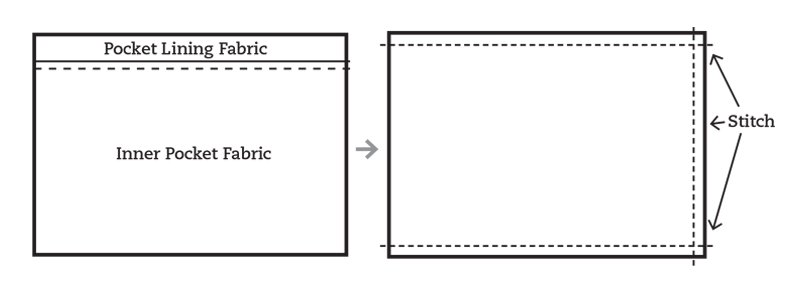
Step 4: Turn both pockets right-side out and press.
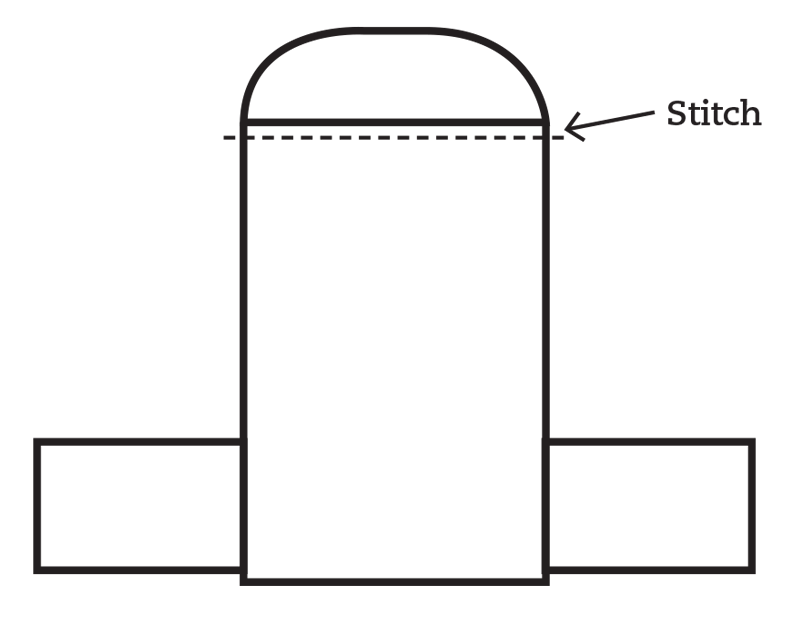
Step 5: With right sides together, align the two fabric diaper clutch flap pattern pieces. Place the batting flap piece on top, aligning all edges, and stitch the upper rounded edge.

Step 7: On the right side of one 15”x22” main fabric rectangle, align the raw edge of one pocket with the raw edge of the rectangle 1” up from the lower edge. Pin in place. (The outer pocket fabric, contrast fabric #2, should be visible). Repeat with the remaining pocket on the opposite side and pin in place. Then, stitch both long sides and the lower edge, beginning and ending stitching ½” from the upper edge.

Step 9: Along the upper edge, fold the raw edge under ½” towards the wrong side and press.
Step 10: Slip the raw edge of the flap in between the pressed edges from the previous step ½”. Pin in place and then stitch approximately ¼” from the folded edge.

And there you have it! Now fill your clutch with the essentials and toss in your diaper bag, or gift it to your favorite mom-to-be!
What do you think of this project? Leave us a comment or share with us on Facebook!

This will make a great gift for my new expected great-granddaughter.
Can’t wait to make this!
Love the patterns
What a wonderful number of people involved in such generous projects. However little you think your donation is, there are many people grateful for what you do. Check your local hospital if you think you do not have any contacts to donate to.
Please I don't have a sewing machine, how do I go about this training successfully? Secondly, you charged me more than $2 am not okay with it, please get my balance back to me.
Do you have pattern for a covered twin size headboard?
Why attach pockets 1 inch from lower edge? Why not flush?
how can I print out written instructions. the only that prints out is diagrams of bag
I have a friend who just gave birth to a son. I thought this would a quick and easy project that would be helpful for her. I downloaded your instructions which amounted to two pages of pattern pieces but, no instructions to speak of. It wasn't until last night when I decided to review the pattern, that I realized that I was missing valuable information to complete the project. Your members need all the pertinent information. I'm glad I have a printer. I would hate to do all the writing longhand. One more thing, it also helps to have a picture of the finished item.
I made one of these for my Son and DIL and they LOVED it...they said that it was one of their favorite thing I made for them. They kept it and used it when their Son was born. When I saw this pattern back then I just made it to see how useful it would be...because it all folded together it was light weight and compact! I did put a little more padding on it so it would be extra comfy! Some of my daughters friends...they basically lived with us...are not having Kids of their own....so I'm glad I ran across this again so I will be making several more! Easy gift!!!