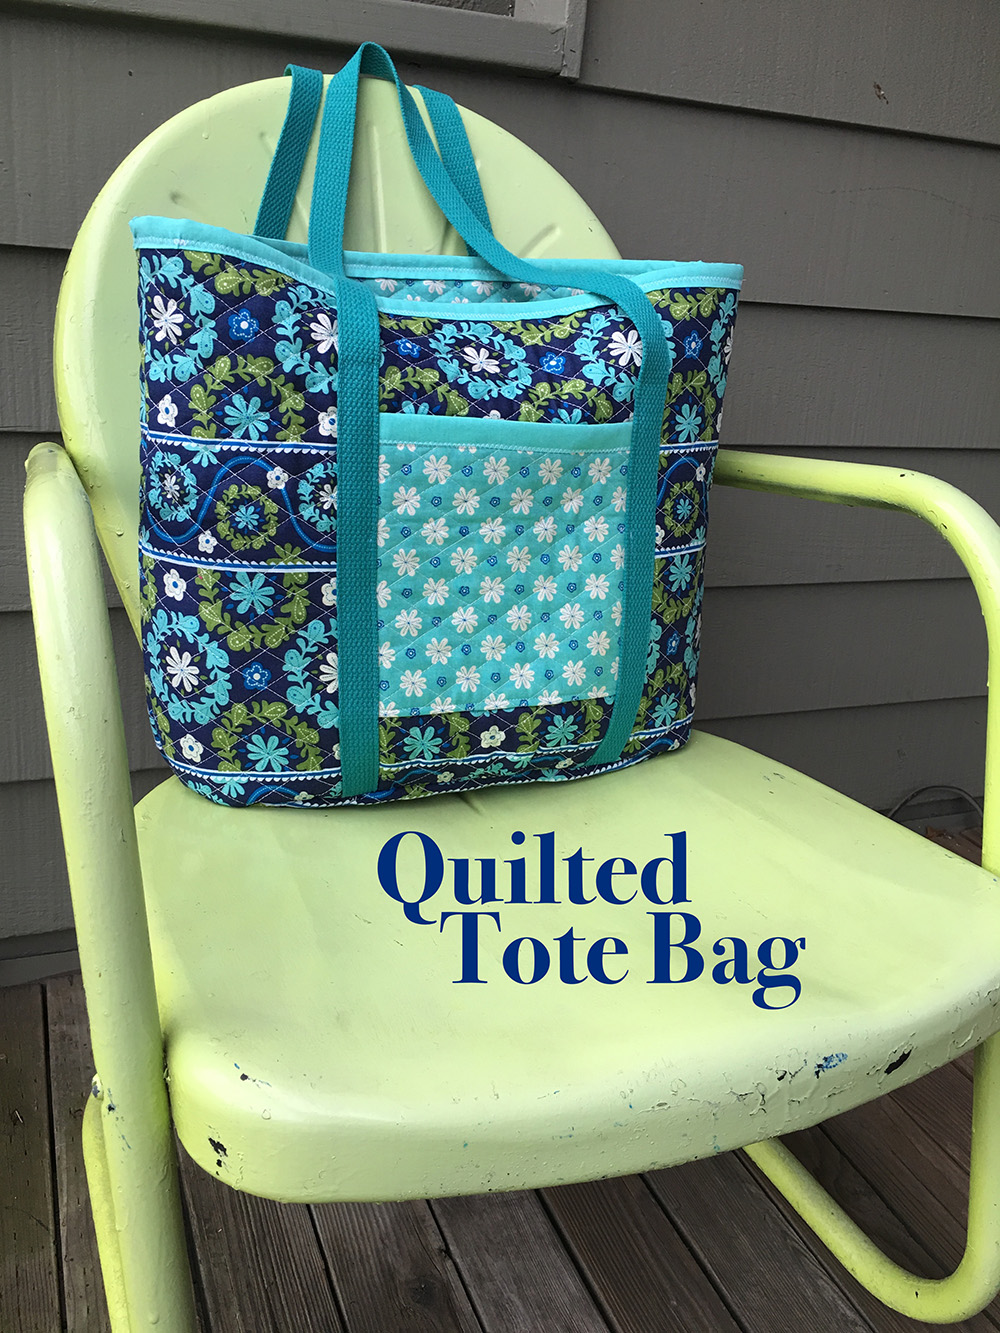
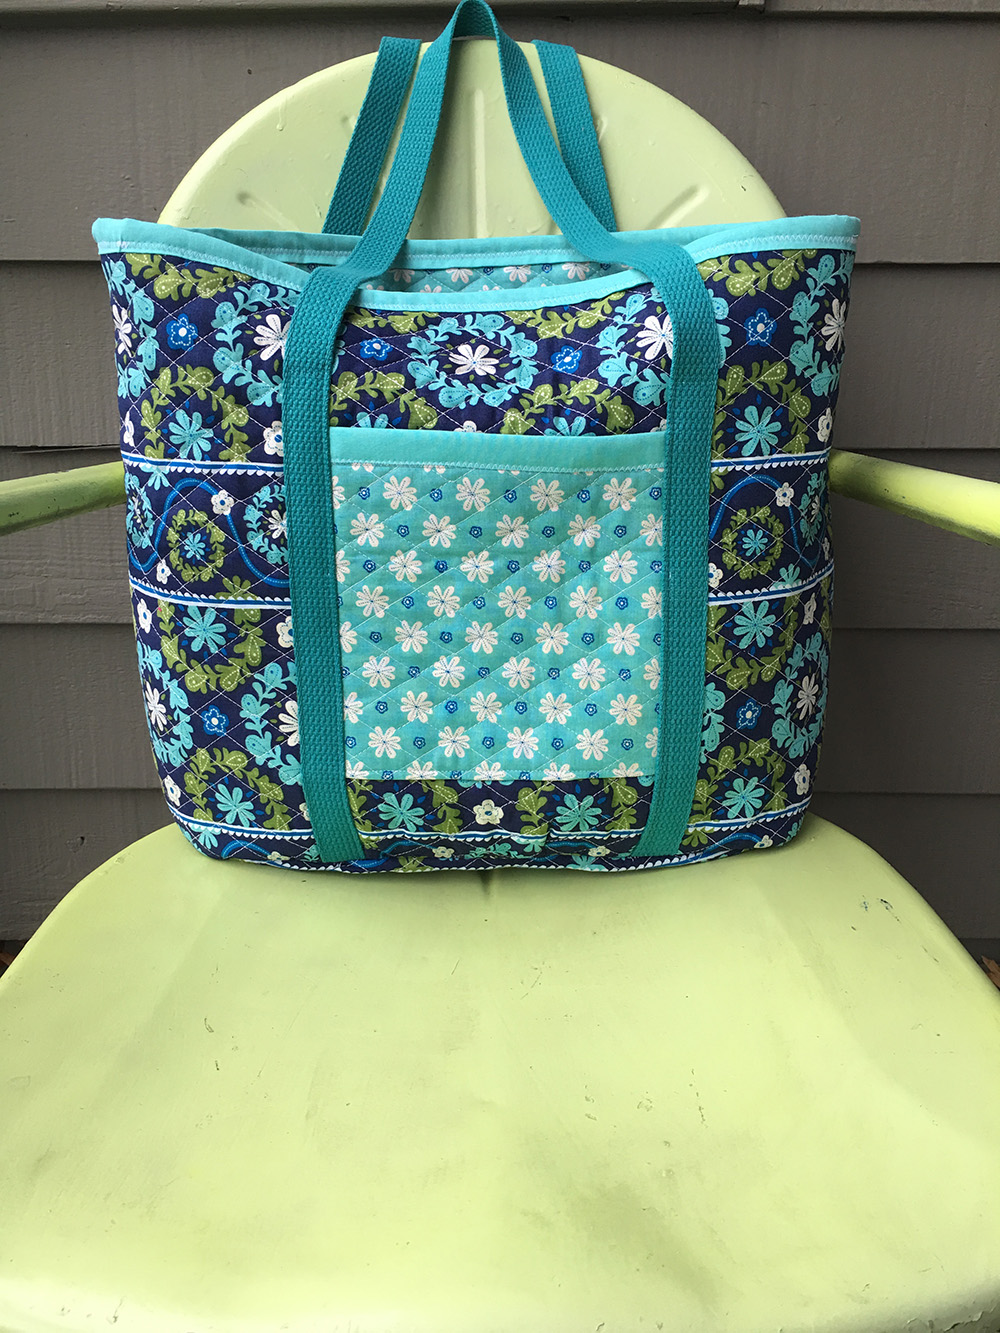
Pre-quilted bags can be found in designer stores everywhere. Why not make your own for a fraction of the cost? I personally have been coveting a quilted tote for a few years. I saw some pre-quilted fabric in the remnants bin and jumped at the chance to finally create my own!
This fun project only requires one yard of fabric. As you make this tote you will learn important tips for how to manage the added bulk created by the batting. You will also discover how to match patterns like a pro and how to make perfectly matching bias tape.

Supplies:
• 1 yard of 44” wide pre-quilted fabric (more if pre-washing – see step 1a under Cutting & Prep.) • ½ yard of matching quilting cotton • 114” of 1” wide heavyweight cotton webbing • Denim machine needle • Matching all-purpose thread (possibly in multiple colors depending on pattern) • Hand sewing needle • Removable fabric marker • ¼” wide double stick fusible web (such as Steam-A-Seam) • Fabric clips or paperclips • Pinking shears (optional)Cutting & Prep
Step 1a: If you would like to wash the pre-quilted fabric prior to sewing it, zigzag stitch (or serge) the raw edges to keep it from pulling apart in the wash. There’s a slim chance that the fabric will shrink in the wash; consider purchasing an additional ¼ yard to allow for this. Allow the fabric to air dry to avoid shrinkage.
Step 1b: Pre-wash and dry the quilting cotton per fiber content directions.
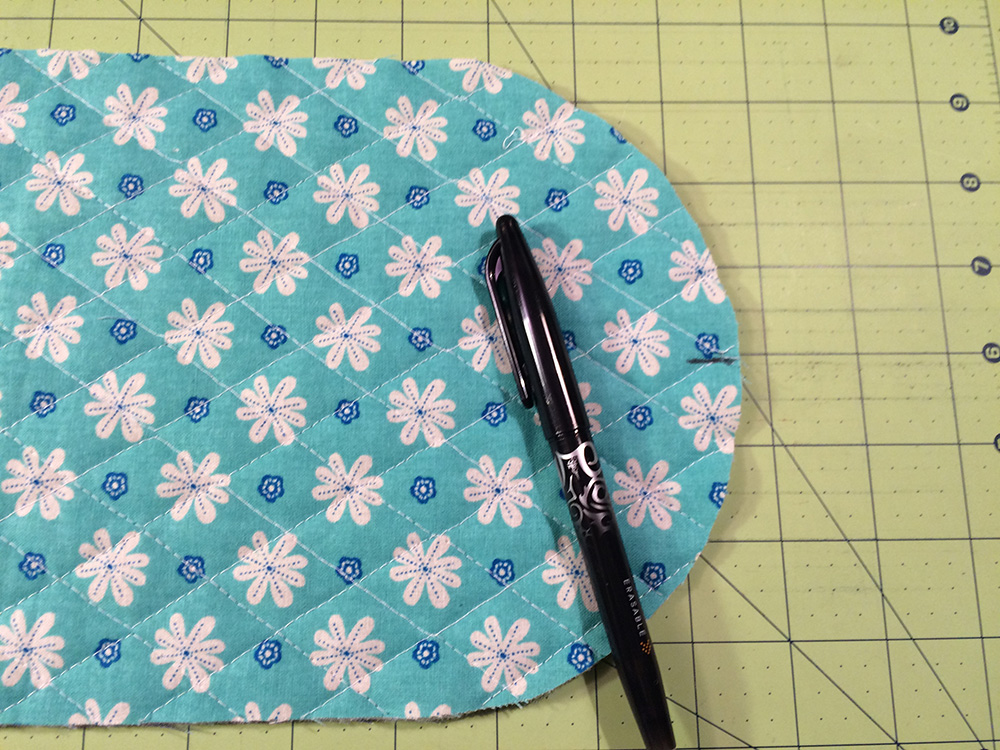
Step 1c: Download and print out the bag base pattern. The pattern comes on two pages, but the total size should be 7” tall by 16” wide.
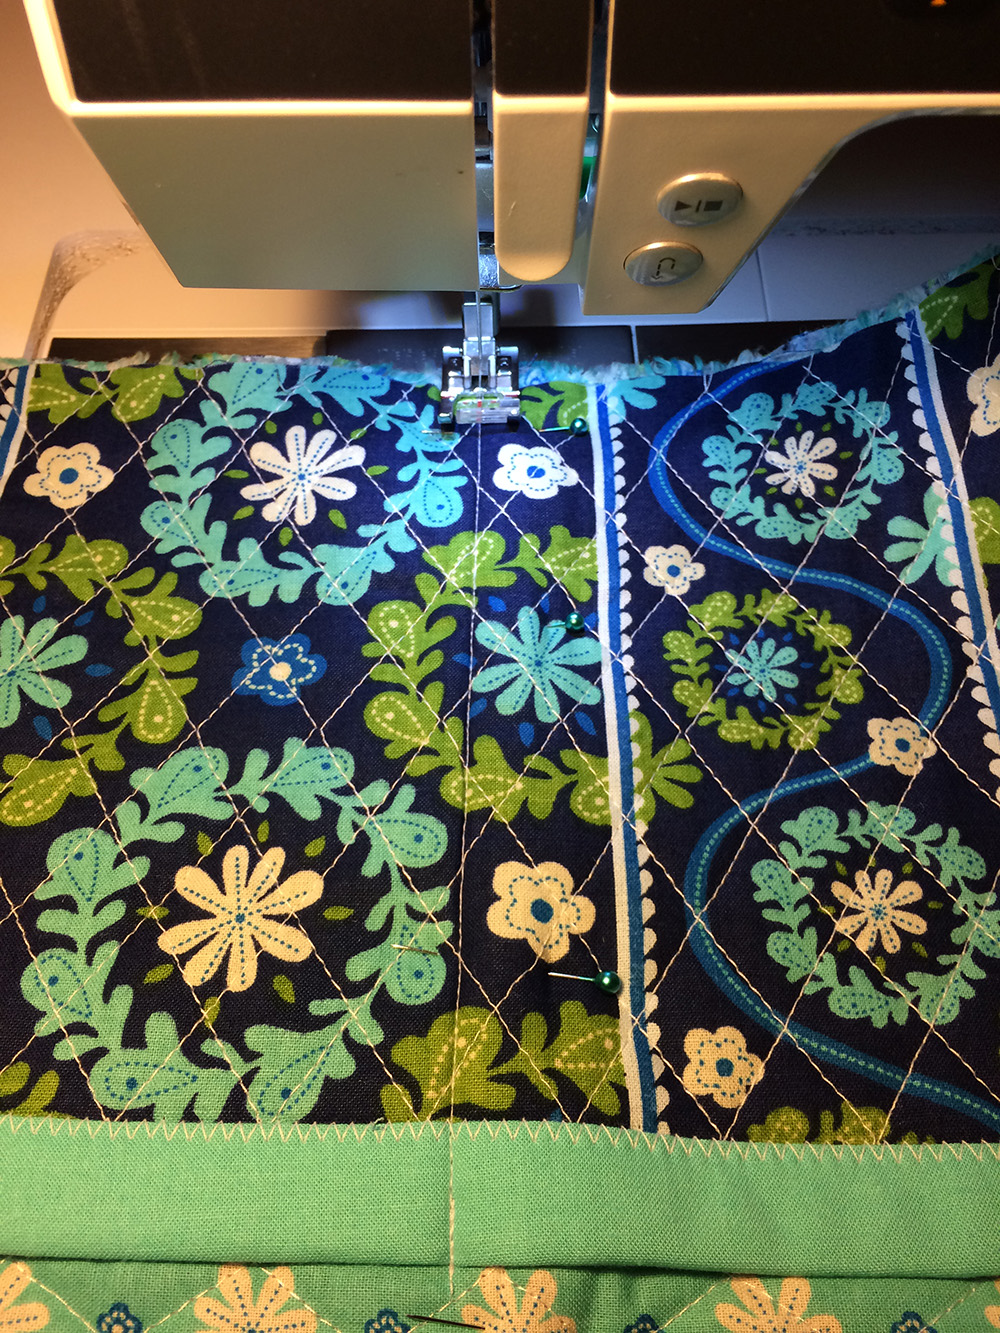
Step 1d: Lay out the pre-quilted fabric. Consider how you would like the fabric’s pattern to repeat. In the featured project, the stripes were selected to run horizontally. To make sure the stripes would intersect properly, the two large rectangles were cut first as one large rectangle measuring 15” x 42½” then that rectangle was cut in half to create the rectangles required below. Using this technique for two pieces that will line up once sewn will help keep the pattern repeating properly. To match a vertical pattern simply cut the rectangle out as 21¼” x 30” then cut that in half per the specifications below.
Note: Make sure the pocket pieces and bag base can be cut out of the fabric remainder prior to cutting out a large rectangle for the two bag sides.
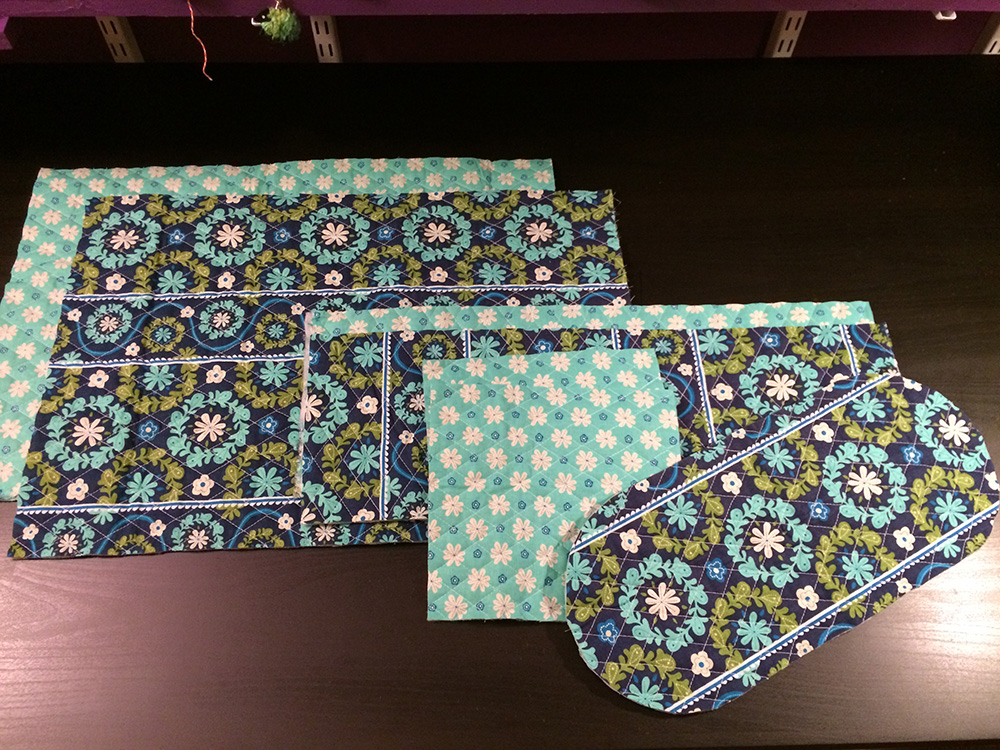
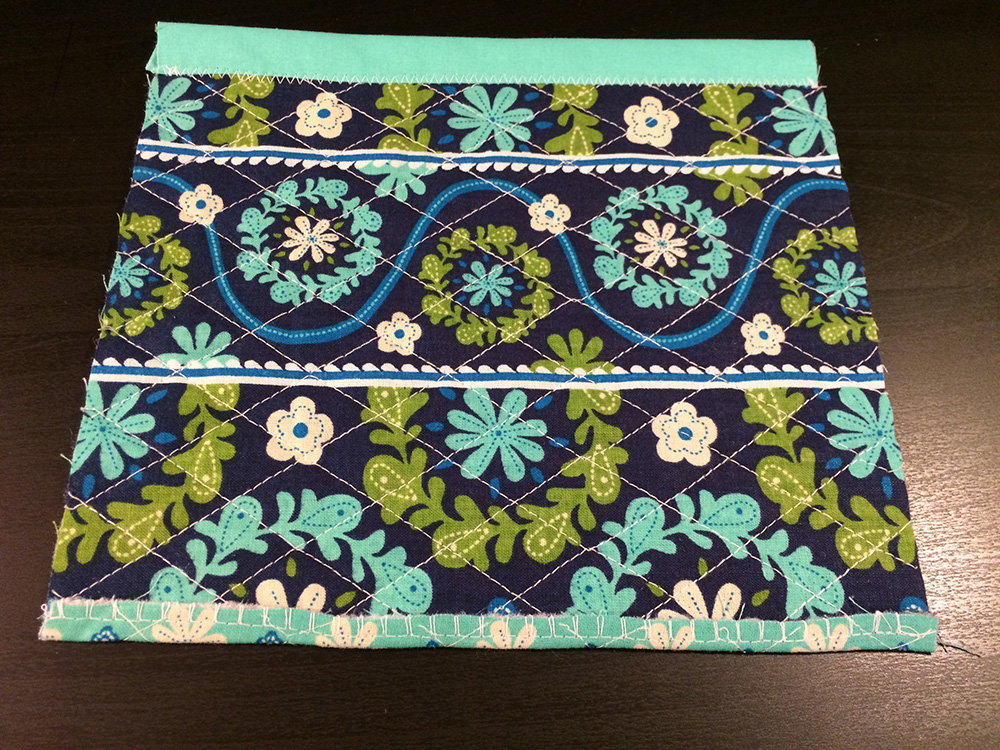
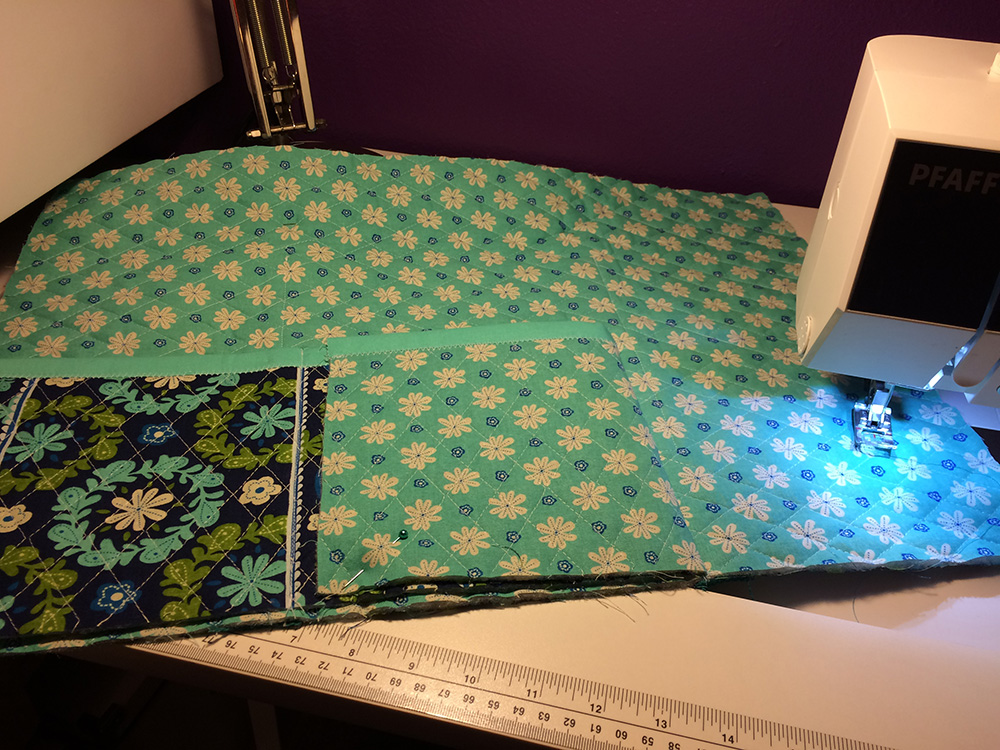
Step 1e: From the pre-quilted fabric cut one bag base, two 15” x 21¼” rectangles for the bag sides, two 8” x 21¼” rectangles for the inside pockets and two 6” x 8½” rectangles for the exterior pockets. Bear in mind how the pattern will repeat on the bag base, bag sides, and exterior pockets. Use the instructions in step 1d to ensure proper stripe alignment.
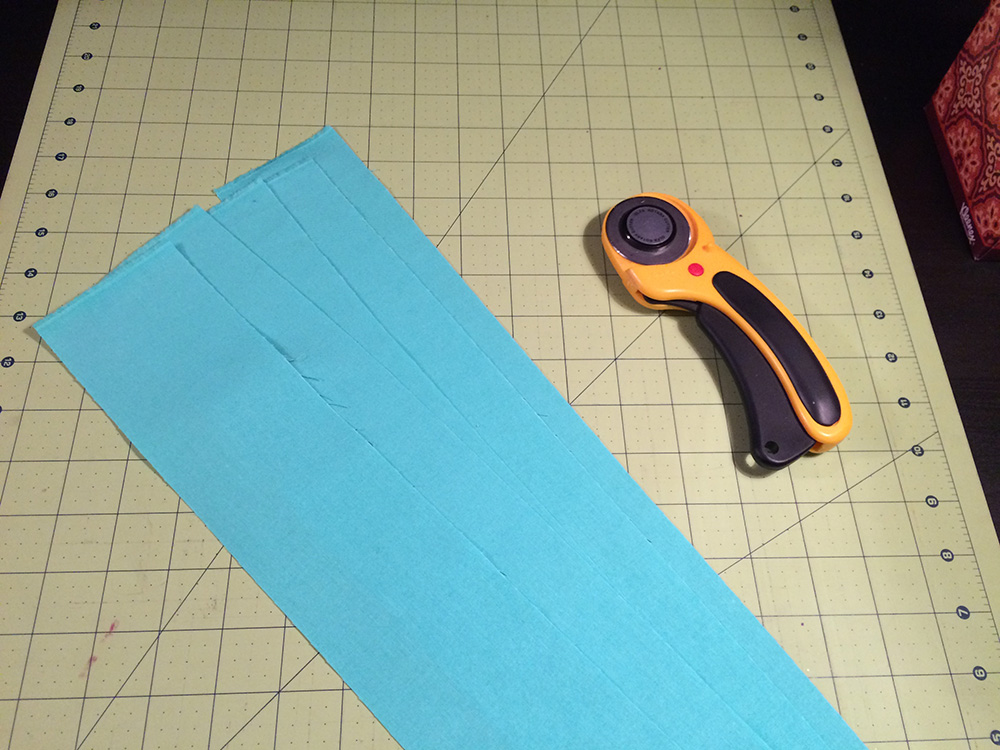
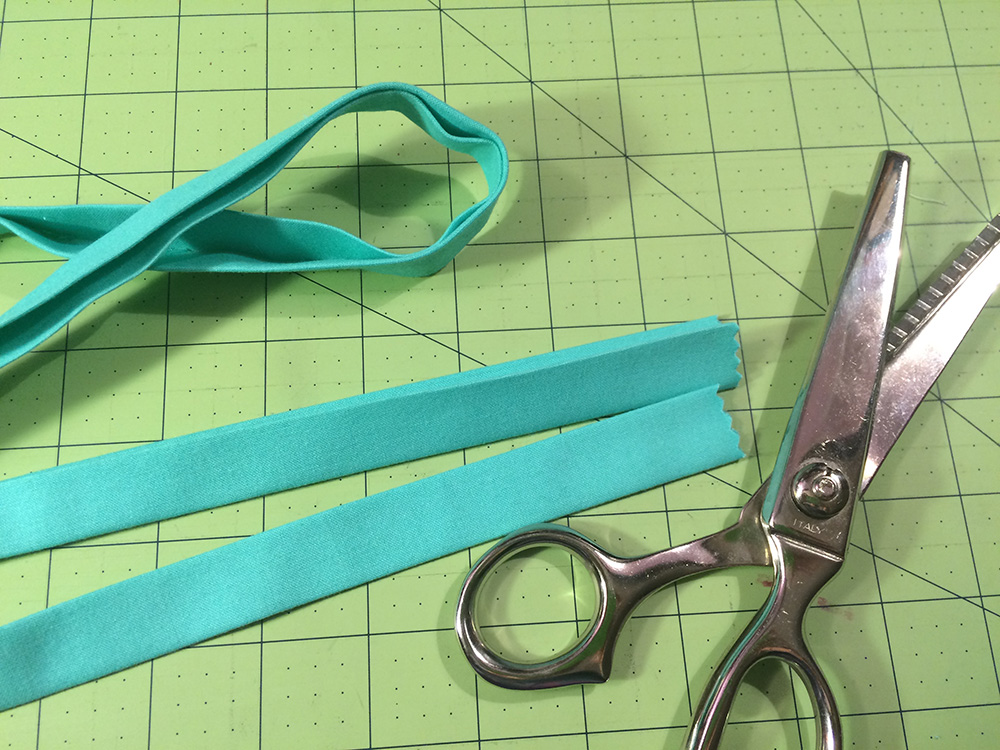
Step 1f: From the quilting cotton cut five 3” x 42” strips. If the strips are a little longer or a little shorter than 42” that’s fine. In total this project requires 178” of bias tape strips.
Note: In traditional bias tape, these strips would be cut on the bias. However for this project it is not necessary to achieve the stretchy qualities of traditional bias tape and these can be cut along the crosswise grain.
Step 1g: Cut the cotton webbing in half creating two 57” strips; these will be the straps.Making the Bias Tape
 Step 2a: Using a removable fabric marker, draw a line down the center of each strip.
 Step 2b: Fold one long edge into the center, press.
 Step 2c: Fold the remaining long edge into the center, press.

Step 2d: Fold the entire strip in half, press. Repeat to press all strips into center, creating strips of bias tape. The bias tape strips should all be long enough that you won’t need to stitch any together, however if you would like to learn how to do this like a pro check out Kelly Pederson Hanson’s tutorial on our sister site National Quilters Circle:
Constructing the Exterior Pockets
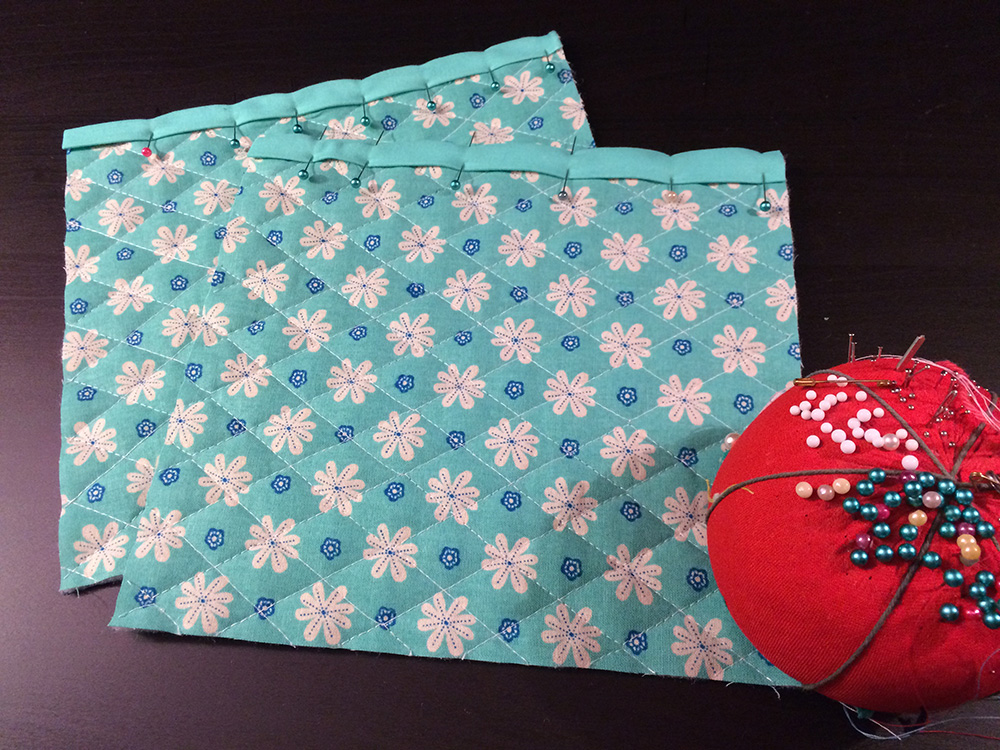
Step 3a: Designate one exterior pocket long edge as the upper edge. Place the bias tape’s center fold along one exterior pocket’s upper edge, and pin in place. Trim the bias tape to match the pocket’s length. Repeat to pin bias tape to the remaining pocket piece.
Step 3b: Stitch the bias tape to the pocket. Repeat to stitch the remaining pocket.
TIP: Using a denim needle to stitch pre-quilted fabric will make the process smooth and easy!
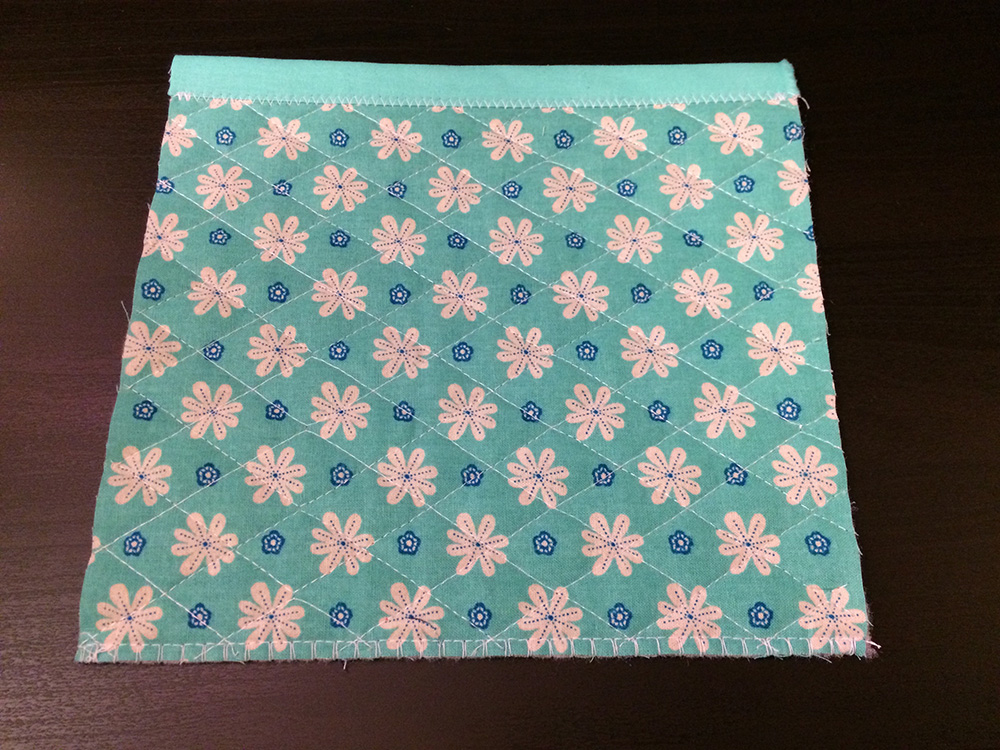
Step 3c: Using an overcast stitch, secure the exterior pocket’s lower edge. Repeat to secure the remaining pocket’s lower edge.
Step 3d: Press up the lower edge ¼” to the wrong side.
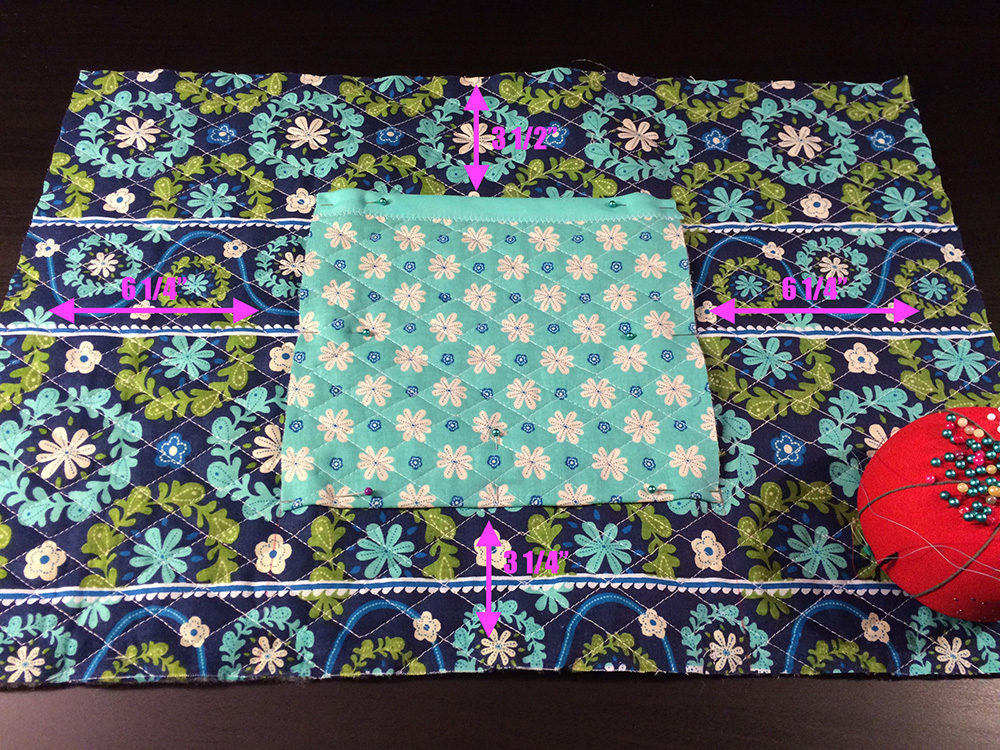
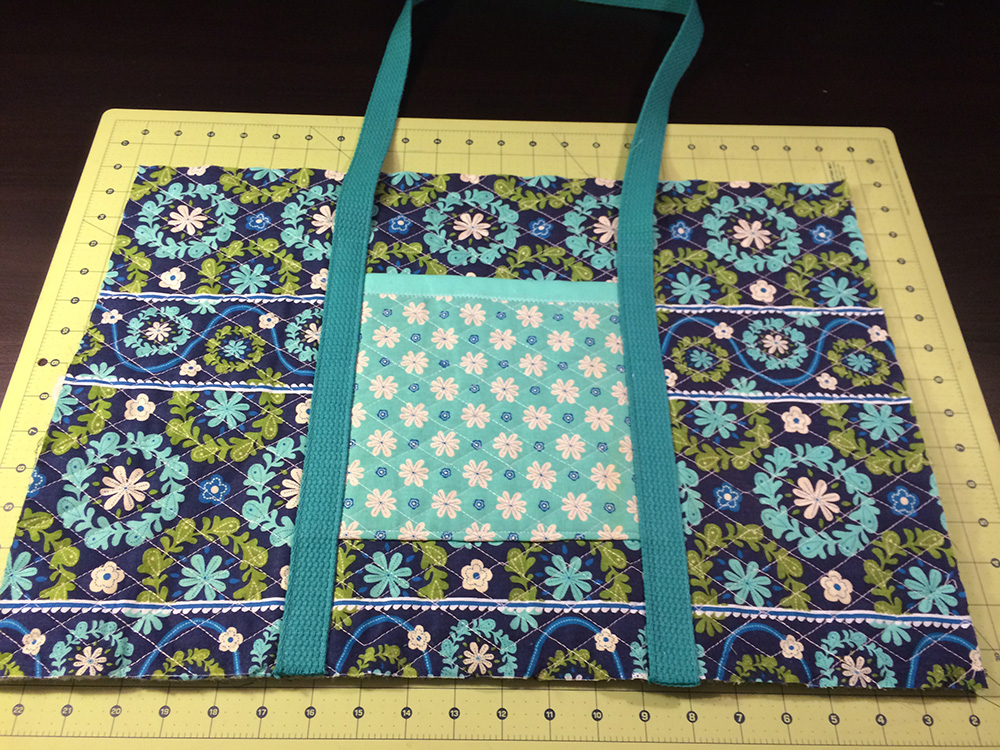
Step 3e: Place the exterior pocket on the bag side’s right side 3½” from the upper edge, 6¼” from each side and 3¼” from the lower edge.
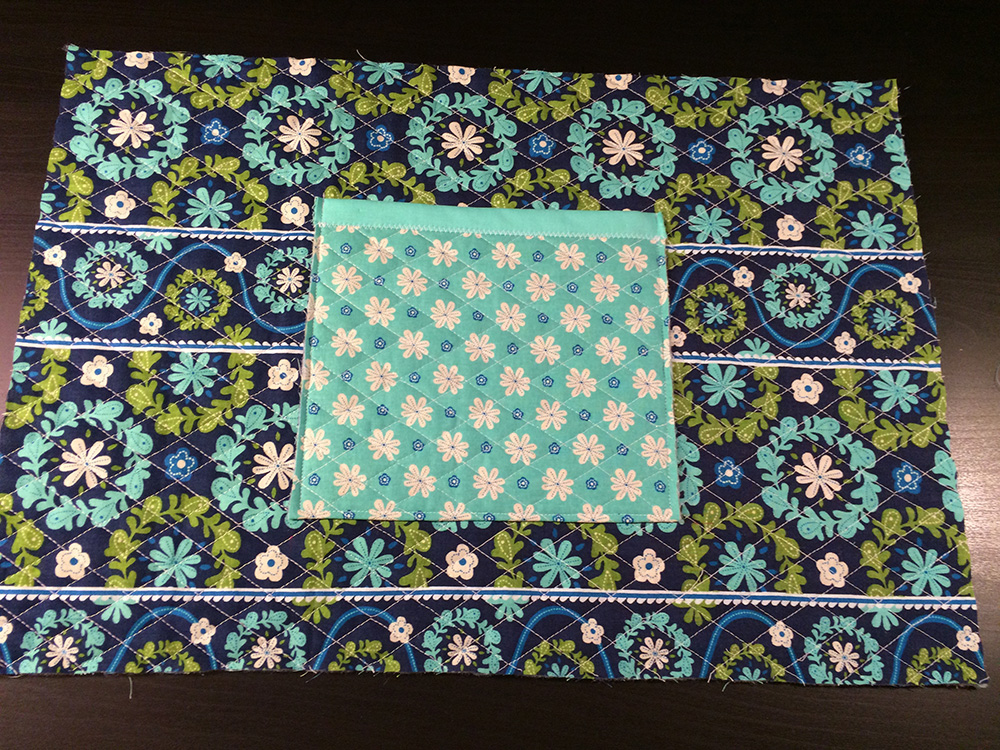
Step 3f: Stitch around the perimeter of the exterior pocket leaving the upper edge open. Repeat the previous steps to stitch the remaining pocket to the remaining bag side.
Constructing the Interior Pockets
Step 4a: Designate one interior pocket long edge as the upper edge, repeat for the second pocket piece. Place the bias tape’s center fold along one interior pocket’s upper edge, and pin in place. Trim the bias tape to match the pocket’s length. Repeat to pin bias tape to the remaining pocket piece.
Step 4b: Stitch the bias tape to the pocket. Repeat to stitch the remaining pocket.
TIP: Use a zigzag stitch for a fun and professional look. A sewing colleague taught me this trick years ago! The zigzag stitch is far more forgiving and will look nice and straight.
Step 4c: Measure in 7¼” from the interior pockets side, mark using removable fabric marker. Repeat to mark the remaining pocket.
Step 4d: Pin the pocket to the bag side, aligning lower edges. Repeat to pin remaining pocket.
Step 4e: Stitch the pocket to the side using the marks as guides. Begin stitching from the lower edge and work to the upper edge. Backstitch at both ends. Repeat to stitch the remaining pocket to the remaining bag side. This step requires that you stitch over the exterior pocket partially. These stitch lines will be covered with strap and the pockets will not be oddly shaped in the end.
TIP: Load the bobbin with thread that matches the bag’s right side.
Step 4f: Baste around the interior pocket’s perimeter securing it to the sides and bag side lower edge. Repeat to baste the remaining pocket to the bag side.
Attaching the Straps

Step 5a: On the bag side’s right side, place a piece of double stick fusible web over the stitches formed while creating the interior pockets. The fusible web should end at the exterior pocket’s upper edge. Repeat to place a piece of fusible web over the second stitch line on the bag side’s exterior.
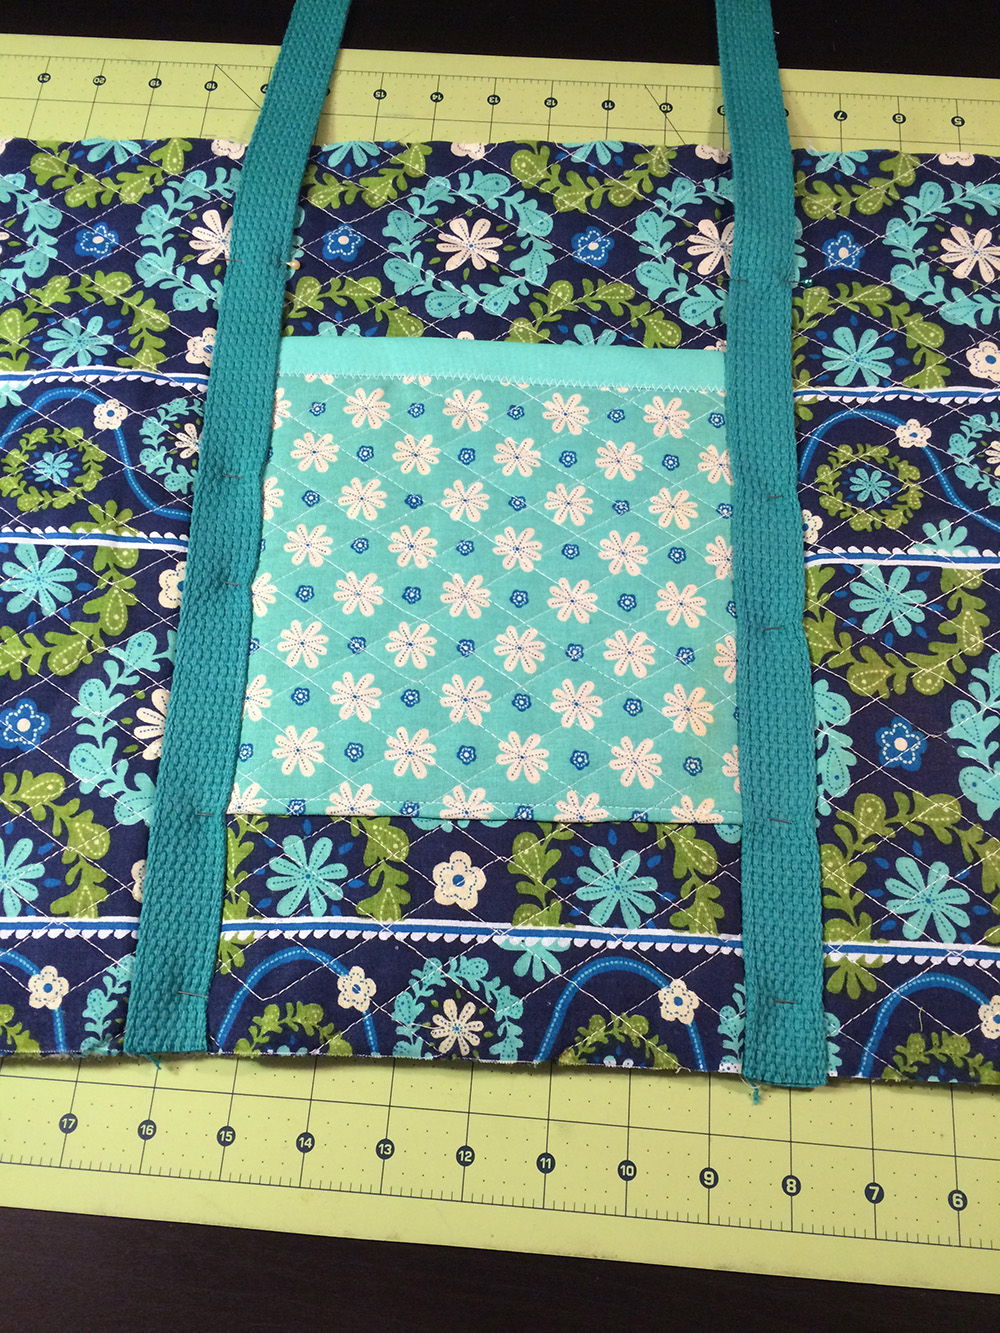
Step 5b: Place one strap’s cut edge along the bag side’s lower edge. Align the inner side of the strap over the fusible web. This will cover the exterior pocket. Following the fusible web manufacturer’s instructions, adhere the strap to the bag side. Align the remaining cut edge with the bag side’s lower edge making sure the strap is not twisted. Place the second strap side directly over the fusible web and adhere it to the bag side using the iron as with the first. Pin the entire strap in place. Place the pins on the bag side’s wrong side. The uppermost pin should be roughly 4” from the bag side’s upper edge.
Step 5c: Working on the bag side’s wrong side, stitch over the previous stitches used to create pocket dividers. Stitch up to the uppermost pin then backstitch. Repeat to stitch the other strap, making sure to stitch over the previous stitches.
TIP: Use thread that matches the strap in the bobbin.
Step 5d: Fold the interior pocket out of the way to stitch the remaining side of the strap. Pin the folded pocket back to secure for stitching.
Step 5e: Working on the bag side’s right side, stitch the remaining side of the straps to the left and right of the pocket, securing the strap fully. Repeat the process to stitch the remaining strap to the remaining bag side.
Constructing the Bag
Use ½” seam allowances unless otherwise noted.
Step 6a: Clip the two bag sides right sides together. Stitch down both sides.
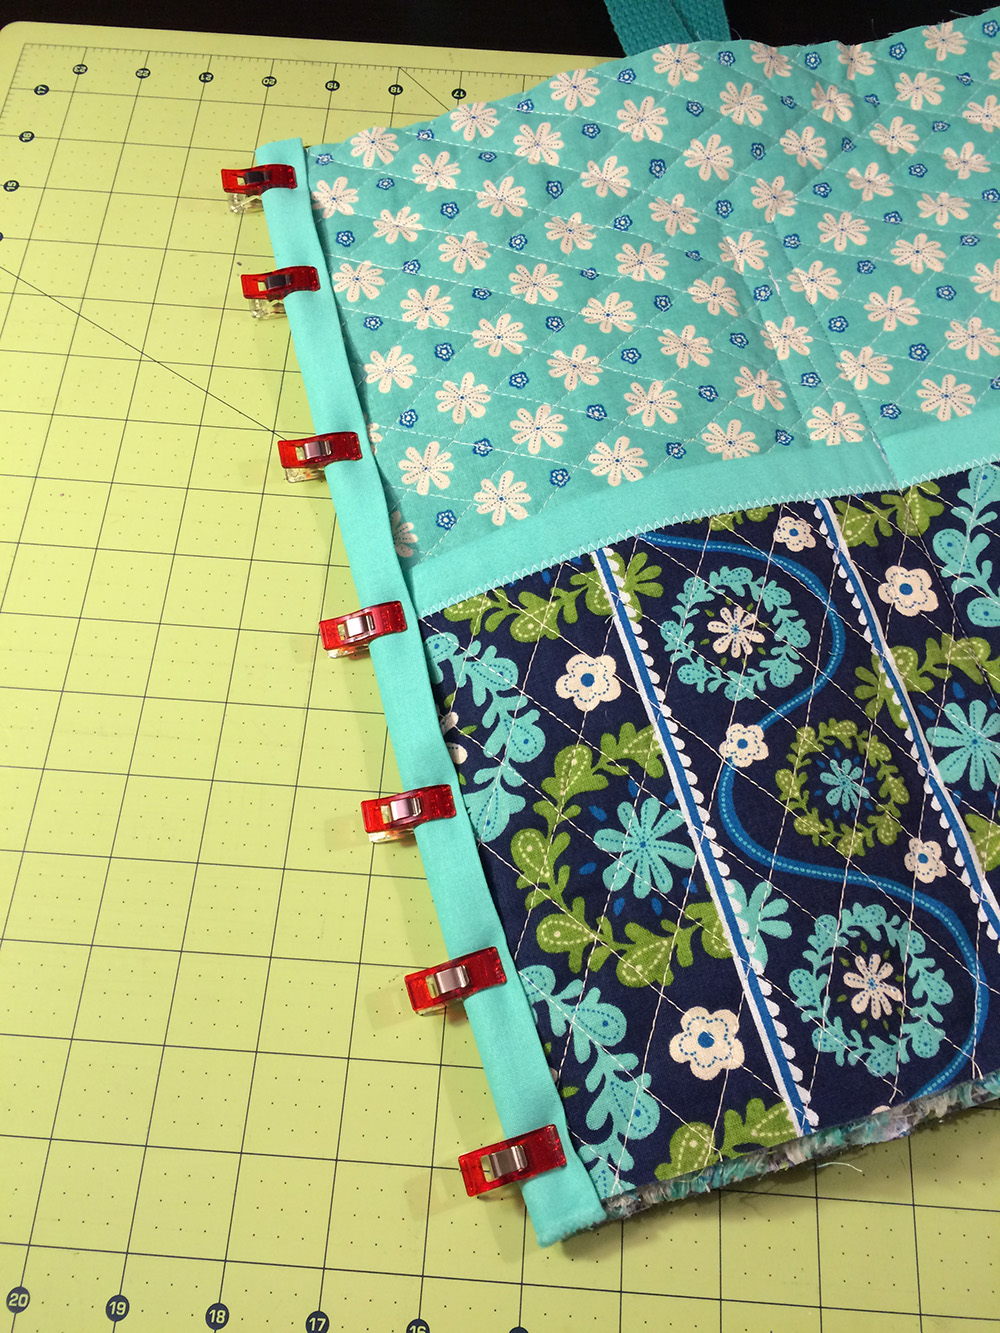
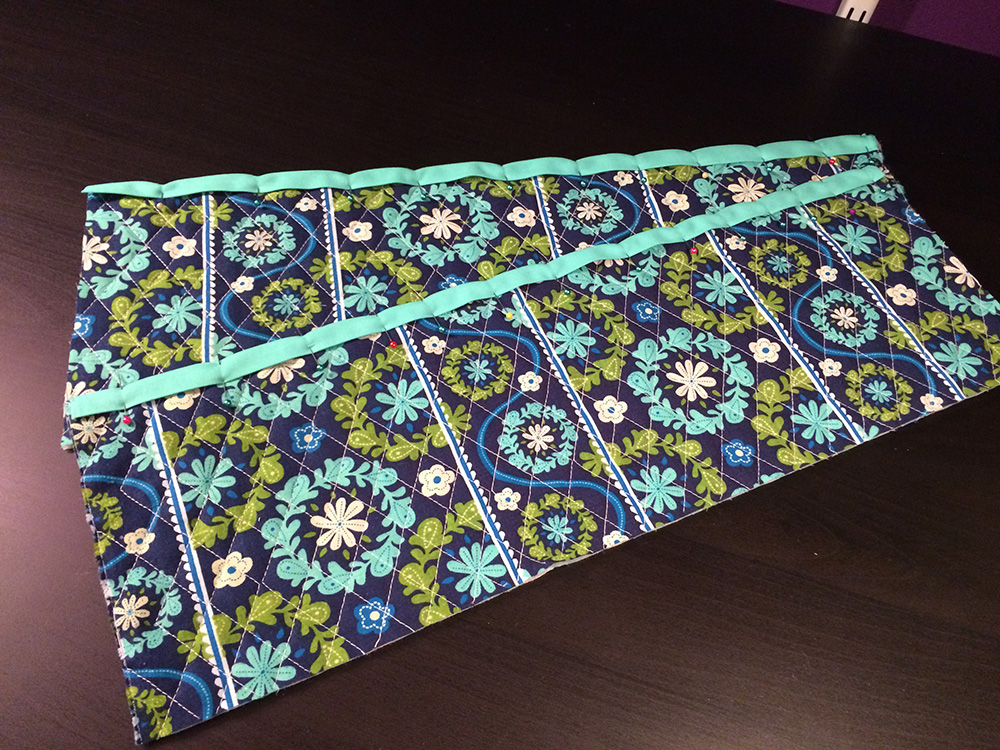
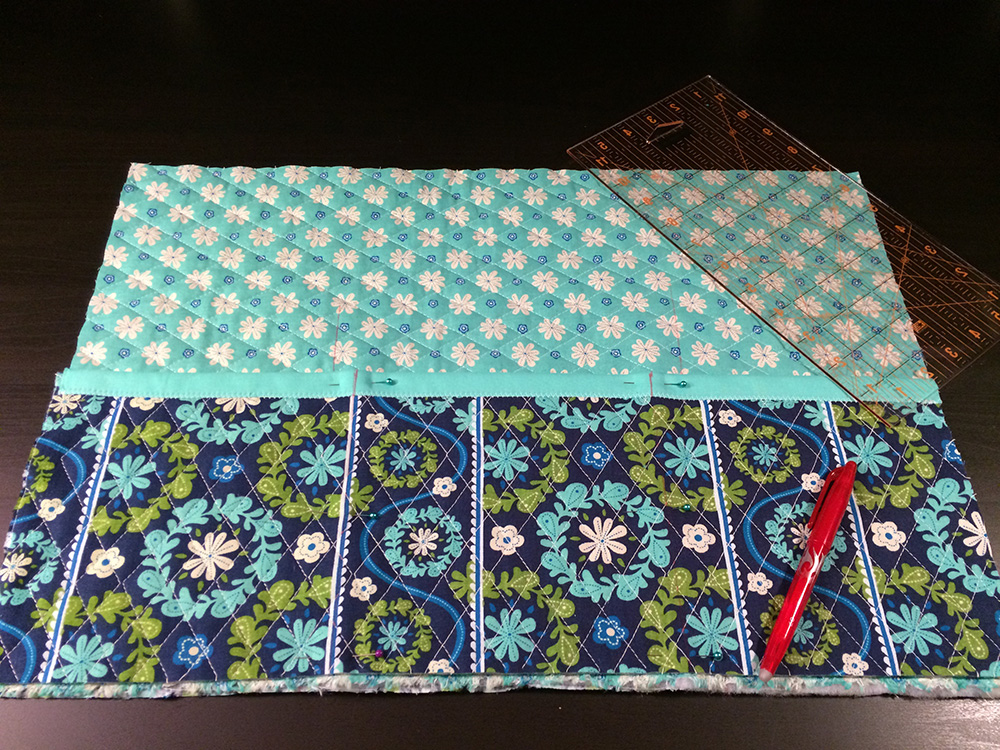
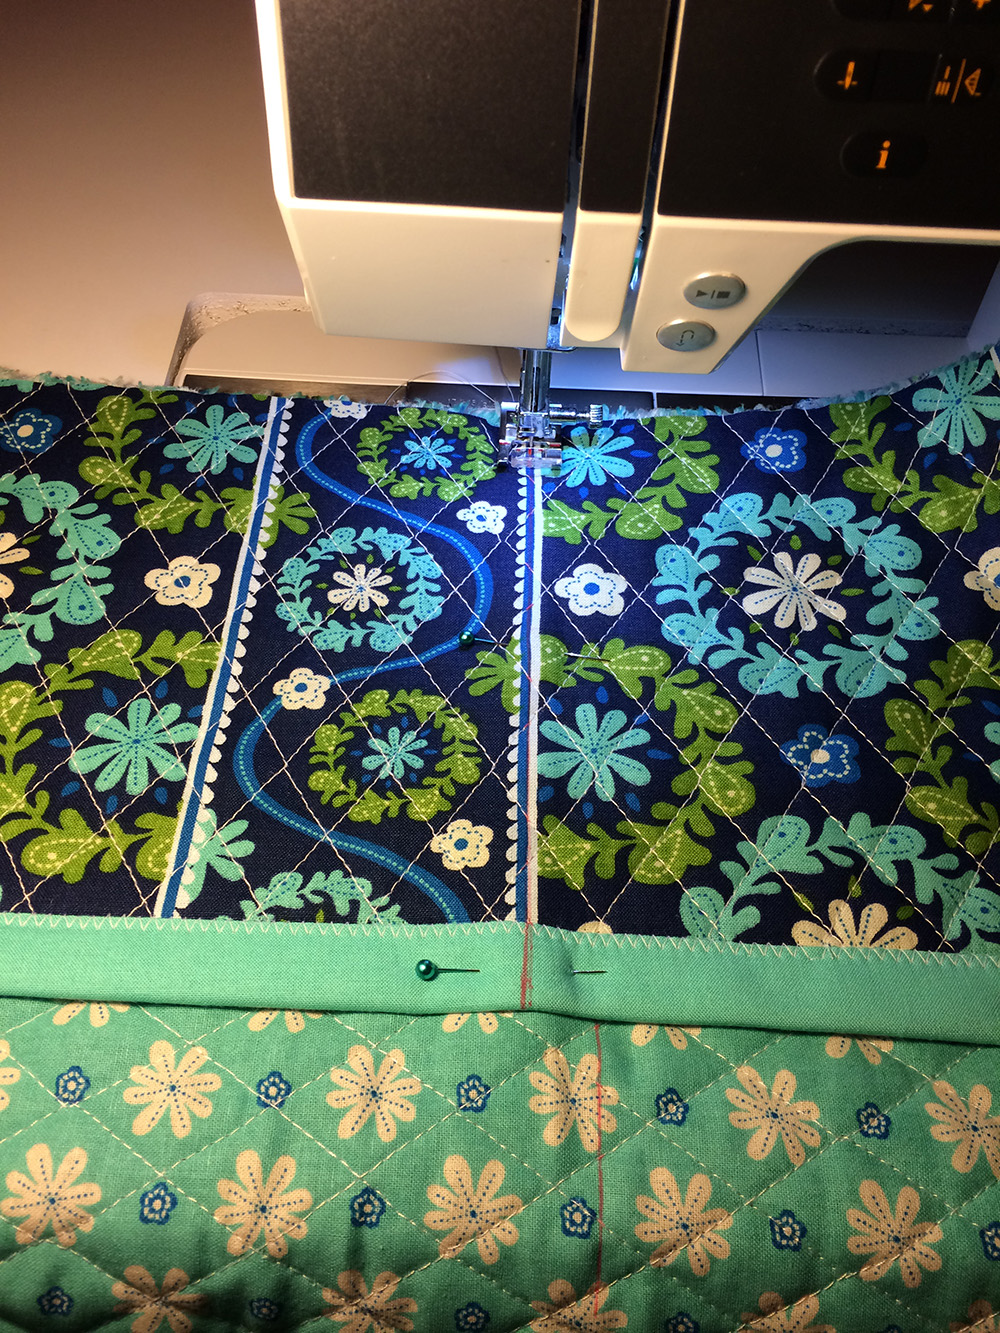
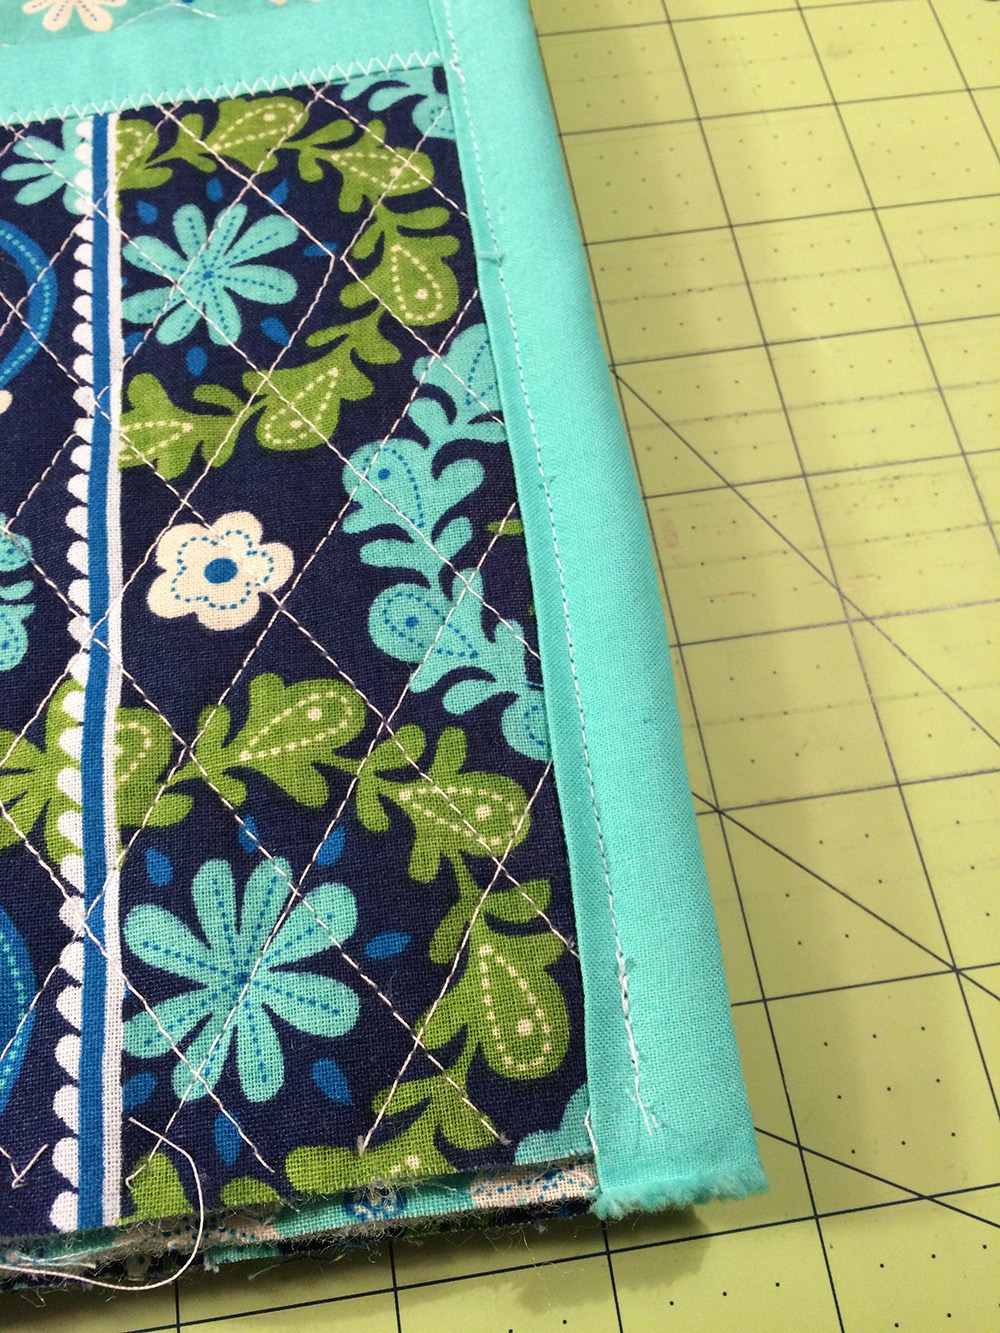
Step 6b: Place the bias tape’s center fold along the bag’s side seam, and clip in place. Trim the bias tape to match the bag’s length. Repeat to pin bias tape to the remaining side seam. Stitch down both side seams, attaching the bias tape and encasing the seams.
TIP: If all the layers prove too much for your zigzag stitch to form properly, try a straight stitch instead.
Step 6c: Using a removable fabric marker, mark the center point on the bag base’s rounded ends. Find this by folding in half and marking or by measuring and marking.
Step 6d: Trim the side seams at a slight angle to eliminate some bulk from the side seams. Pinking shears are optional in this step.
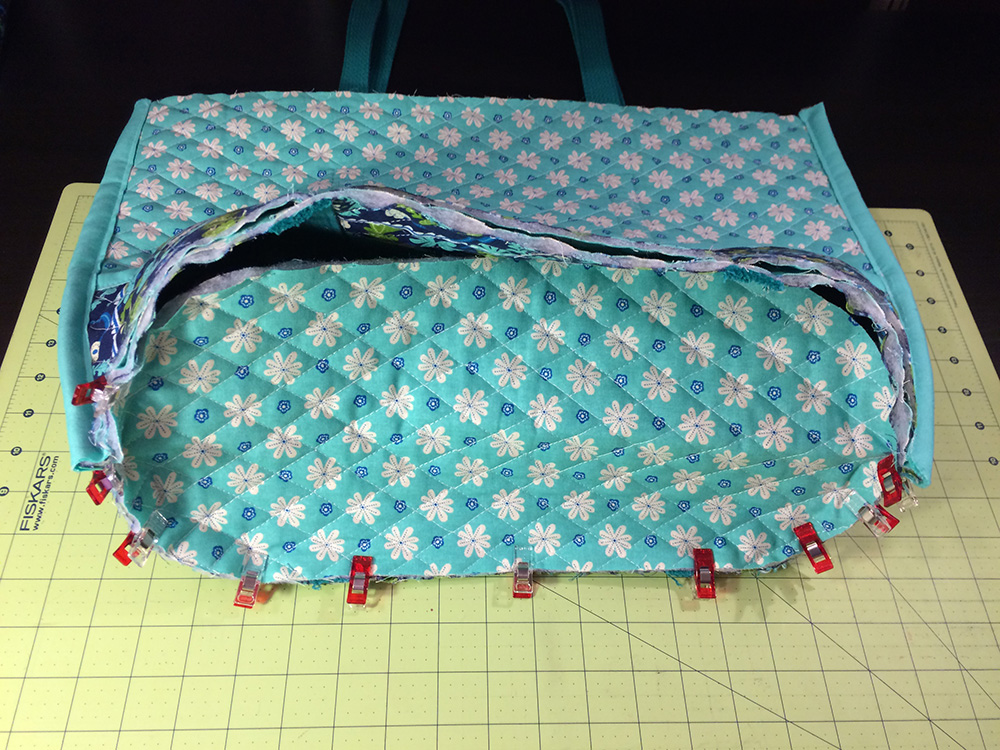
Step 6e: Align the center marks on the bag base with the side seams on the bag sides, clip right sides together. Only clip one half of the seam and only stitch from side seam to the next.
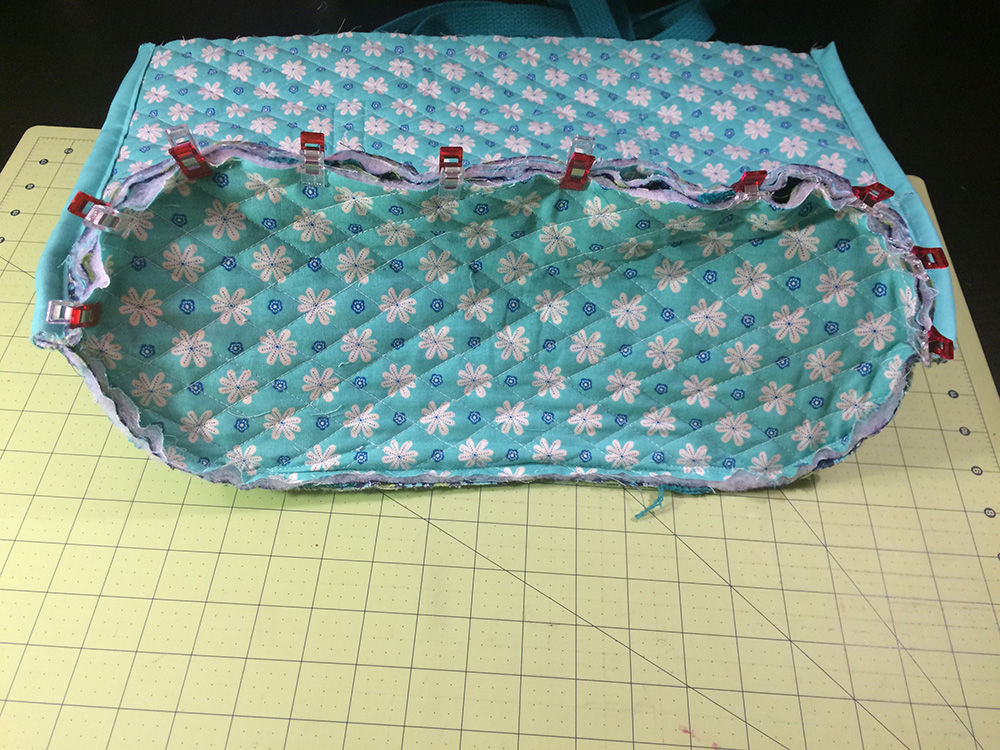
Step 6f: Repeat to clip the remaining bag side to the bag base, stitch to join together. By sewing one half of the perimeter and then the next it helps keep seams nice and even, distributing the bulk properly.
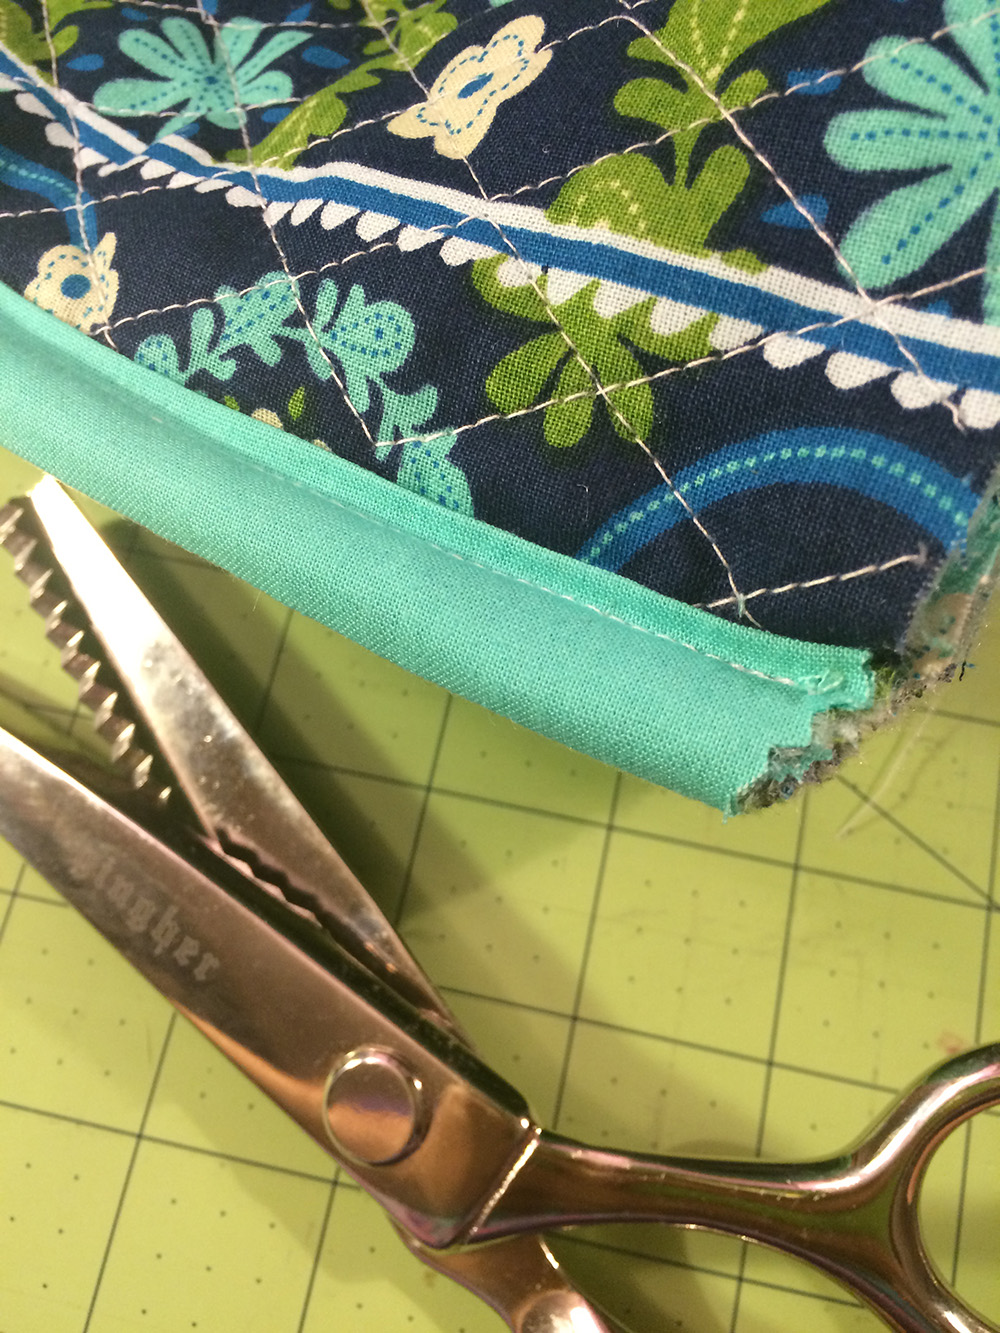
Step 6g: Measure the circumference of the bag base seam, trim a piece of bias tape to match plus 1”. Pink the bias tape’s strip ends.
Step 6h: Place the bias tape’s center fold along the bag base’s seam, and clip in place. Overlap the pinked edges. Stitch in place, encasing the bag base’s seam. If your sewing machine can’t sew through all the layers at the side seams, don’t force it. Stitch as close to the side seam as it will allow and proceed on to step 6i.
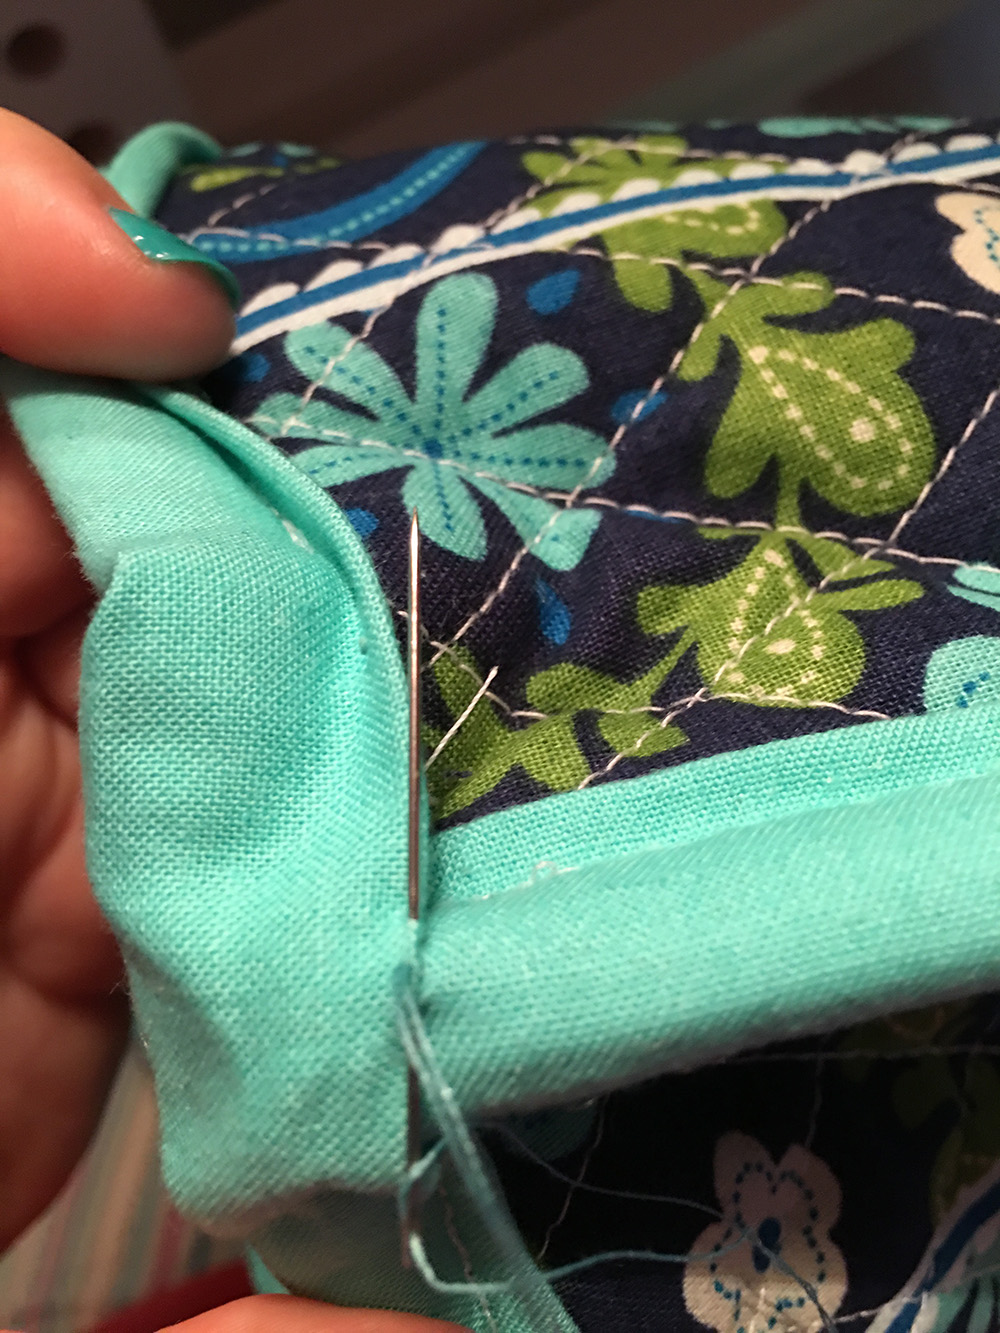
Step 6i: Using a hand needle and matching thread, slipstitch the bias tape to the side seams.
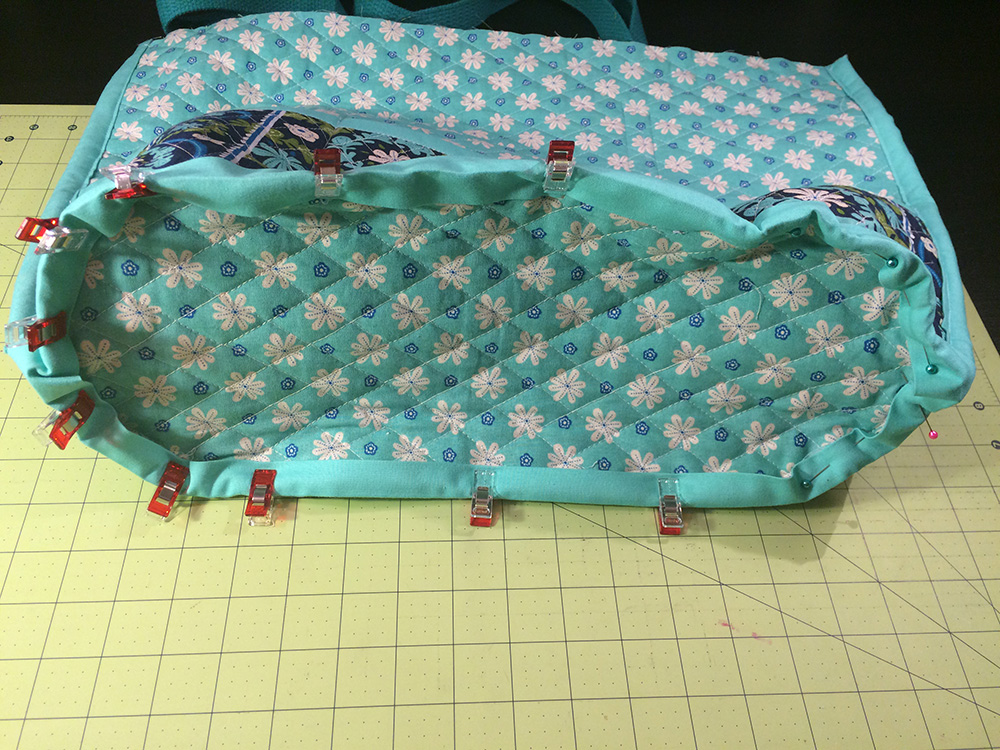
Step 6j: Place the bias tape’s center fold along the bag’s upper edge, and clip in place. Overlap the pinked edges. Stitch in place, encasing the bag’s upper edge seam. Here too it is perfectly acceptable to leave the side seams for hand stitching, though it should be easier to stitch through the fewer layers on the upper edge.
Now take your tote out to pick up books or groceries and wait for the compliments to roll in! No one will ever know it’s not a designer bag.
Want another take on a tote bag? Use pre-quilted fabric to make Ellen March’s padded tote project, no fusible fleece required. She offers a different take on how to make straps in this video: Padded Book Bag
You can pick up additional tips for working with bulky fabrics in this video: Tips for Managing Bulky Fabrics
Intrigued by quilting and want to learn some tips and techniques? Check out our sister site to learn from the experts: National Quilters Circle
Have something to add? Leave a comment or email editor@nationalsewingcircle.com.

The dimensions are not correct for the oval base/bottom piece. The bag is 21.5 inches wide and the oval base is only 17 inches long. No matter how you "ease" the side of the bag to the base; it will not fit. I have been sewing for many decades and should have seen this miscalculation. I will cut a new oval base (praying I have enough fabric left!) that is about 3 inches longer, maybe more, than printed pattern piece. Has anyone else had a problem with this?
Thanks for pattern brillant instructions
I Love this Bag .Always wanted how to do it with Quilted fabric ,Now I know Thank you Mary!!
How can I print this pattern on my desk (from) top HP COMPUTER? SYLVIAKEO@GMAIL.COM
Love the fabric. It would be nice if the name and manufacturer were included so it could be duplicated.
interested in your sewing tips from the experts
I have never quilted and looking for a step by step how to quilt
You gave a link where the full pattern for this tote could be found but it doesn't look anything like the bag you are giving the instruction to. Are they different? and if so, why would you give instruction for one bag but sale one that is different than what is shown in the video? Thanks, Annie
I don't think the dimensions foe the outside pocket are correct. It says 6" X 8 1/2" but that seems too short. When I try to lay it out on the bag sides it does not fall matching your measurement from the top and bottom. Not sure if I am doing something wrong or what, but I can't make it work with the measurements as they are here. Help. Thanks.
I love this pattern and the instructions are fabulous!!!