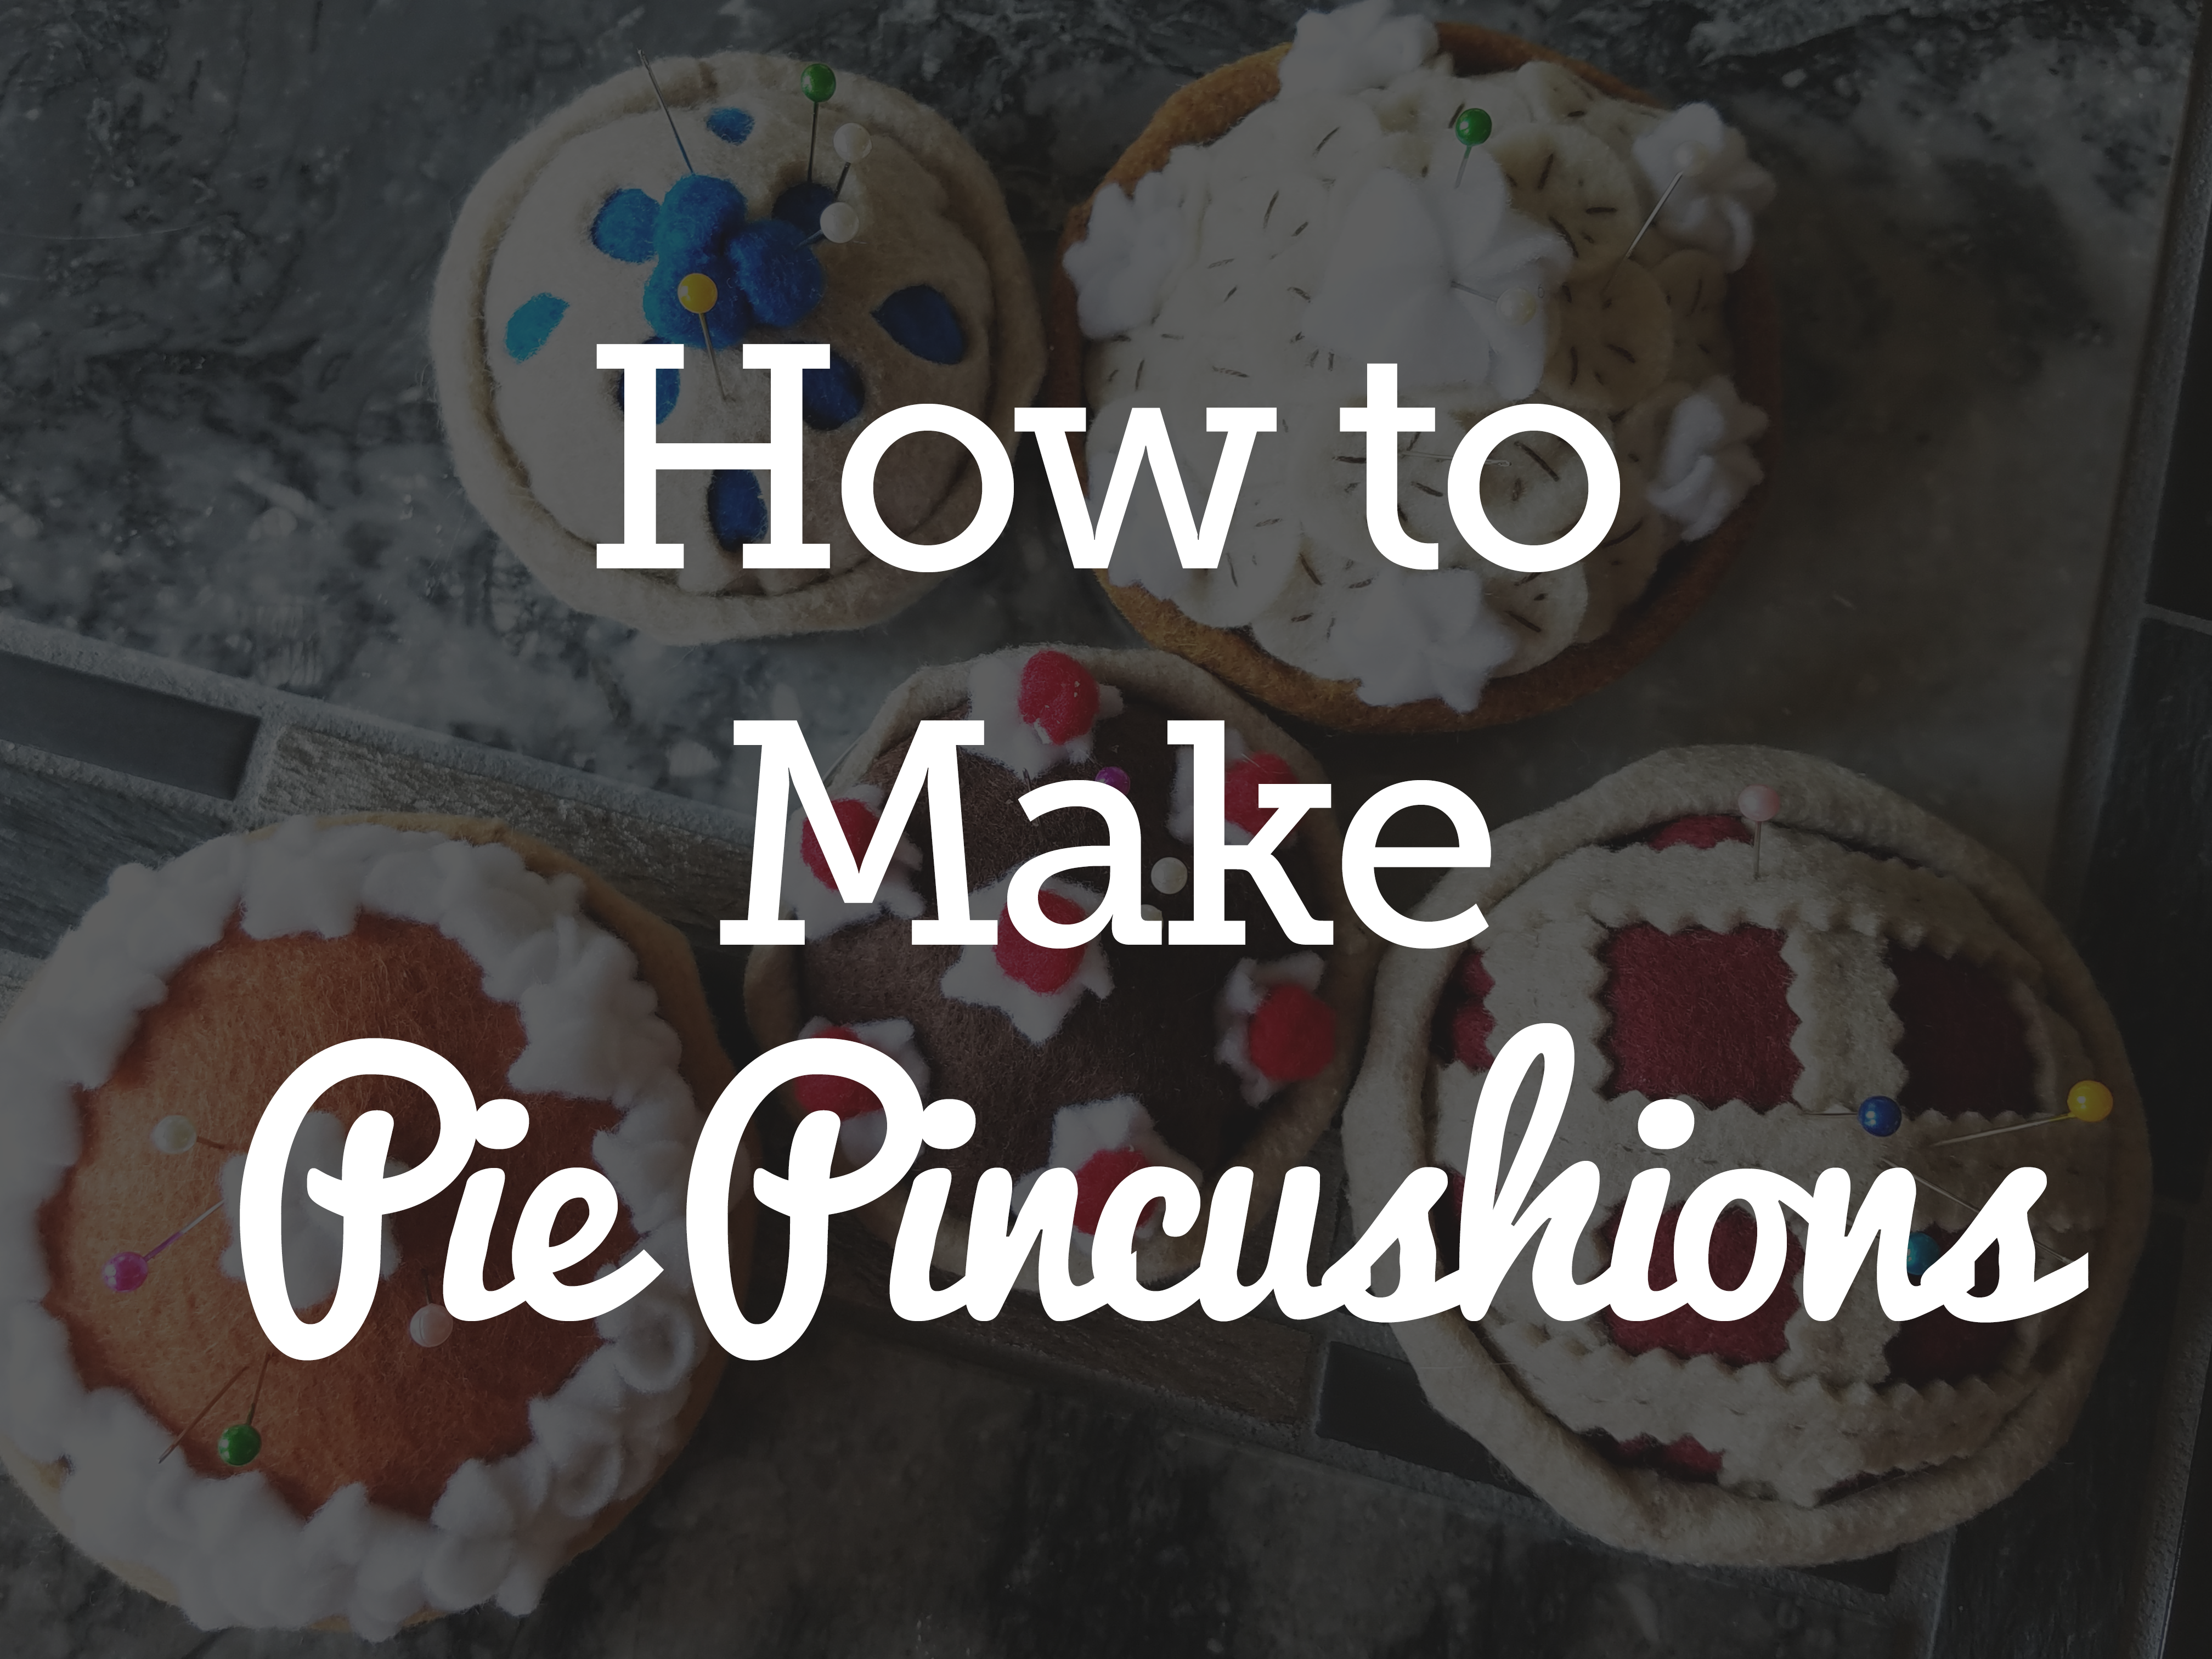
The fall season signals the start of holiday baking—or in this case, projects that look like holiday baking! These fun little pincushion pies require just a few simple materials and look so good you could almost eat them! Whip up a batch today to use in your sewing room or give as a gift this holiday season!

Supplies
-Small amounts of felt (colors vary depending on the pie you are making) -Coordinating hand sewing thread or embroidery floss -Hand sewing needle -Mason jar lid -Fiberfill or other “stuffing” -Hot glue or other craft glue -A nickel -A quarter -Marking pen -Scissors -Pinking shears (for the cherry pie) -Flexible measuring tapeCrust for all Pies
For the crust section of all the pies, begin by removing the center round section of your Mason jar lid. Use the mason jar lid as a template, and cut out a circle. This will become the pie bottom. Next, using a flexible measuring tape, measure the circumference of your Mason jar lid. Mason jars come in several different sizes and styles, so the size of your pincushion pie will vary depending on your lid. Using the measurement, draw and cut out a 1” high rectangle the length of your lid circumference. Using scissors, freehand cut a wavy edge along the upper edge of your rectangle. This will become the outer crust of your pie.
Next, using a hand sewing needle and thread, align the two short edges of the outer pie crust and whip stitch together. Once this is complete, align the lower straight edge of the outer pie crust along the outside edge of the pie bottom circle. Using a hand sewing needle and thread, stitch the outer pie crust to the pie bottom. Your crust is now ready to fill!
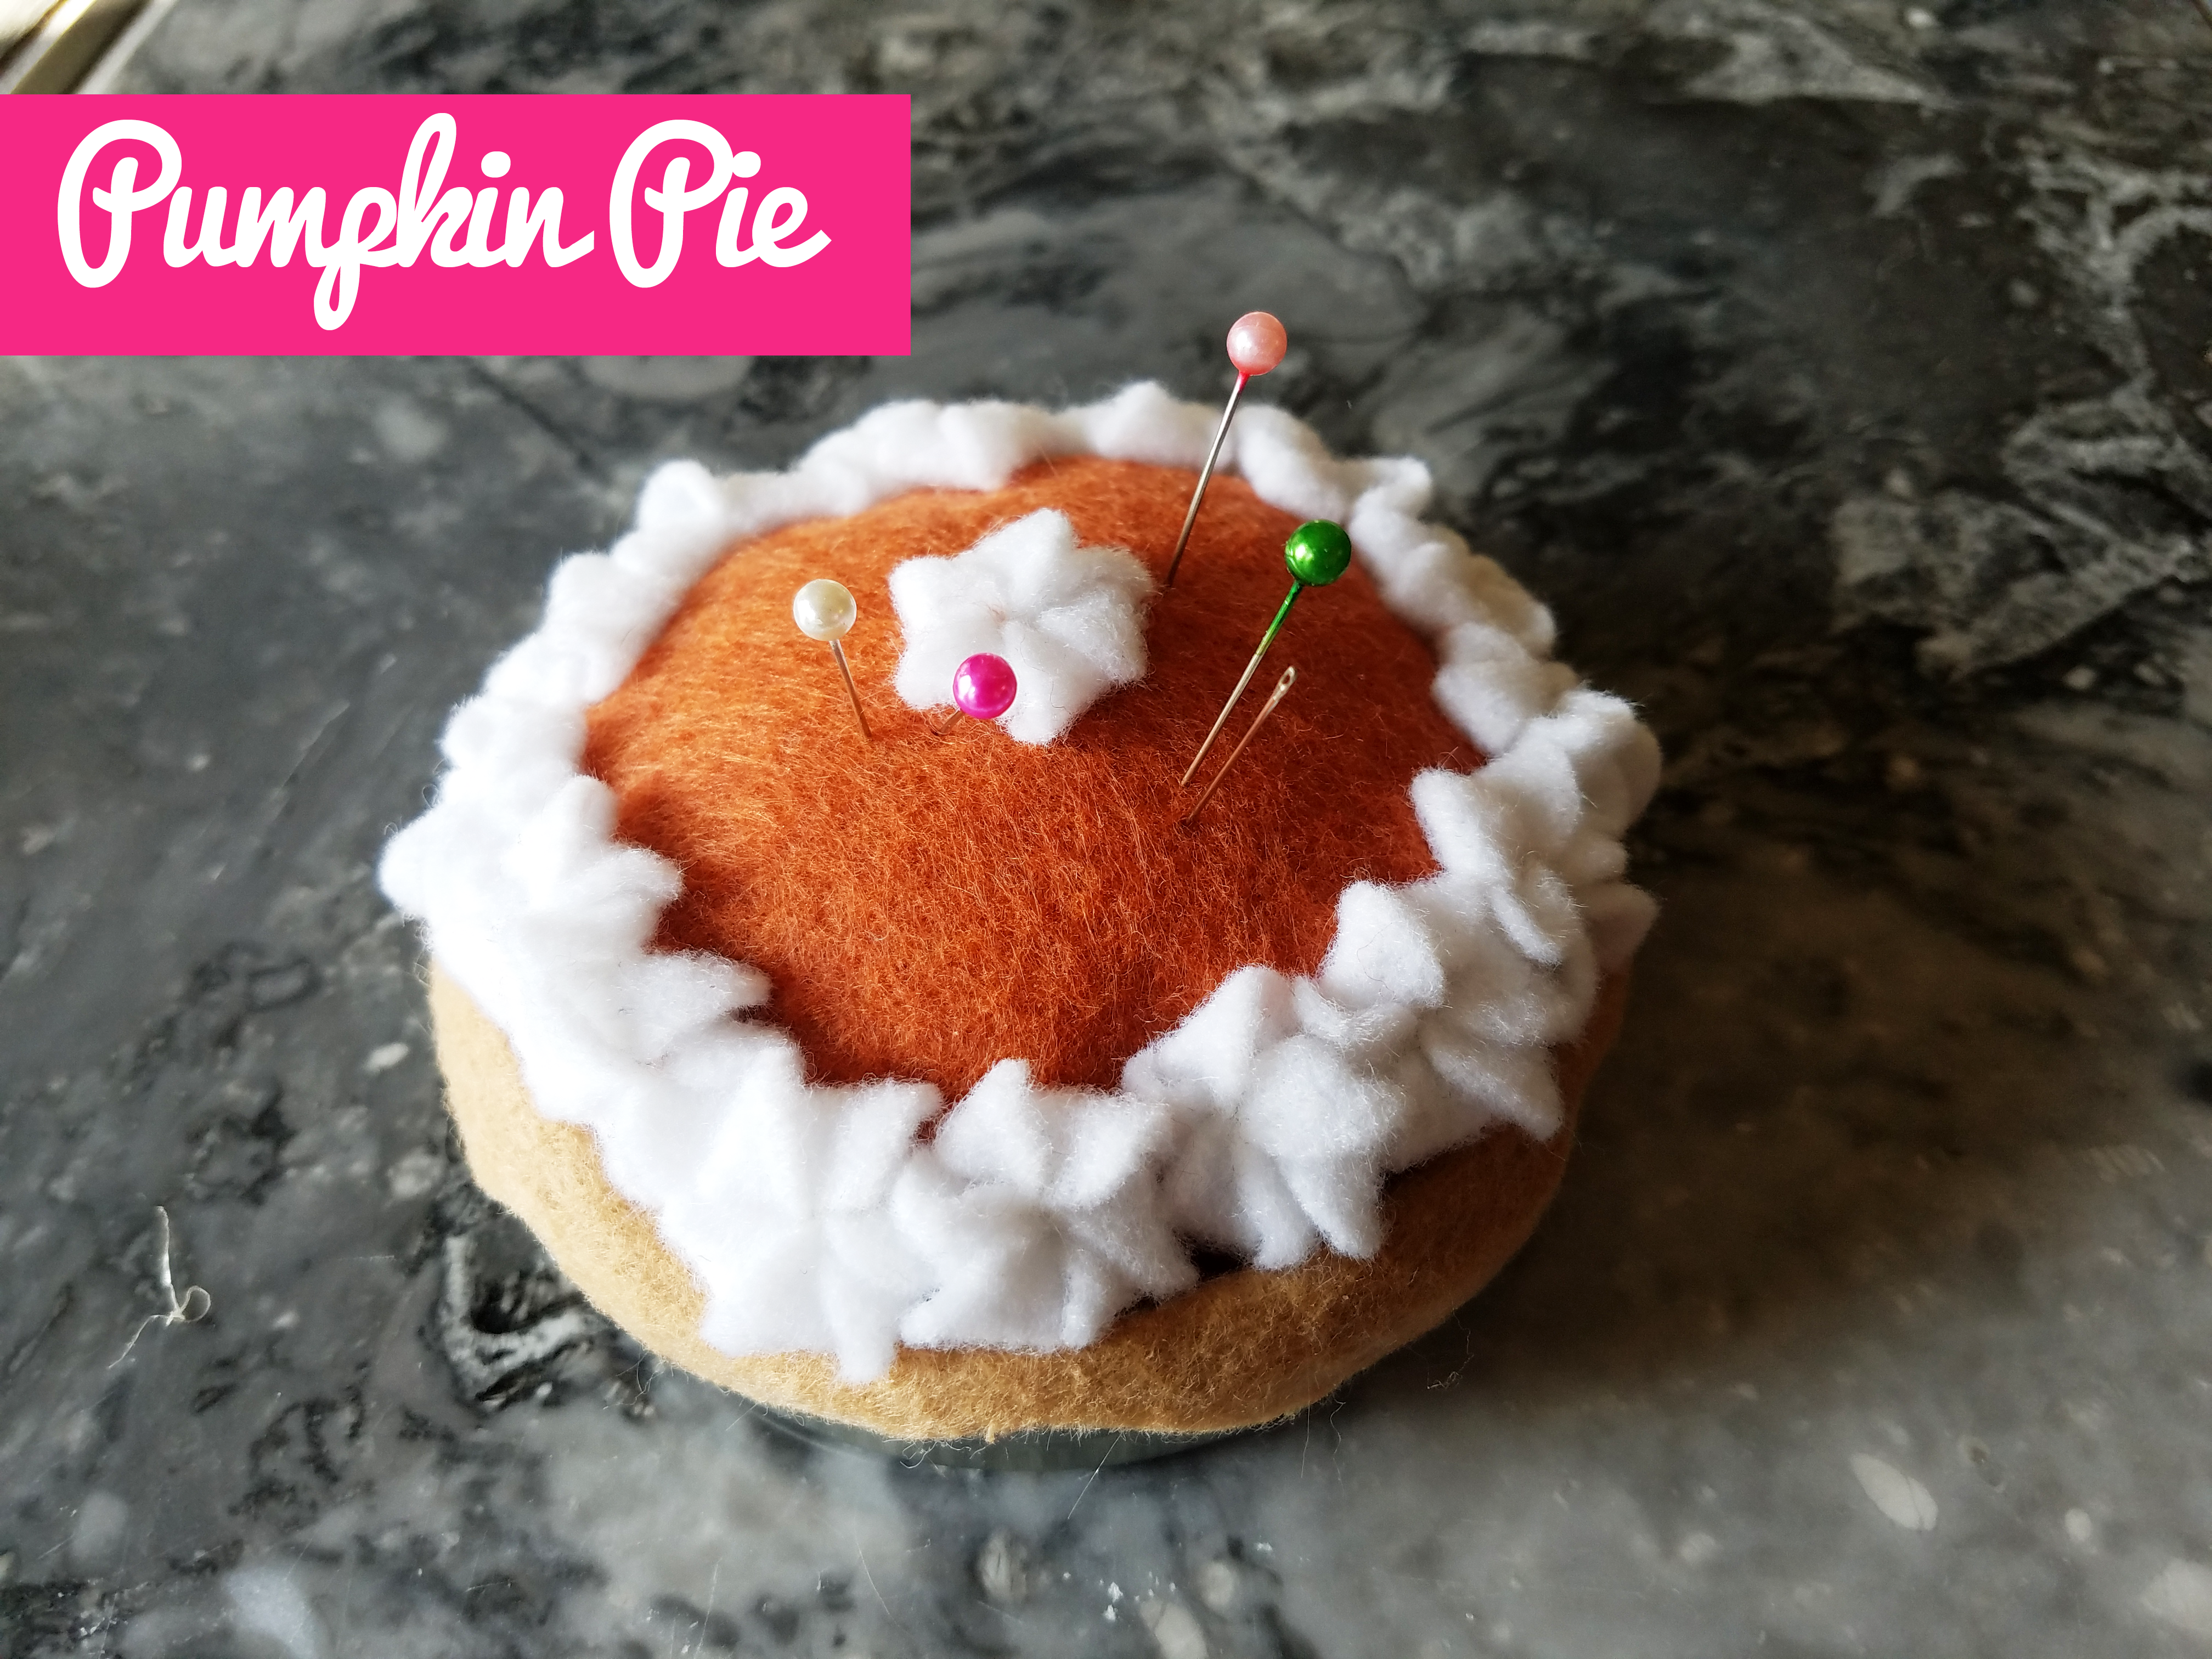
First, complete crust as directed above. Use your Mason jar lid as a template again to trace and cut out a circle of orange felt. Using a quarter as a template, trace and cut out fifteen to eighteen small white circles. These will become dollops of whipped cream! The number you make will depend on the size of the lid you are using of and how many can fit around the edge of the pie. Use scissors to cut small curved wedges from the white circles as shown below.
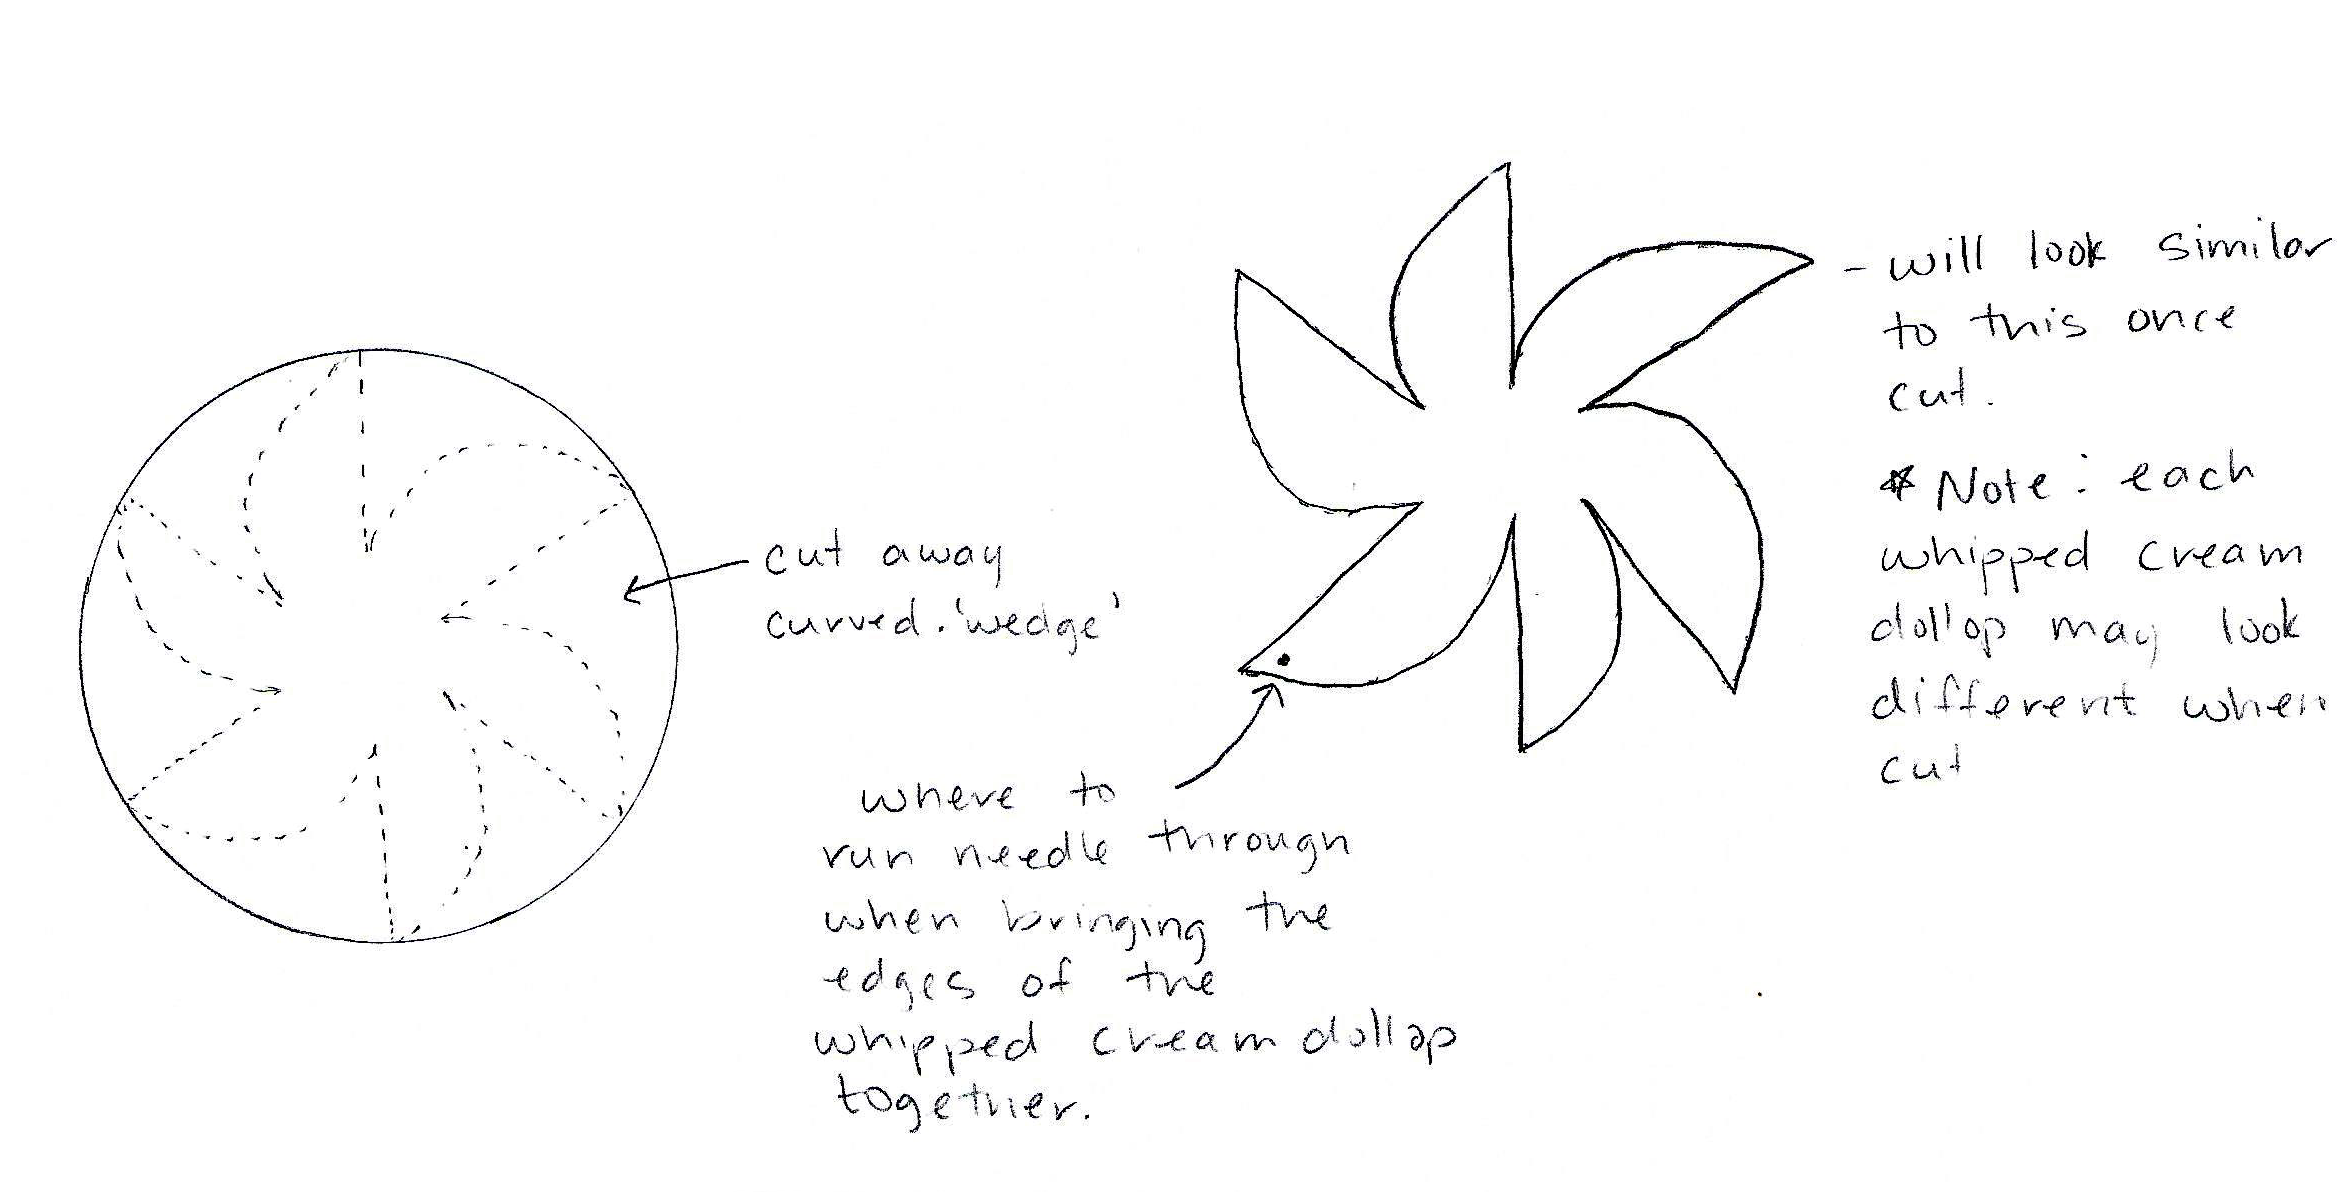
Using a hand sewing needle and thread, run the needle through the upper points of all wedges and bring them together. Pull the thread tight and then bring it down through the center of the circle to the back side. Again, pull the thread tight to complete the dollop and tie a knot in the thread. Repeat with each small white circle. Using a hand sewing needle and thread, sew the orange circle to the lower edge of the outer pie crust just above where you previously attached the outer pie crust to the pie bottom.
Sew roughly three quarters of the perimeter of the pie top, then insert fiberfill between the layers and finish sewing the perimeter. Next, position the whipped cream dollops around the outer edge of the orange circle and one in the middle- glue or stitch in place. Using hot glue or other craft glue, adhere the pie to the bottom of your Mason jar lid. Insert pins and enjoy!
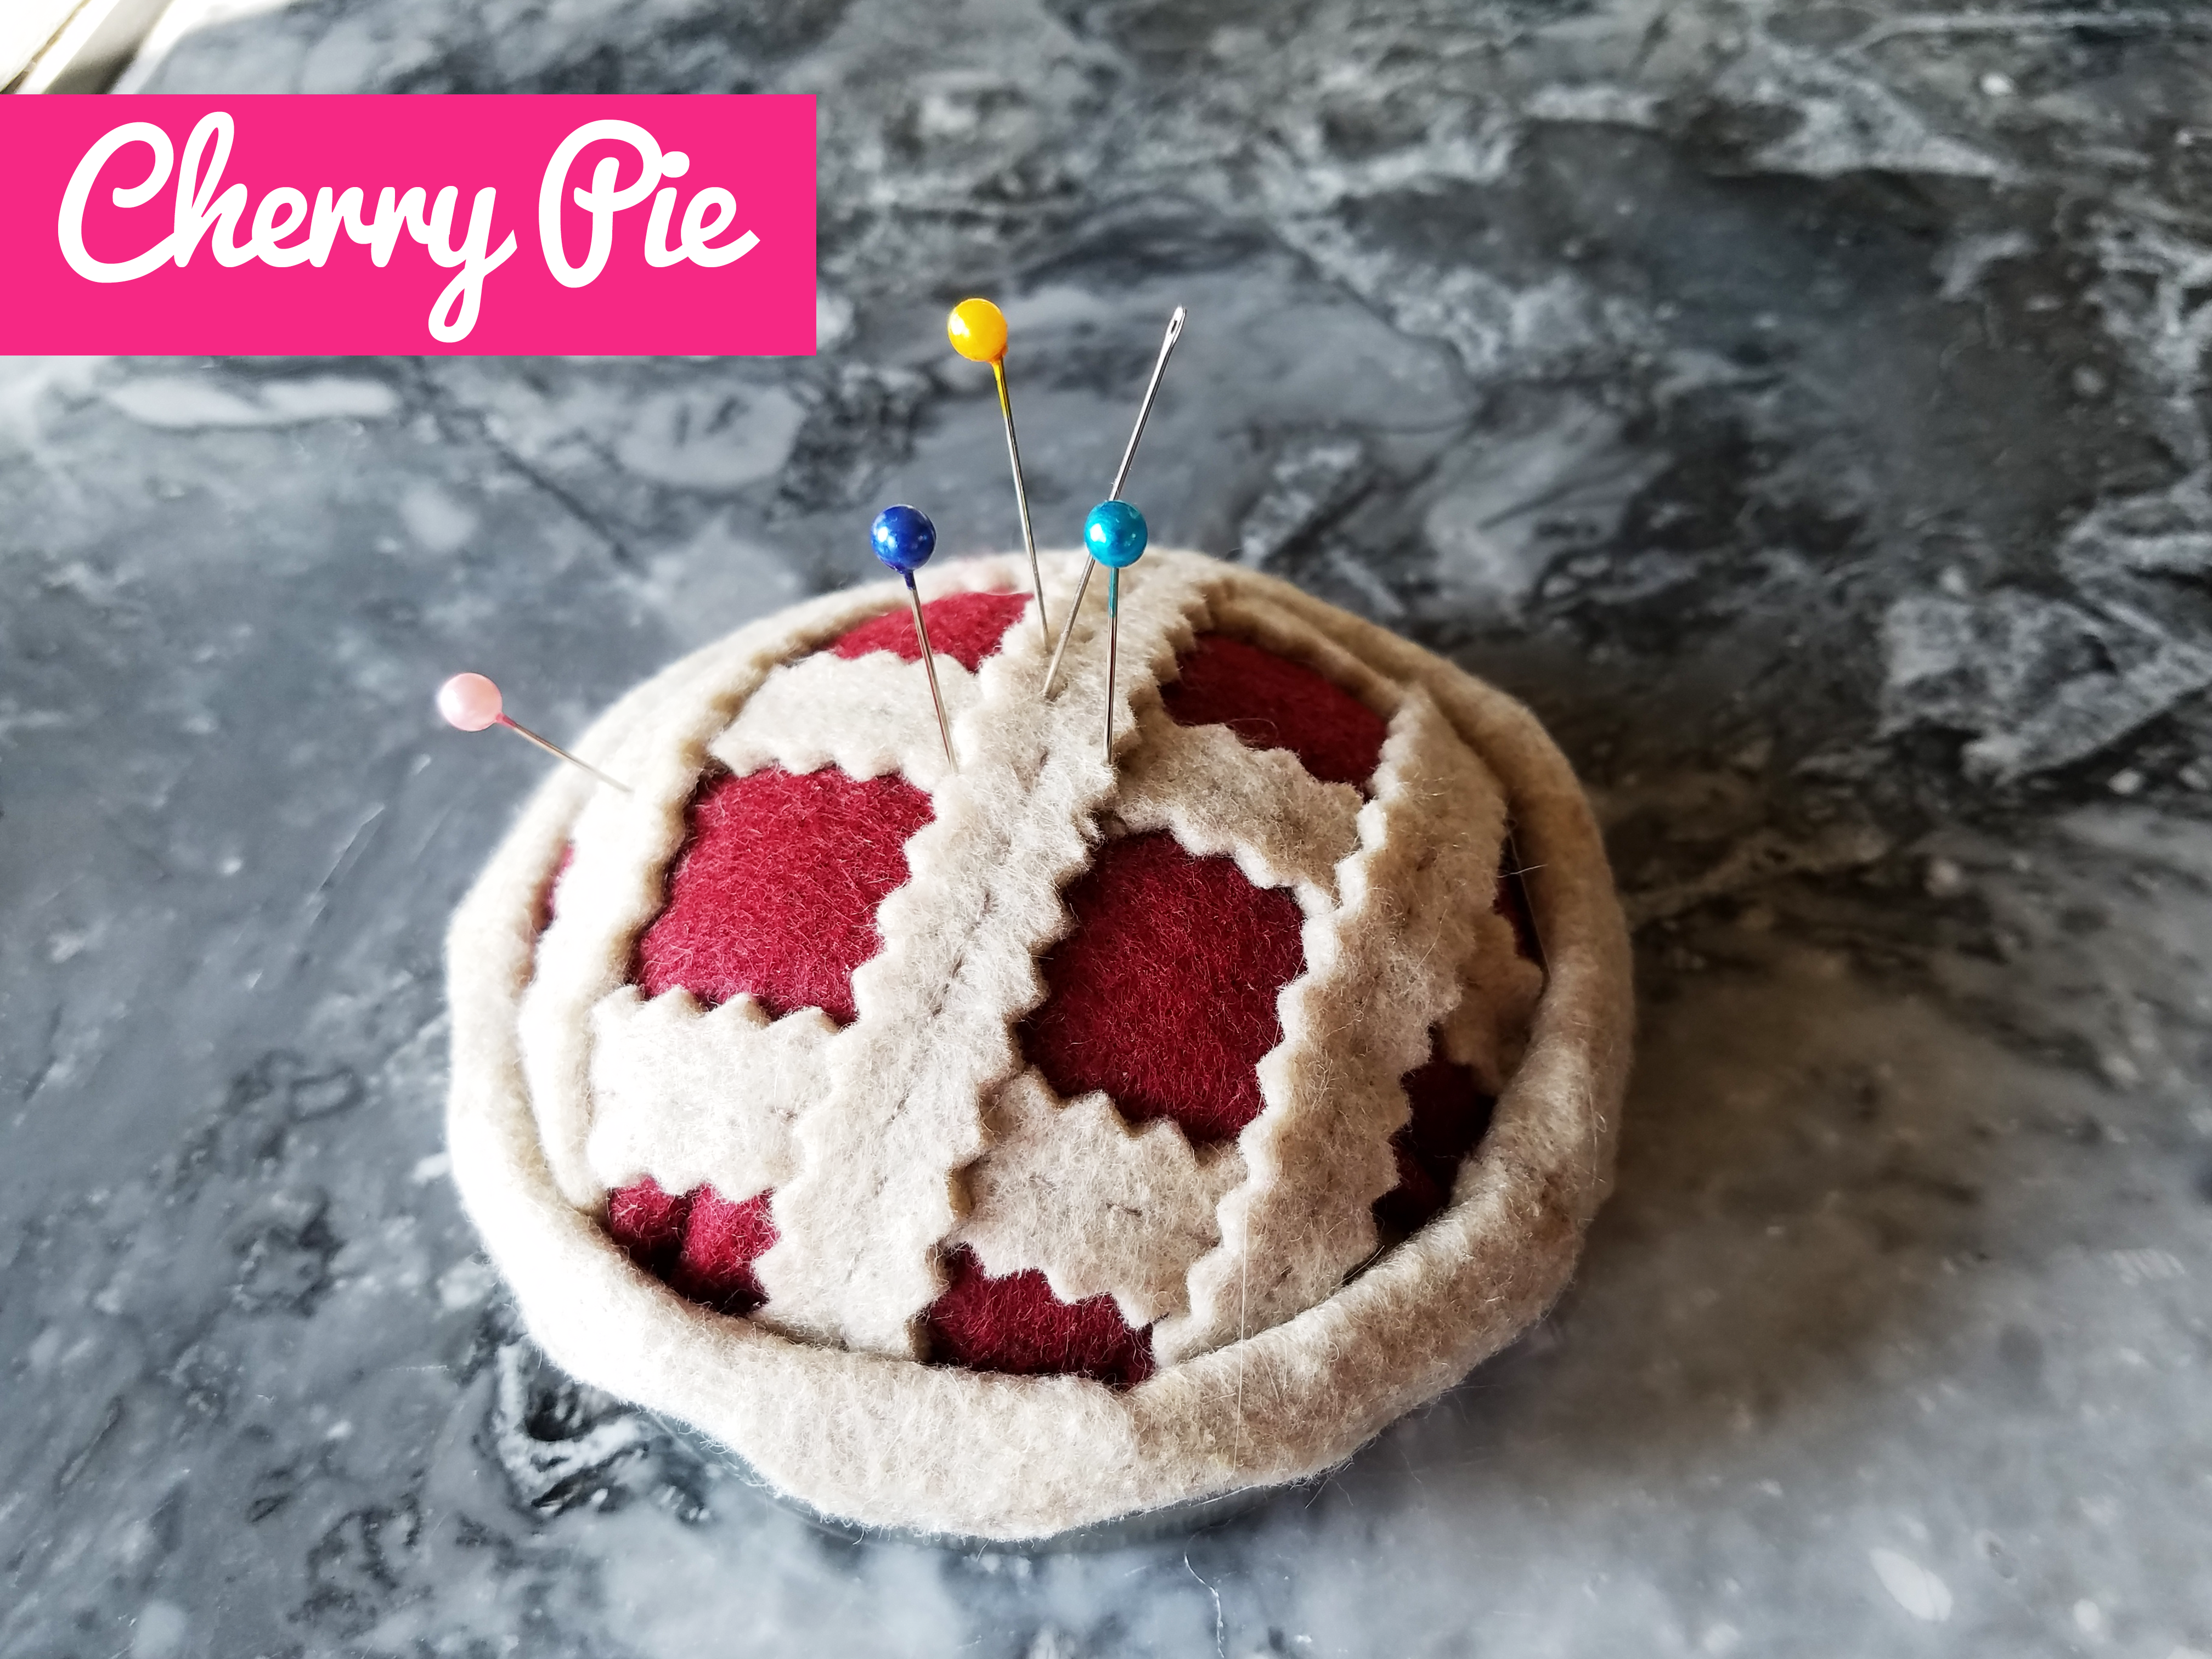
First, complete crust as directed above. Next, use your Mason jar lid as a template to trace and cut out a circle of red felt. Using pinking shears, cut six ¼” strips from the same color felt as the pie crust and bottom. Lay the strips across the red felt circle in a cross-hatch pattern and either glue or stitch in place. Trim any edges of the strips that hang over the edge of the red circle.
Using a hand sewing needle and thread, sew the cherry pie top to the lower edge of the outer pie crust just above where you previously attached the outer pie crust to the pie bottom. Sew roughly three quarters of the perimeter of the pie top, then insert fiberfill between the layers and finish sewing the perimeter. Using hot glue or other craft glue, adhere the pie to the bottom of your Mason jar lid. Insert pins and enjoy!
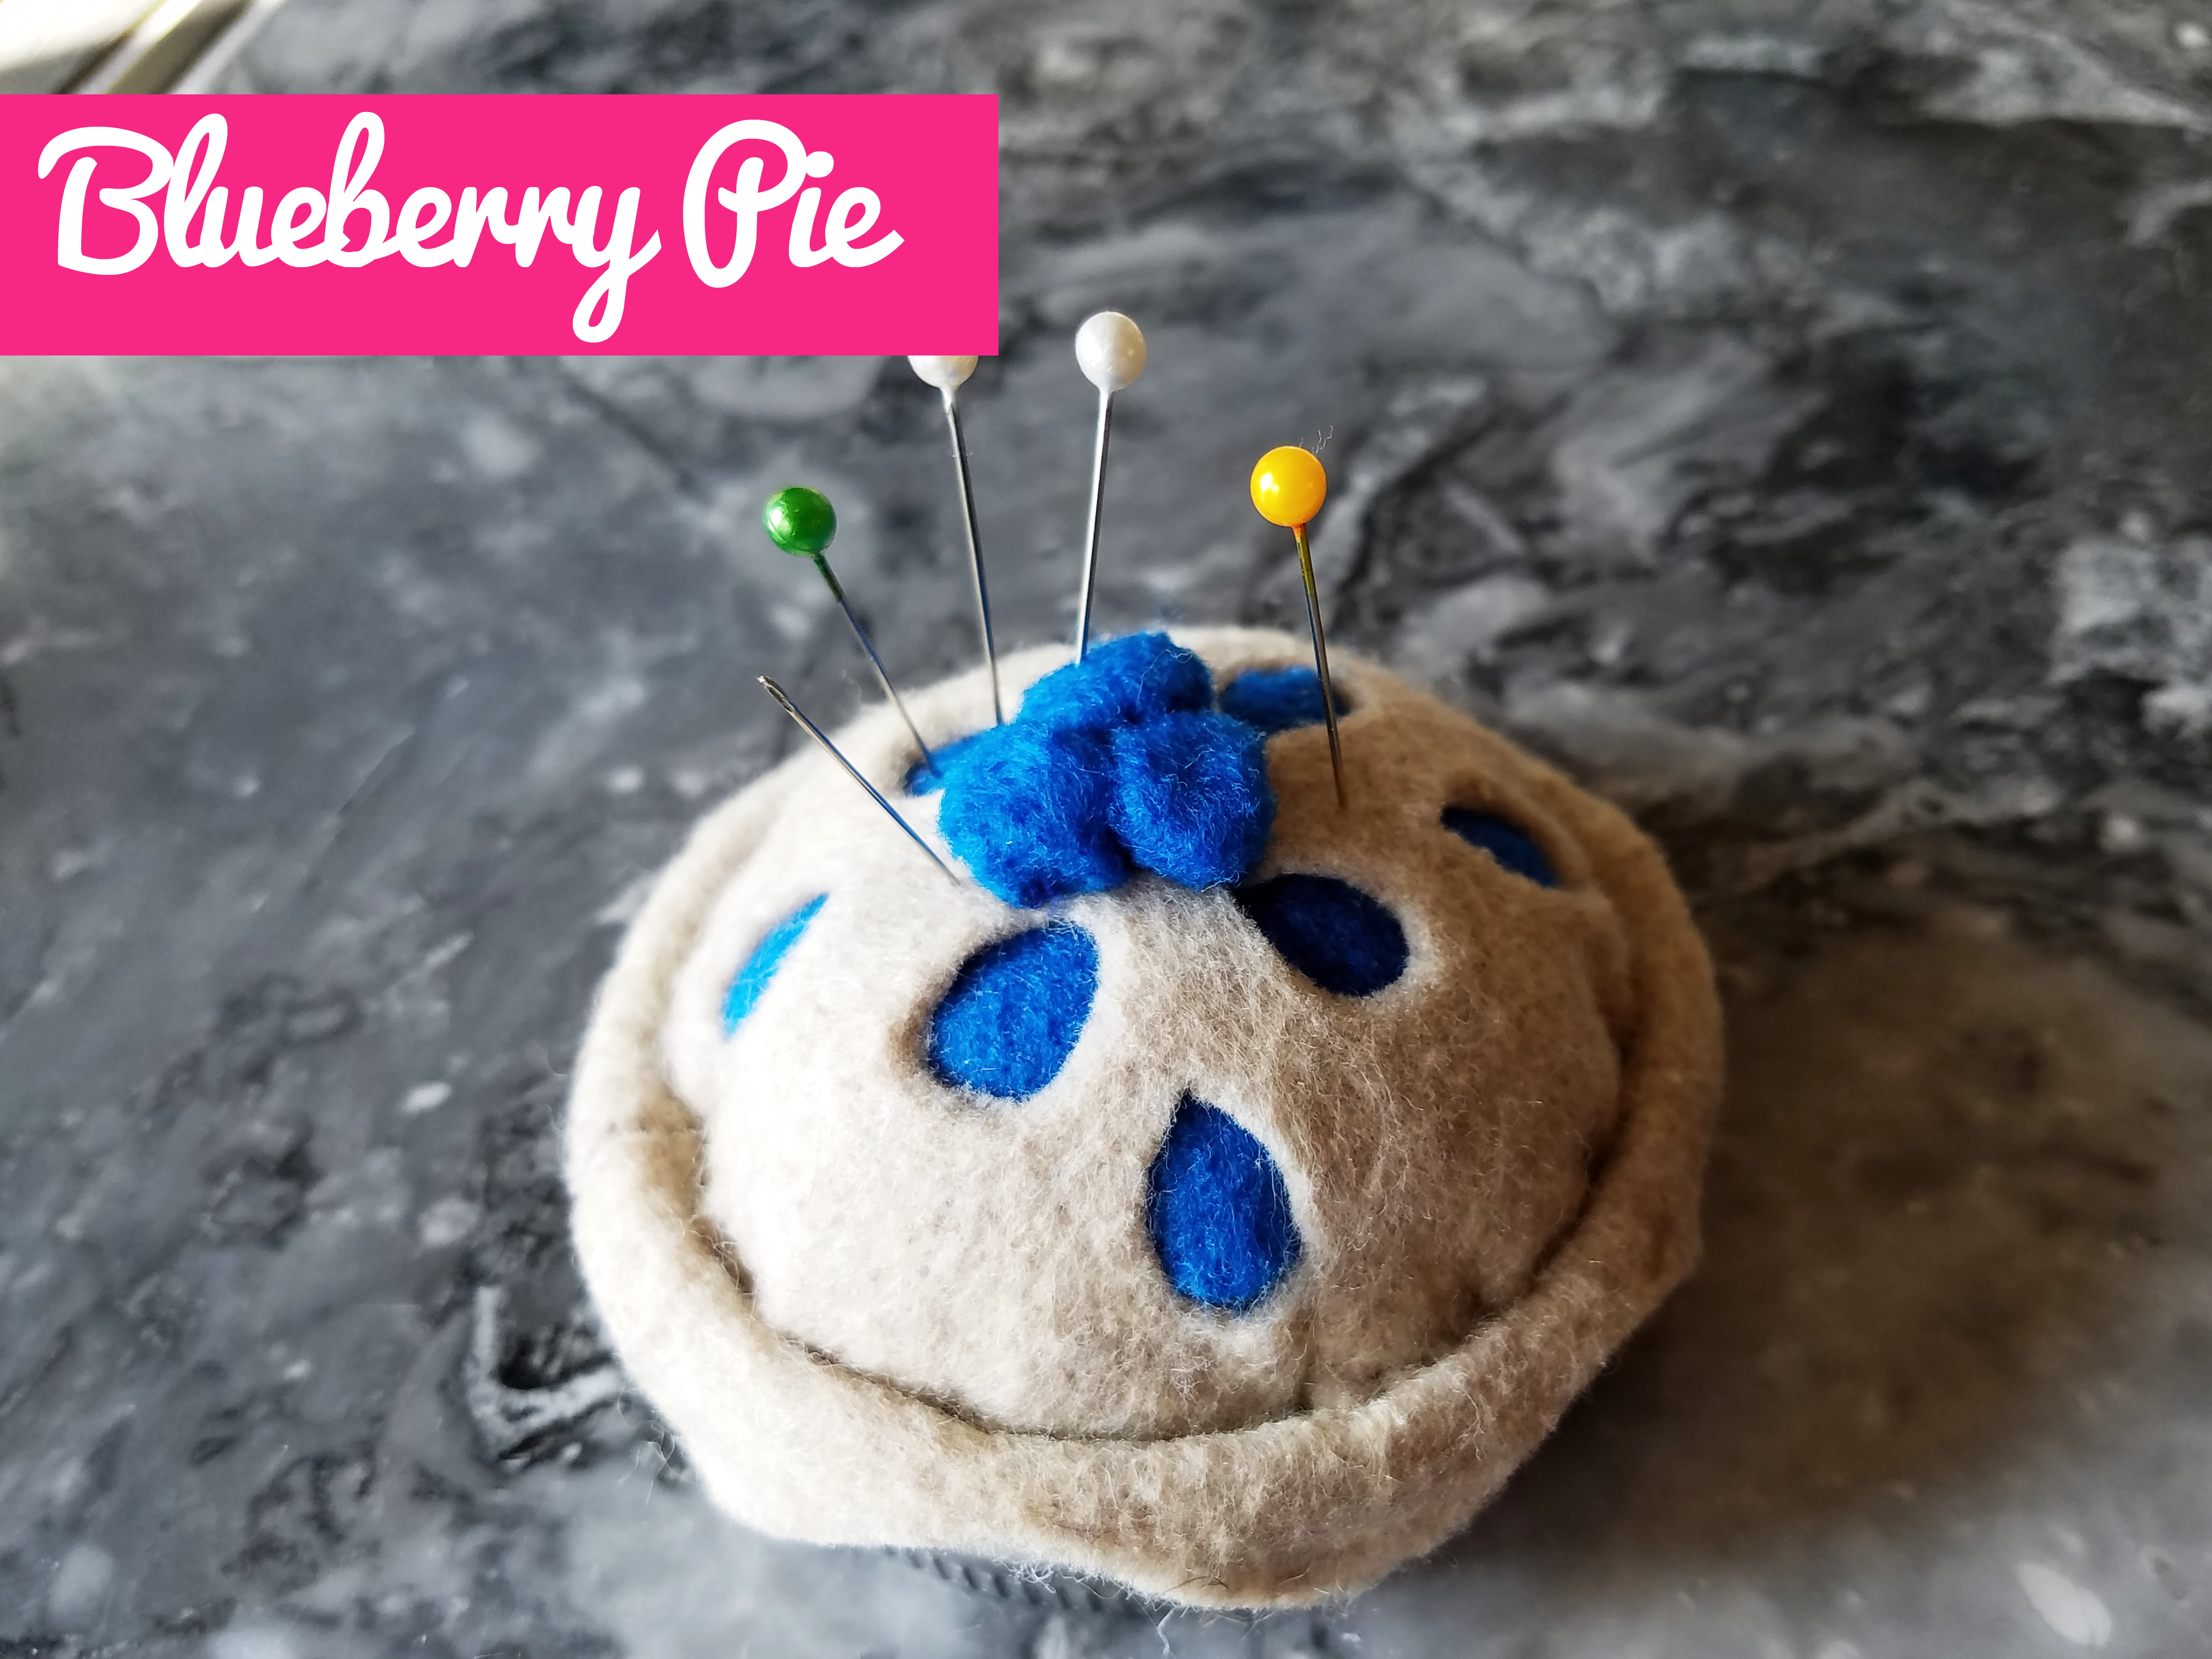
First, complete crust as directed above. Using your Mason jar lid as a template, trace and cut out a circle of blue felt, and a circle of crust-colored felt. Using a nickel as a template, trace and cut out three small blue circles. One the wrong side of the crust colored circle, either draw the design shown below or your own pie crust top design and cut out.

Layer the crust colored circle on top of the blue circle and baste together around the perimeter. Using blue thread or embroidery floss and a hand sewing needle, place a running stitch around the perimeter of the small blue circle approximately 1/16” from the edge. Pull the thread tight to create the small blueberry and tie a knot. Repeat with the remaining two circles. Using a hand sewing needle and thread, sew the blueberry pie top to the lower edge of the outer pie crust just above where you previously attached the outer pie crust to the pie bottom.
Sew roughly three quarters of the perimeter of the pie top, then insert fiberfill between the layers and finish sewing the perimeter. Place the three blueberries at the center of the pie and either glue or stitch in place. Using hot glue or other craft glue, adhere the pie to the bottom of you Mason jar lid. Insert pins and enjoy!
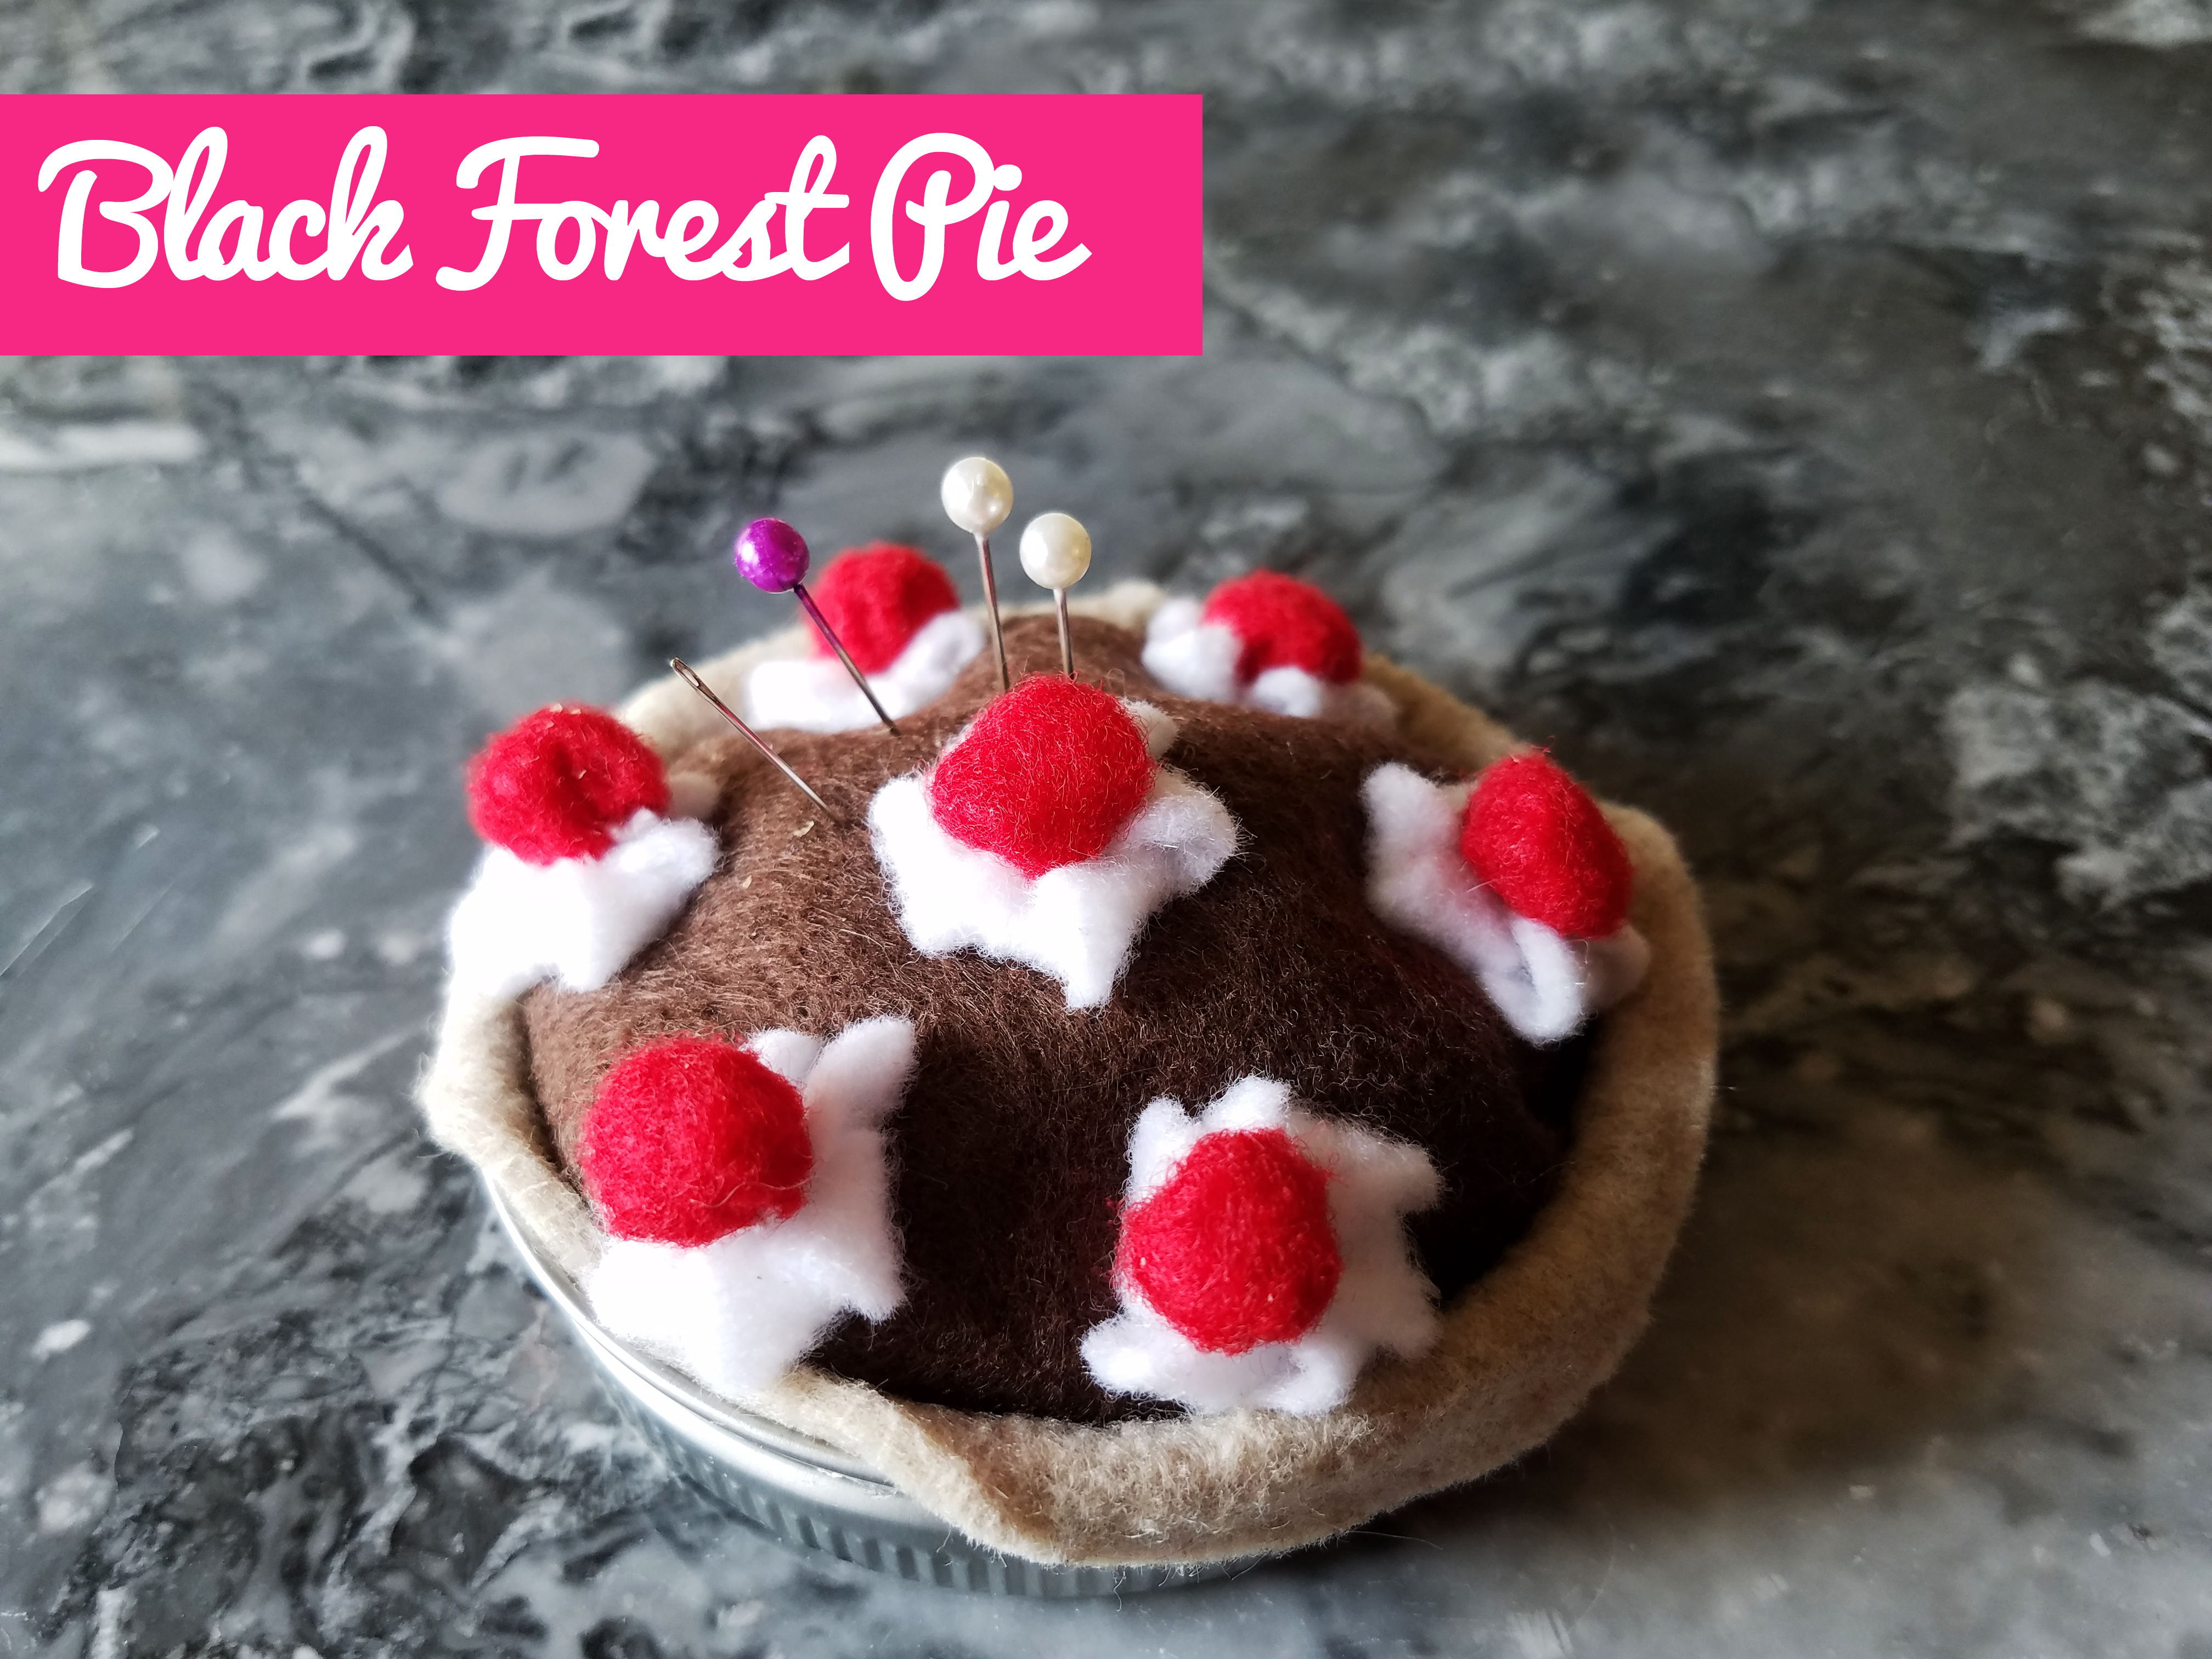
First, complete crust as directed above. Next, use your Mason jar lid as a template to trace and cut out a circle of dark brown felt. Using a nickel as a template, trace and cut out seven red circles. Using a quarter as a template, trace and cut out seven white circles. Use scissors to cut small curved wedges from the white circles as shown in the pumpkin pie pattern.
Using a hand sewing needle and thread, run the needle through the upper points of all wedges and bring them together. Pull the thread tight and then bring it down through the center of the circle to the back side. Again, pull the thread tight to complete the whipped cream dollop and tie a knot in the thread. Using red thread or embroidery floss and a hand sewing needle, place a running stitch around the perimeter of the small red circle approximately 1/16” from the edge. Pull the thread tight to create the small cherries and tie a knot. Repeat with the remaining six circles.
Using a hand sewing needle and thread, sew the pie top to the lower edge of the outer pie crust just above where you previously attached the outer pie crust to the pie bottom. Sew roughly three quarters of the perimeter of the pie top, then insert fiberfill between the layers and finish sewing the perimeter. Space the whipped cream dollops and cherries along the outer edge and glue or stitch in place. Using hot glue or other craft glue, adhere the pie to the bottom of your Mason jar lid. Insert pins and enjoy!
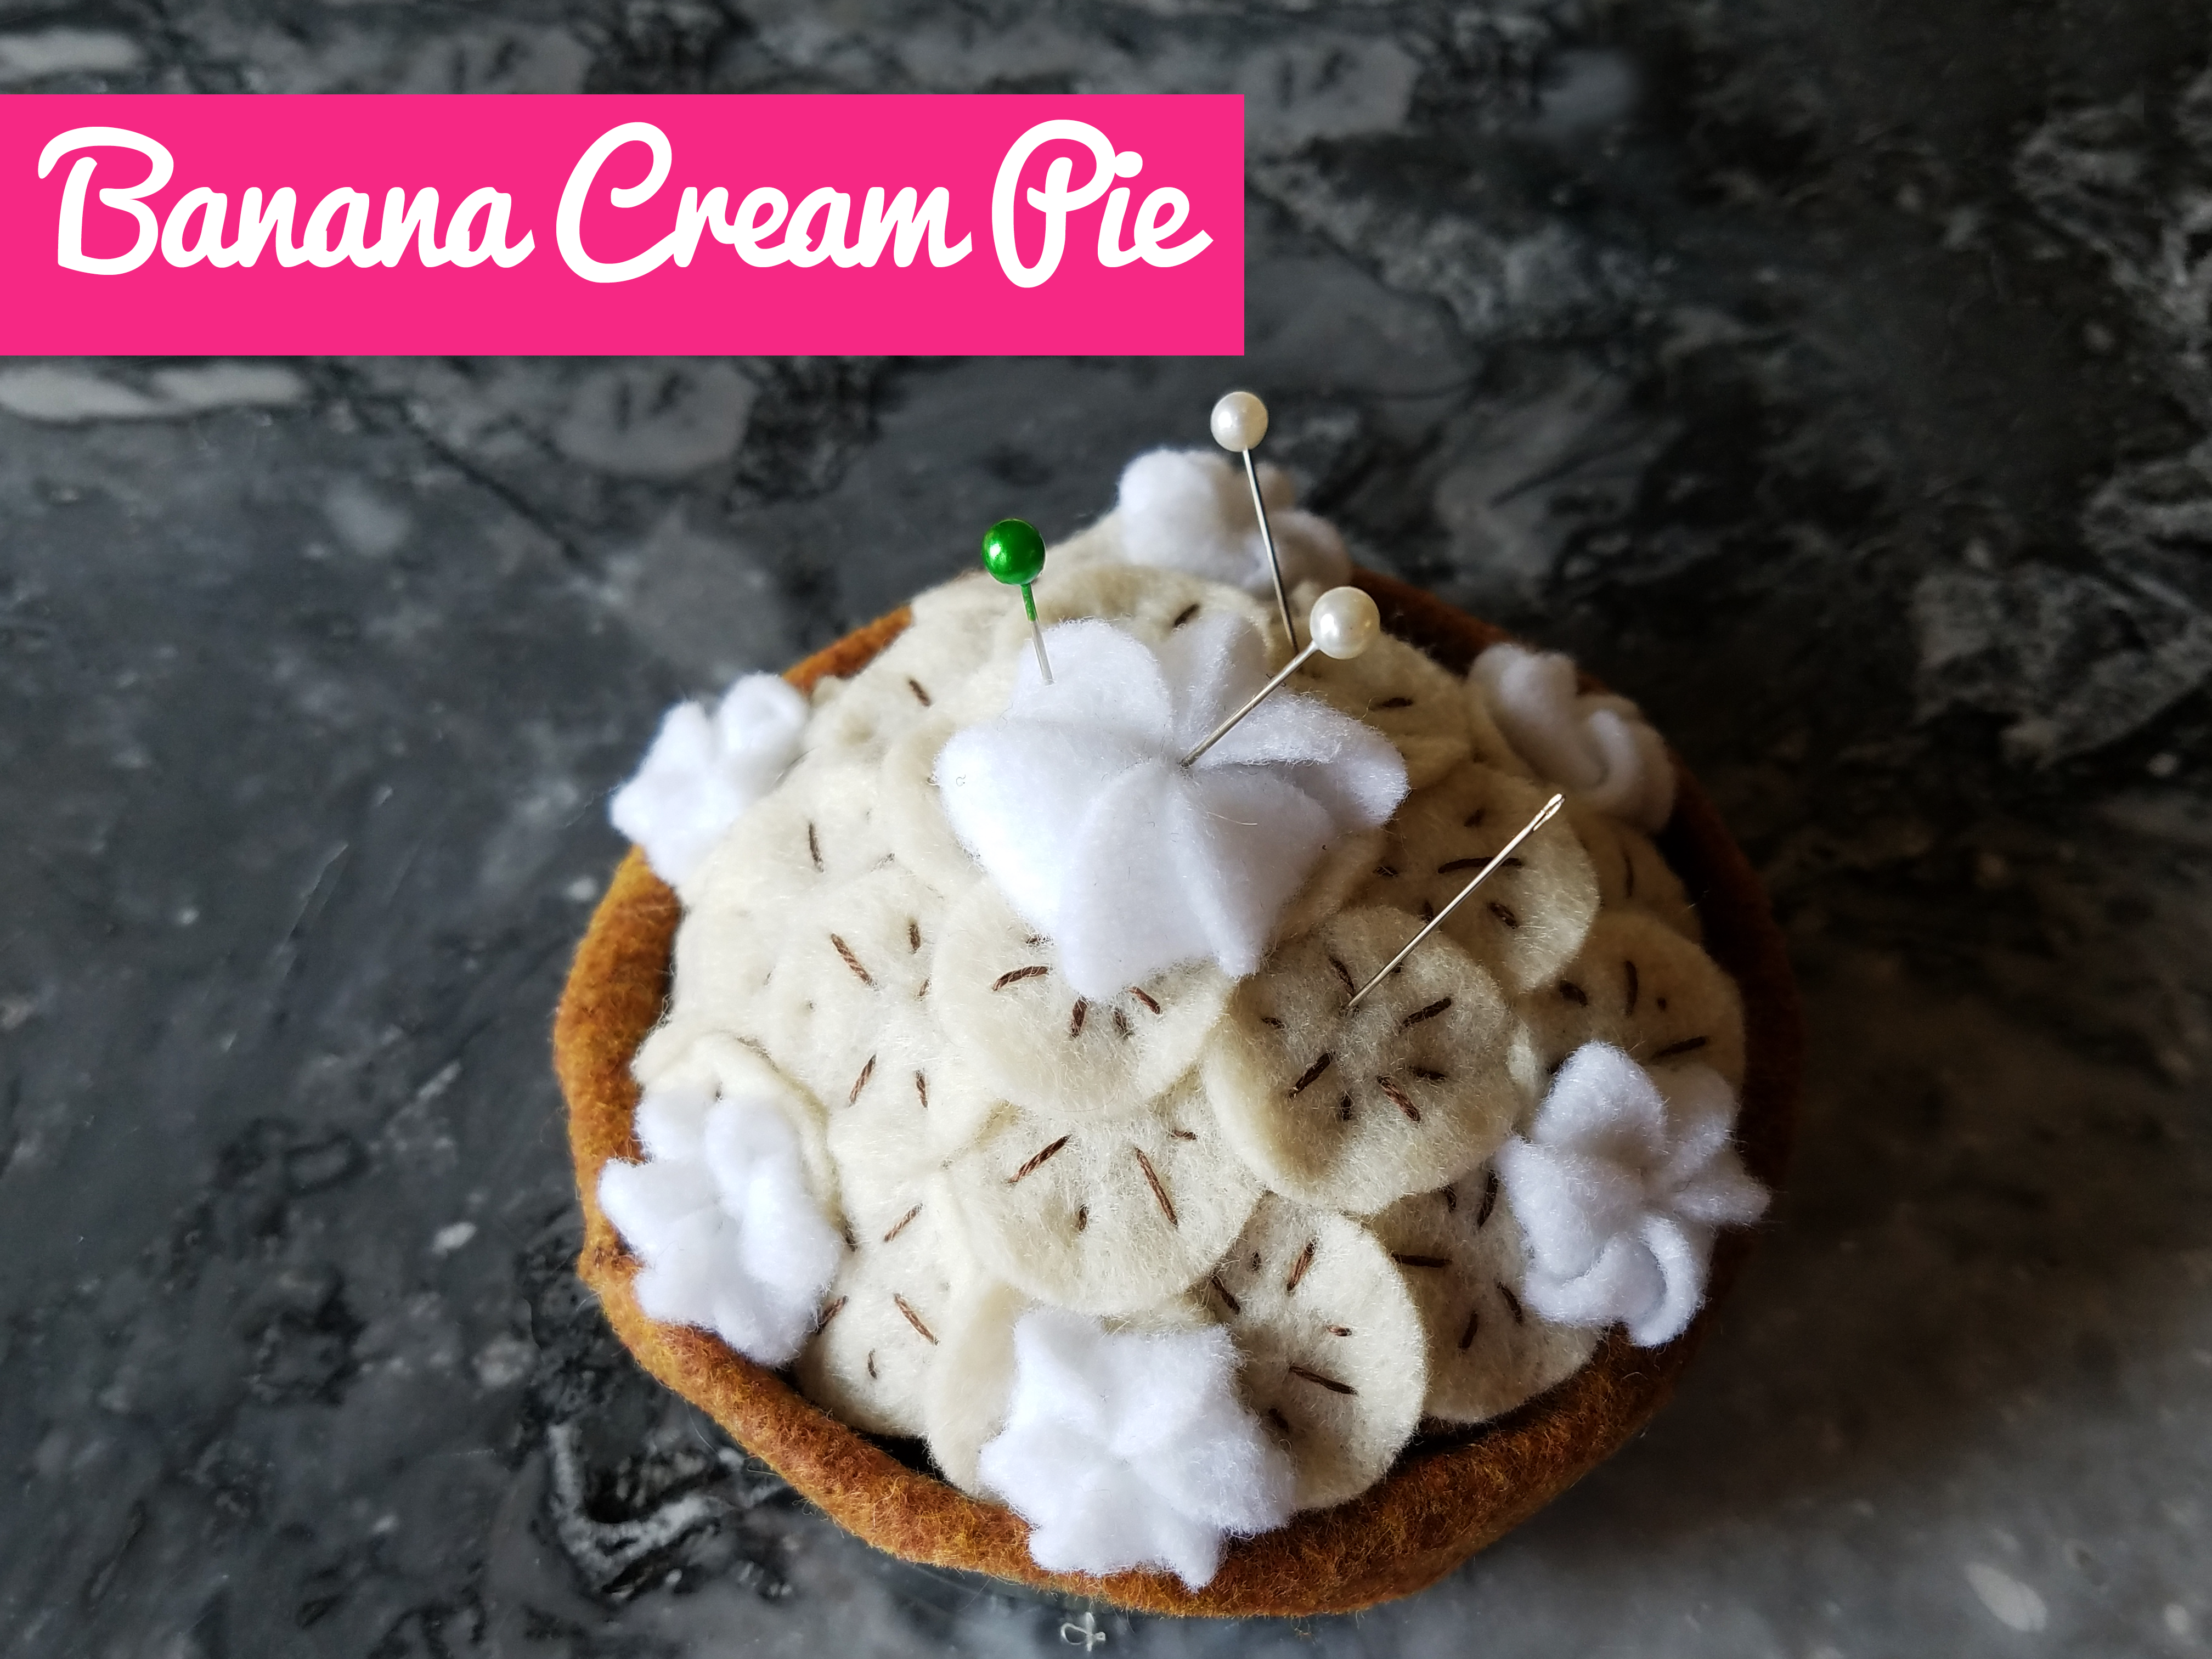
First, complete crust as directed above. Next, use your Mason jar lid as a template to trace and cut out a circle of felt in any light color. Using a nickel as a template, trace and cut out approximately 25 light yellow or beige circles. These will become your banana slices and the number of them you will need will depend on the size of your Mason jar lid. Using a hand sewing needle and several strands of brown thread, make five to seven running stitches in various lengths and in various directions around the center of the banana slices.
Position the banana slices in a circular pattern around the top of the first large felt circle cut. Make another running stitch through both the felt circle and the banana slice to secure it in place. Using a quarter as a template again, trace and cut out six white circles. Again, use the quarter as a template and lightly trace a circle. Cut out around the circle approximately ¼” from the line to create a larger circle. This will become the large center whipped cream dollop. Use scissors to cut out small curved wedges from your white circles as shown for the pumpkin pie.
Using a hand sewing needle and thread, run the needle through the upper points of all the wedges and bring them together. Pull the thread tight and then bring it down through the center of the circle to the back side. Again, pull the thread tight to complete the whipped cream dollop and tie a knot in the thread. Using a hand sewing needle and thread, sew the pie top to the lower edge of the outer pie crust just above where you previously attached the outer pie crust to the pie bottom.
Sew roughly three quarters of the perimeter of the pie top, then insert fiberfill between the layers and finish sewing the perimeter. Space the six small whipped cream dollops around the outer edge and glue or stitch in place. Place the large whipped cream dollop in the center and either glue or stitch in place. Using hot glue or other craft glue, adhere the pie to the bottom of your Mason jar lid. Insert pins and enjoy!
What’s your favorite pie? Let us know in the comments below! Happy sewing!
Have something to add? Leave a comment or connect with us on Facebook.

Have students that want to make these as we begin our sewing unit. I would love the pattern
Hello, I'm new here, but just a comment to how sweet these pincushion pies are! I love the cleverness of the whipped cream dollops too! Thank you for sharing this. Liz
I think these are so adorable! But I’m having trouble sewing the pie top into the crust :( any tips. I’m kinda stuck
I was pretty confused until I figured out it meant the lid and band of a two-piece lid.
These are so cute I so love crafting thank you for sharing
Qué ideas tan originales, y qué simples para realizar!!! Muchas gracias por compartirlas!!
These are so cute
Thanks. Looking forward to making these soon.
Been looking for such pattern- Thank you. Anxious to make & desperate need.
Sew cute.