Today, we'll cover how to sew bias tape, looking at applying the tape to the neckline of a garment. Any edge that needs to be finished can be trimmed with bias tape. There are many ways to approach this, all slightly different from the rest, but most ending with the same result. This method is one of my favorites, as it gives a clean and professional edge with very little effort. It is a standard edge finishing sewing technique.

Finishing an edge with bias tape instead of a facing is a nice approach for a more informal garment, or for sheer fabrics when you do not want to see the facing underneath. Use a contrast color or print to add a bit of zip to the inside of your garment!
How to Apply Bias Tape to a Neckline

Step 1 -
Start with your shoulder seams sewn but not the side seams. It is easier to sew the bias tape when you have access to the neckline area and the whole item can be opened flat.

Step 2 -
Using a flexible ruler, measure around the entire neckline. Add a couple of inches to the amount for overlapping in the back.

Step 3 -
Using a ruler with a 45 degree marking on it, line up the 45 degree line on the selvage of the fabric, allowing the rest of the ruler to go into the fabric on the true 45 degree bias.
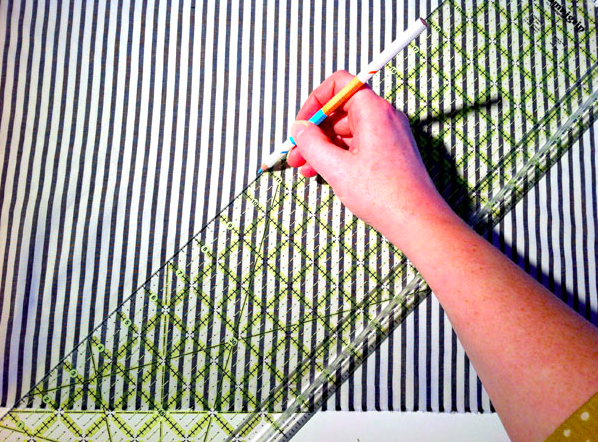
Step 4 -
Marking along the true bias edge of the ruler, use a sharpened chalk pencil to draw a line equal to the measurement from step 1.

Step 5 -
Move your ruler over and draw a parallel line one inch from the first line.

Step 6 -
Cut along each of the two drawn lines to make a one inch strip of bias tape.

Step 7 -
Find the center of the bias strip and line it up with the center point on the front of the neckline. Pin with right sides together. Continue around the entire neckline, pinning the bias tape to the neckline, ending in the back.

Step 8 -
When you reach the center back, over lap the two ends of the bias tape and pin together so the bias tape fits the opening.

Step 9 -
Sew along the pinned spot, joining the two ends of the bias tape together.
Step 10 -
Trim the ends of the bias tape off, leaving about a quarter inch of fabric on each side of the seam. Press the seam open and repin it to the neckline. It should now fit the opening perfectly.
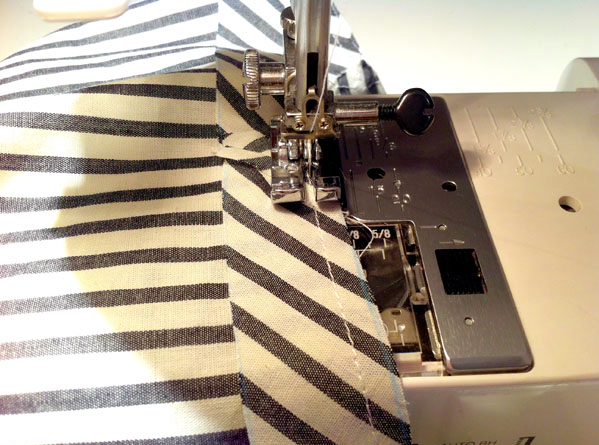
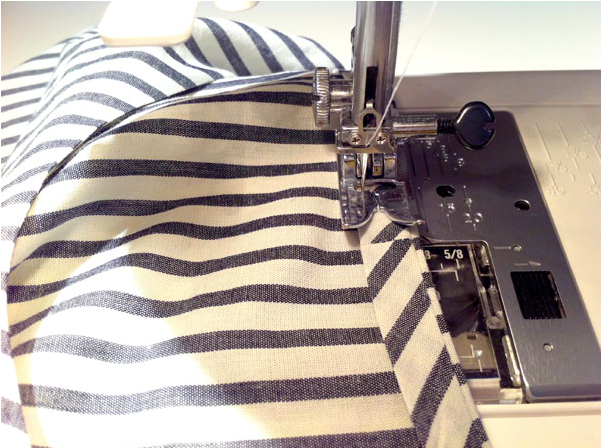
Step 11 -
Stitch the bias tape to the neckline using a quarter inch seam allowance. This is much easier done with a quarter inch seam foot, as pictured.

Step 12 -
Trim the quarter inch seam allowance in half all the way around the entire opening. This is easier done with small 5 inch scissors.
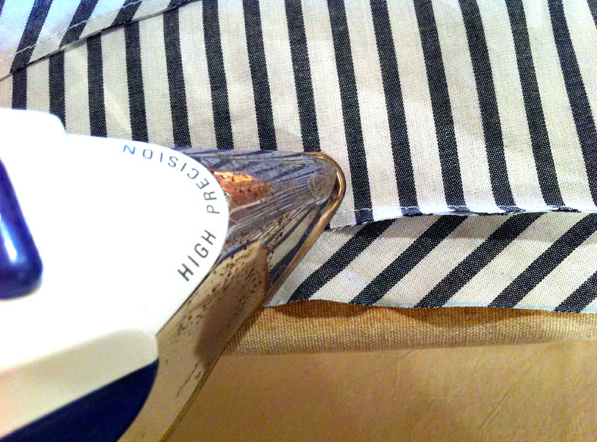
Step 13 -
On the inside of the neckline opening, press the seam allowance up toward the bias tape.
Step 14 -
Flip the garment over, right side out and press the seam flat.
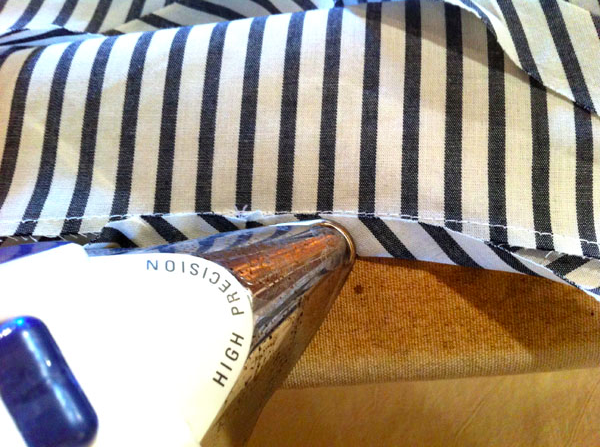
Step 15 -
Fold the bias tape into the opening, lining up the raw edge with the stitch line and press all the way around the opening.

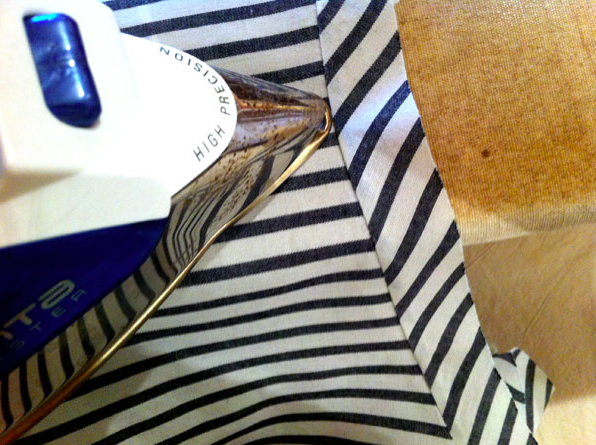
Step 16 -
Fold the bias tape again, rolling the seam line just slightly to the inside so none of the bias tape shows on the right side of the garment. Press well and pin in place for sewing.
Step 17 -
Stitching on the inside, sew as close to the inside fold as possible. Try moving your needle to get close to the edge but allowing your foot to line up with the outside edge. You have a better shot at sewing straight when you give yourself something to follow.

Step 18 -
Give the entire opening a good press and you are done! Remember that you can use this method of sewing bias tape to any opening on any garment, even if the original instructions call for other ways of finishing!

Share tips, start a discussion or ask other students a question. If you have a question for an expert, please click here.
Already a member?
No Responses to “How to Apply Bias Tape to a Neckline Tutorial: Method 1”