E
How to Alter Sewing Patterns for Shorts and Pants
National Sewing Circle Editors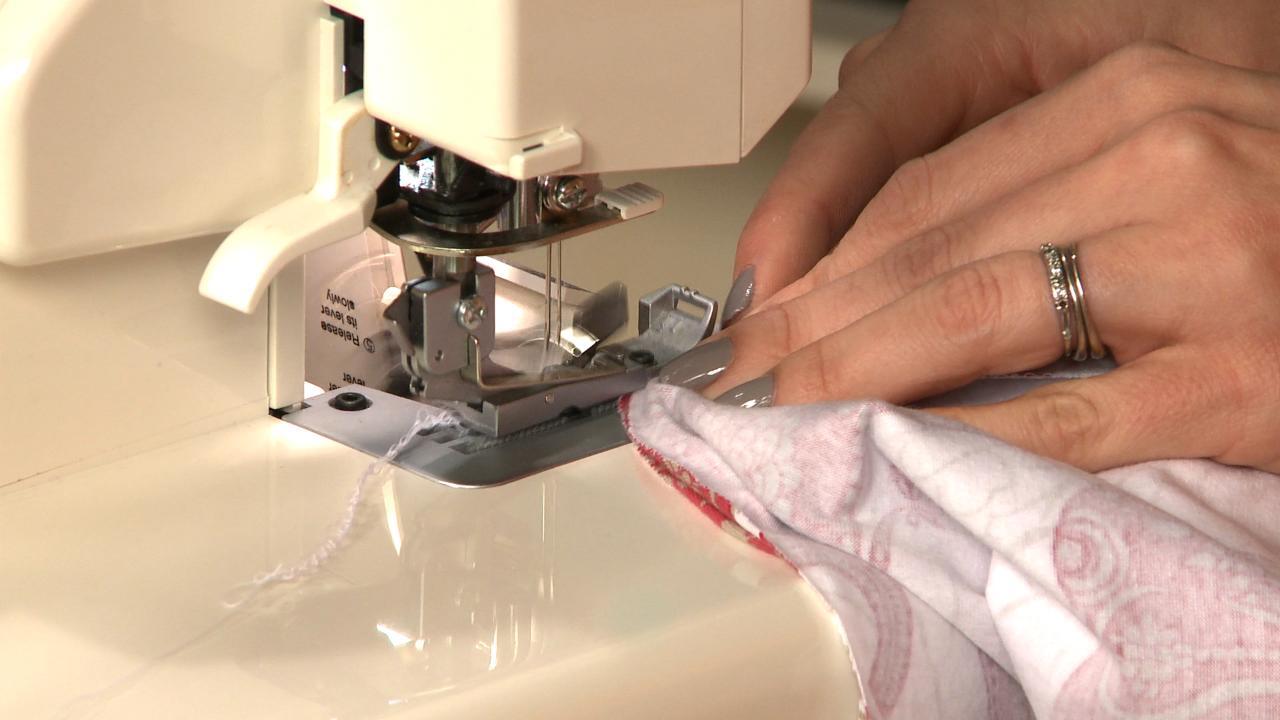
Video Player is loading.
Watch as Ellen March shows you how to make a pair of comfy lounge pants! She shows us how to start with a commercial pattern for pants or shorts, and modify the pattern to a new style. Learn how to use an existing pattern and modify it to be exactly what you want it to be. Use this helpful instruction to get started on a new pair of pants or shorts today!
I'm gonna show you how to make a pair of really comfy lounge pants using a great knit fabric. I'm starting with a commercial pattern, and you can use a pants pattern, or a shorts pattern, and I'm gonna show you how to modify it for this style. So, it is going to be these giant things. So you have your front and your back, and as you see, I've modified it to flare out at the legs a little bit. So if you're using an existing shorts pattern you want to add a little bit to the length, so that the pants are gonna hit you just below the knee.
If you're using a pant pattern, which is obviously going to go to the floor, or to your shoes, you're gonna want to shorten it pretty much the same amount. So just measure yourself from the waist to below the knee a little bit, and lengthen your pattern as such. So I'm gonna work with, actually, a pair of baby pants, so that I can show you the pattern modification a little bit easier, and we won't have all these pieces of paper to contend with on the table here. So your shorts pattern, or pants pattern will look similar to this. As you can see, we have our crotch seam, a waistline, the side seam, the lower edge, and the inseam.
Now on the baby pants, we don't have a front and a back because babies are wearing diapers. So you don't really have to adjust the crotch. So we're using sort of the same piece for the front and the back. So what I do is I want to flare out the leg a little bit, and I'm just going with three inches because I thought that with the knit that I'm using, it's not super, super stretchy. And I just want it to flare out slightly.
Now, if you're using a jersey, or something like this, and you want super flowy pants, you could go as far as five or six inches. It's really your prerogative. Just keep in mind the front and the back you're adding three inches to both. So you've already got six inches going on. So I just mark out three inches, make a little dot.
And then I want it to start to flare from my hips, not from the waist. I don't really want to mess with where the waist is fitting me already. And you want a really good fit through the bum area. So you can sort of eyeball where you think the hip is going to hit and mark it. You can take a tape measure and be more precise with it.
Just below the hip is where you're looking for. So now I need to match up these two points, and I'm using a curved ruler to do that. And you just kind of match up the curve of the ruler with where your points are, and mark, and then you want your straight edge to connect these lines down here, and that's all there is to it. Here's our modified pattern piece. You can change this to gauchos.
You can make this line a little bit darker so that you know where you're cutting. You can transfer this to a little bit heavier weight paper so that you can use it and reuse it over and over again, but the point is you have your brand new pattern. So if you are working, obviously, you will be on adult size version. You could see I've taped some scratch paper to the bottom of this to lengthen it. And then we're going out.
This is the small size line, and I'm going out three inches here from the regular edge. And then this is the large line. And you want to make sure to transfer any markings that might already be existing on the pattern. So I've transferred my little notches here to this outer edge seam. So you want to do the same for the front that you did for the back.
And then you're gonna cut out your fabric. And make sure that you cut a right piece, and then turn it over and cut a left piece for each one. All right. So once we've done that, we have our cut pieces, and I'm just placing them right sides together. And as you can see here on the waist seam I've stabilized it with a little bit of fusible knit interfacing, which is, like, one of my favorite things when working with knits.
So as you can see, knit wants to kind of roll a little bit, which makes it really difficult to sew. So, this fusible knit interfacing is going to keep this nice and flat as you can see. And I've only stabilized the waistline seam because I'm gonna use a serger. So I don't really find it necessary to do the outer seam, the inner seam, and the crotch seam. Now, if you are using a conventional machine, you may want to go ahead and stabilize those areas as well.
And you're gonna find your fusible knit interfacing looking just like this off the bolt. One side is fusible, the other side is not. And as you can see it stretches, and is gonna move with the fabric. It also wants to roll when you stretch it just like the fabric. So it's really important that you get fusible knit, and then I just cut it into strips, and just applied them following the manufacturer's instructions, all along the waistline seam.
Like I said, conventional machine, especially, if you're doing this for the first time, you may want to do all of your other seams as well. Also, if you're using a conventional machine you want to choose a ballpoint needle, and that is going to pierce through the fabric fibers, and it's gonna eliminate puckering and snags, anything like that, especially, if you are working with a jersey, or another type of knit. This one's a pretty stable knit. I happen to really enjoy it, and it's really comfy. It's more like a pajama pant, more conducive to that.
So it all depends on the style, of course, that you're going for. So, like I said, I'm using a serger and I'm gonna surge the outer leg seam, and the inner leg seam, and the outer and the inner, of course. And I have set the serger to a four thread overlock stitch. And a lot of times people will tell you to just set it for a three thread overlock because you want the most stretch that's available with the thread in the fabric as one, but I really like a four thread because with the three thread when you open up the seam to press it flat, you don't really have the extra straight stitch in there that the four thread is giving you. So it opens up a little bit, especially, over time.
And I just really like the finished look of a four thread overlock. And I don't find that it does anything particularly horrible to the knit, so. I mean, I don't find that it doesn't allow for the stretch. So I'm just gonna get going here. And I have the cutter engaged, and I'm just gonna trim off maybe an eighth of an inch of the fabric.
And that's really just to clean it up. And I should mention, too, that the seam allowances are accounted for on the particular pattern that we're using. And I'm obviously not using a 5/8ths seam here. And so I have even more ease sort of built in by using the serger stitch. Okay, great.
And you can see the stitch is plenty stretchy. It's moving with the fabric. Then I'm gonna go on the inner leg seam, and I'm starting from the crotch, and going downward. It's very important, too, to let the machine guide the fabric through the presser foot, as opposed to stretching it while you're sewing, that type of thing. You could see this is totally flat and nice.
We had no issues. So now we're gonna have our left piece and our right piece. This one's already sewn and turned right side out. And I do want to mention a lot of the times people make, like, pajama pants for the first time, or lounge pants such as this. And they accidentally sew this crotch seam, instead of sewing this inner leg seam.
And if you've ever had the problem of making pants, and you try them on, and the crotch goes all the way down to your knee, that is what you have done by accident. So you may want to write all over this, or mark it in some way that this is the crotch seam, and we're leaving this open until this step, so, good tip. So what we're gonna do is place the one that we've turned right side out, into the one that is still wrong side out, and align those seams. And you can place pins along the seam lines if you want. You could just hold them in place.
I mean, obviously, with the baby pair of pants it's not as crucial to pin. Okay, now here is where we're sewing the crotch seam. Now, I never go from the upper edge to the crotch back to the upper edge. Just if you have any sort of shifting, or stretching, that may occur, especially, on a conventional machine, it's gonna be all wonky. So I always start from the crotch and go up, and then from the crotch and go up on the other side.
And I also want to make sure that my seam allowances are going in opposite directions you can see, and that just kind of distributes the bulk better. You don't have this knot sitting at your crotch. Okay, just trim that up a little bit, and go from the other side. And you can make this pair of pants with fleece. You can make them with regular cotton.
You can make them with flannel. It's a really, really forgiving pattern. And, also, when you are starting from the crotch, and moving upwards, you want to make sure not to trim off the little crotch point there, crucial. All right, so we are almost done, it's so easy. So now we're gonna turn this right side out.
And you can see our pants taking shape. So, the next thing to do is our waistband treatment. And there are a couple of different things you can do. I particularly love an elastic waist. You can also do a drawstring waist.
And if you do that, a drawstring waist, I do a buttonhole here at the center front that I thread my drawstring through. And the buttonhole just reinforces things right there. You can even put a grommet right there, and for a baby pair of pants you can use a shoelace for your little drawstring, but probably not as safe for a baby to use a drawstring. So it's a good idea to stick with elastic there, but what I do here, and you can see we're all nice and stable with our fusible interfacing is I simply just fold it over and stitch it by machine, by conventional machine. And you want to make sure your seam allowances are lying flat.
You can give this a good press. Fold it over the entire way about an inch, inch and a half. And then there's no need to do a double fold here because your knit is not going to ravel, but I particularly like the finished look of a double fold waist. And then you would just stitch close to the fold. Of course, you need to leave an opening for your elastic to go through.
And when you're feeding it through there are a couple of different things you can do, too. And I just wanted to show you some varieties of elastic. I just make sure to choose a knit elastic, and for a baby version I would go with 3/8ths, or 1/2 inch, depending on how wide your casing is, but for the particular pant pattern I was working with today, I go with a 3/4 inch knit elastic for adult pants. It's just a little nicer. Yeah, so you would stitch your casing, put your elastic in there.
And you can feed your elastic through with a simple, good old safety pin. That's how I think everybody has learned how to do it. They also make some really nifty elastic pullers, I think they're called, but you would stick your elastic in through here the end. Use this to feed it all the way through. Match it up, pull this apart, sew your elastic together.
So if you happen to find these they're really cool tools to have on hand, but, of course, a safety pin is gonna do the trick for you. So once you have your elastic in there sew it up. Sew up your finished seam there, and your pants are almost finished. And I'm gonna show you on our finished adult pair what I've done here. Now, I sewed my elastic casing with a stretch stitch, so that the stitch would move with the elastic.
Now, you certainly don't have to do that. It's gonna work just fine using a regular straight stitch. So just practice and kind of see the method that works best for you. Another thing that I like to do is once I have the elastic in here, and I've distributed it through the waistband just by pulling it a little bit, I like to stitch over each seam line. And I pull the elastic taut and out of the way.
And I just stitch in the ditch along each one. And that really ensures that your elastic is gonna lie flat through the life of the pants, and you're not gonna have it rolling, or coming out. And it's just a great little tip. Okay, so once you have your waistband done then it's time to discuss the hem. And I've just left these completely raw, which is perfectly fine because, again, as I said, the knit isn't going to ravel.
And you can even just like pull it, and have it curl a little bit, and then you're done. You can just serge around the edges and then you're done. You can do a double fold hem if you really like finish edges, and you don't want to see these seams, or you can do just like the elastic waist, and just fold it over once and stitch close to the raw edge. And then you're totally done. And you have a great new pair of pants.

The instructor's pattern for adult wide leg pants simply would not work when you come to hem them - the angle she drew is too steep. Ideally you want seams and hemline to be at right angles for tidy hemming. I appreciate with a knit fabric you can fudge it a little, but I for one would not want to wear pants made from the pattern she drafted, they would look most odd.