E
Fold Over Elastic Binding
National Sewing Circle Editors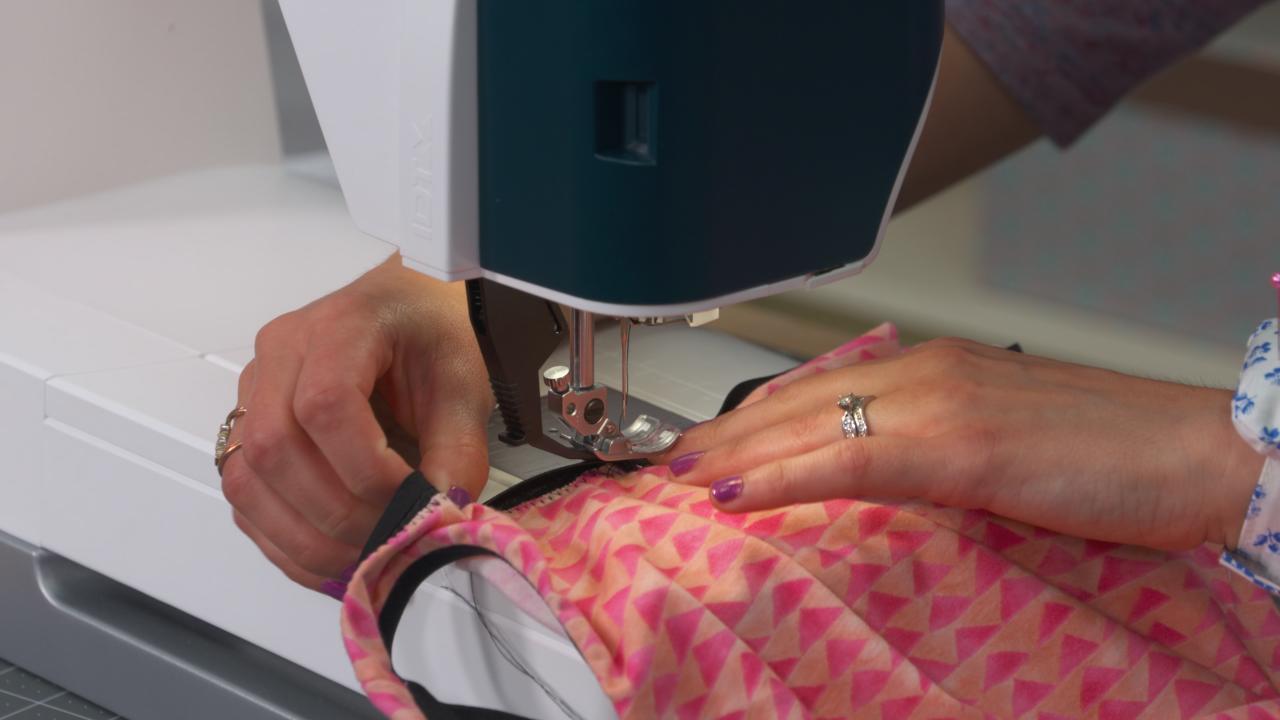
Video Player is loading.
Fold over elastic is a great way to bind the edges of a garment in areas that require stretch, like the neck opening or armscye openings on a knit top.
In this video, Nicki Lafoille shows you step-by-step how to sew fold over elastic to these areas.
Fold Over Elastic
Nicki begins by explaining what fold over elastic is and how it is different from standard elastic. For more information on elastic, check out the complete guide to elastics.
Nicki also talks about some of the different widths and colors it can be found in. While it has two distinct sides, a dull side and a shiny side either can be used as the ‘right’ side, depending on personal preference.
Nicki then explains the two main ways that fold over elastic can be sewn into a knit garment in the neck and arm openings – in the round and in the flat. She begins by demonstrating how to sew fold over elastic in the round around the neck opening. Nicki explains how to measure in order to know how much elastic to cut to give you enough to overlap the ends, sew them together, and still have the elastic lay flat when it is attached to the garment.
She then explains how to quarter mark both the elastic and the shirt. This step is essential in making sure that the elastic is evenly distributed around the neck opening of the shirt.
She then shows how to sew fold over elastic to the edge of the garment, explaining what sewing machine settings to use, as well as what stitch, needle and thread is best. Attaching the fold over elastic to the edge of the garment in the method that Nicki shows is a multi-step process, however, she explains additional ways it can be done.
She then finishes by showing how to do the same process to attach the fold over elastic to the garment in the flat along the armscye opening and how to join and finish the edges of the elastic when this method is used.
Once you’ve mastered fold over elastic, move on to other elastic types with inserting and sewing elastic with ease.
Finishing of your raw edges with fold over elastic is a quick easy, and attractive way to bind those raw edges, especially on garments, because that elastic has such a nice stretch that it can curve around your armscye and neck line curves. So, to bind your raw edges on garments I have a neck line I'm gonna show you. So you wanna measure the raw edge that you're binding, subtract one inch, and cut your elastic to that measurement. And we wanna do it a little bit smaller than the edge that we're binding, so that it eases everything in really nicely and you won't have any gaping at your neck line or your armscye. So fold over elastic has a shiny side and a matte side, and you can use either side as your right side, just whatever side you decide.
Just denote that as the right side. So I'm going to use the shiny side as the right side. So the strip of elastic that I cut, I'm going to fold in half, and I'm gonna stitch my raw edges to create a loop because I'm binding this neck line in the round, meaning that my shoulder seams already stitched and it's just a circle that I'm binding. So I'm gonna stitch my elastic short ends, and you can use a straight stitch for this. Just add a quarter inch seam allowance.
And then I want to quarter mark my elastic. So folding it in half, I'm going to mark this center and then I'm going to fold it in half, matching the center with the vaccine. And I'm going to quarter mark the elastic and am gonna quarter mark my neck line so that all of the ease of the elastic is evenly distributed. Now to quarter mark my neck line, my front scoop is deeper than my back scoop. So I'm going to mark my center front and center back by aligning the shoulder seams.
And then I'm going to bring those center front markings together. And the quarter mark actually ends up a little bit forward of the shoulder seam. So I'm going to put the seam of my elastic at the back. At the center back. And you want to align the wrong side of the elastic with the wrong side of the fabric.
And when we stitch our first stitching line we're going to stitch with the right side of the fabric up. So you wanna match your quarter marks. We're aligning the raw edge of the fabric with that center line of the elastic fold over elastic comes in a variety of different colors and a variety of different widths. Five eight inch width is the most common width but it comes in between half inch and one inch widths. And if you're using it to fold over an edge the finished with of the elastic one when it's folded over is going to be half of the width that's on the package.
So I like to start at the center back and I'm going to select a stretch stitch on the machine. So you can use a zigzag. You can use a triple stretch stitch any kind of stitch that will give you stretch in the seam. I'm going to put my needle down so that when I start stretching this elastic It's not gonna pull my fabric out from under my presser foot. So I'm just going to stretch the elastic to match my raw edge link.
You don't want to stretch the fabric, just the elastic. So I'm stretching and I'm readjusting. And when this is going under the presser foot, we wanna put an even amount of pressure behind the pressure and in front of it so that fabric is just gliding under the foot. I'm going to try to keep the raw edge of that fabric right in the center of the elastic You can attach this fold over elastic in one seam just trying to fold the elastic over the raw edge and stitch it just with one line of stitching. But I like doing it with two lines of stitching because when you get the elastic stitch down with your zigzag stitch, the next step is just, is really easy because to fold the elastic over and stitch it around the raw edge, it's kind of difficult to get that raw edge to stay right in the middle And this neck line is wide enough for me to stitch this in the round.
You can also stitch it in the flat which is why I've got my other armscye side seam not stitched. For seems like armscye or for neck lines on kids' clothing where the round is just a little bit too small stitching it in the flat is a good option. So you wanna try to keep this raw edge pretty close to the center of the fold over elastic. And it has that little divot in the elastic to mark the center you want your zigzag stitch to stay on your fabric on that one half that we're stitching on. So you're going to see two lines of stitching on the wrong side of your garment on the right side, you'll only see one line of stitching.
And you can change this exact stitch to be a little bit narrower than mine. When you're working with nits, it's all about going slow and steady stop to readjust So the elastic is attached. Now the next step is really easy. All we're doing is folding that elastic over and I don't really even need any pins for this step. I'm just gonna go kind of slow and easy and we're just curving around, around our curves.
We don't have to stretch at this step. We're just stitching fairly close to the edge of the elastic. And I used a thread that matches my elastic. So you can see as it's coming out the back of the presser foot, that thread is completely invisible against my elastic, and I'm not stretching at all. At this point, I'm just easing that fold over my edge.
You can use any stretch stitch, a serpentine stitch triple zigzag, triple stretch stitch, regular zigzag. You can make it fairly narrow. You can even make it a little bit longer than this exact that I'm using, but you don't want to make it so long that there's not enough stretch in that stitch as it comes off the machine, our edge is nicely bound. It has a lot of stretch to it yet and it finishes off that ride really nicely. So you can see the armscye that I did and that black stitching is invisible against the elastic.
It's bound just like the snack line. So to do it in the flat like this armscye it's the same process. Measure your edge that you're binding. Cut your elastic one in shorter, but leave it open in one long strip and quarter mark, the elastic quarter mark your seam and stretch in between your quarter marks just the same way, and then stitch your side seam. The only thing is when you do it that way you will get the raw edges of your elastic are unfinished on the inside.
So if you feel comfortable taking a lighter to the end smear elastic, you can seal it that way. Or you can open up your seam and put a straight stitch align right along your binding. Either press your seam open or press it to one side and attach that binding to the side with just a straight stitch. So full over elastic is a great way to bind those raw edges. And it gives you a nice clean professional look on your edge while still having stretch around your armscye and your neck line.
Share tips, start a discussion or ask other students a question. If you have a question for an expert, please click here.
Already a member? Sign in
No Responses to “Fold Over Elastic Binding”