The Hong Kong Seam
Nicki LaFoille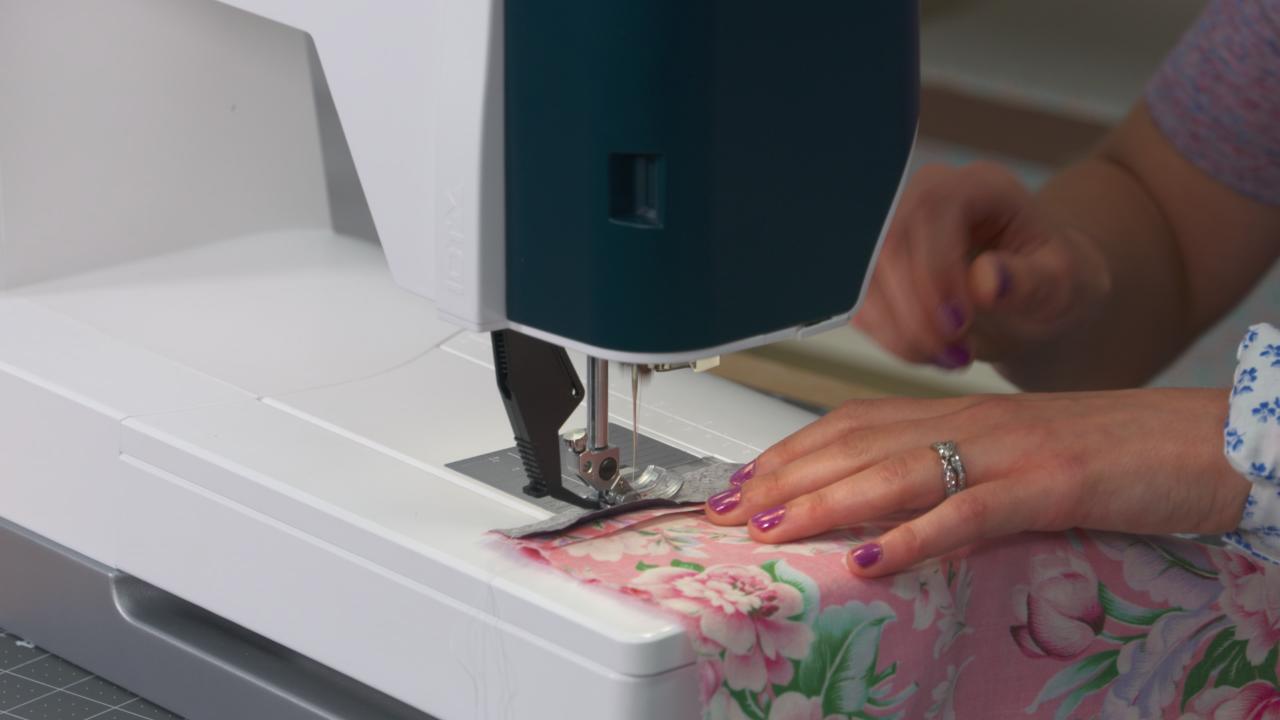
Video Player is loading.
A Hong Kong seam finish is a great way to finish a seam and add pops of color to your garments or projects at the same time. Nicki LaFoille shows you step by step how to do this finishing technique.
Sewing a Hong Kong Seam
To begin, Nicki shows an example of what a Hong Kong seam finish looks like and explains when and why it is typically used. When adding a Hong Kong seam finish to a project, the two seam allowances are finished separately, as opposed to together like some other traditional seam finishing methods. Because of this, it is a great technique to use on bulky or hard-to-work-with fabrics. While this step-by-step tutorial shows how to do this seam finishing technique on basic cotton fabric, you can also use a Hong Kong seam to finish seams when sewing silk.
Nicki begins by showing how to press the seam allowances open and flat. She then explains how the seam allowances are finished with a binding that goes over the raw edges. When sewing the binding onto the seam allowance, you simply place the binding strip and the seam allowance edge with right sides together and sew. Nicki shows how to do this to ensure that you are only stitching one seam allowance at a time and not catching the other, or the rest of the project, in the stitching line. She also talks about the seam allowance that should be used when stitching the binding strip in place.
Once it has been stitched, Nicki shows how to fold under and press the binding strip so that it finishes the edge of the initial seam allowance. The binding will then need to be stitched an additional time to secure it, and Nicki demonstrates how to do that as well. Once all of the steps have been completed on the first seam allowance side, they can be repeated on the other. While doing a Hong Kong seam finish on a garment or project adds a few additional steps to the finishing process, the professional look is worth the work.
The Hong Kong seam finish is similar to a binding, but the underside is left unturned, which greatly reduces bulk when you're finishing off seam allowances. It is great to use on heavier weight, thicker fabrics where turning your seam allowances under in stitching would just create too much bulk. This seam finish is often seen on high-end couture garments because it does add an extra step in the process, but it comes out beautifully clean and crisp on the inside of your garment. And it makes the inside of your garment really strong and stable because these raw edges of your seam allowance are completely covered and finished so everything is nice and strong and stable. And you want to choose a binding fabric that is a very lightweight fabric so you're not adding any bulk to your seam allowance.
Typically, fabrics for the Hong Kong seam finish include silk dupioni, organza, voile, cotton lawn, but you can use anything that's lightweight and won't add bulk to your garment. This seam finish is typically seen on unlined coats and jackets, where the inside of the garment gets a lot of wear and tear. So this keeps everything nice and stable on the inside, but you can use this seam finish on any fabrics you want and any garments you want, dresses, shirts, pants, anywhere you want the inside of the garment to look as beautiful and crisp and professional as the outside. So to do this, you're gonna just stitch your seam using your 5/8 inch seam allowance or whatever seam allowance you're using and cut your bias strips one inch wide and as long as the seam that you're binding. You may need to join your binding strips using your diagonal, using a diagonal seam.
And we're going to push everything off to the left so that we only have one seam allowance layer that we're working with at a time. You're gonna take your bias strip and align it with that one seam allowance. I'm gonna stitch that using a quarter-inch seam allowance. And again, we are just stitching through the one seam allowance layer. And then if you have an excess of your binding at the end, trim that off.
And then we're going to press that binding up. And you can use a contrasting color binding if you want the inside of your garment to have a little pop of color. That's a really fun detail. So we press that up. And then we're just going to wrap that binding around the raw edge.
And when we stitch again, we're going to stitch from the right side. So I'm gonna put my pins on the right side. And you can leave this quarter-inch seam allowance just as it is. You can trim it down. If you're using a fabric that is fairly heavyweight and bulky, you can trim that down to just get rid of as much bulk as you can, or you can just leave it as it is.
Now, to stitch and secure that raw edge of our binding, we're going to stitch either in the ditch or top stitch right along that binding. So stitching right close to that stitching line, but on the binding. If you have an edge stitch foot or a stitch in the ditch foot, that's very helpful here. And I'm using a contrasting thread so you can see where I'm sewing, but you would use a matching thread to kind of hide this stitching line. And then that is secured.
And if you have any excess on the wrong side, you can trim that down, again, just to reduce as much bulk as you can. And then you'll do the same thing to the other side. So you'd flip it around and then get your other seam allowance, so you're stitching just through the seam allowance and the binding. And then when everything is pressed and clipped, your seam allowances are bound, so the raw edges are completely encased and the inside of your garment looks beautiful and professional. And as I mentioned, it does add an extra step to your sewing.
A lot of times, I will just zigzag stitch my seam allowances on the inside because I want to get done with it. But this really is very easy to do and it adds a little extra time, but it is, it's easy. And the professional look that it adds to the inside of your garments is really worth it, especially if you're using your heavyweight fabrics. And then the inside of your garment looks as beautiful as the outside. And that is as easy as it is to do the Hong Kong seam finish.
Great tutorial. One thing you should mention is that the fabric applied to the seam allowance should have the same fabric care requirements as the garment that it is applied to.
The binding had raw edges. Wouldn’t they frey after a few washes? Thus, would it be better to sew the binding on with a zig zag stitch to address this?
Finally got it
Couldn’t get the video to play!
Hi Nikki. Could I sew binding to raw seems first, then sew seems together? Or must it be done as you showed? If so, why? The why would help me understand and remember. I have trouble with my grip, so it would be easier for me to sew the seems last. Thanks Anna and thanks so much for your very informative video
But there is a raw edge on the inside of the binding... I have seen garments with seams bound using bias tape such that there are no raw edges to the binding. Which is more common?