E
How to Sew a Pillow and Sewing Perfect Corners
National Sewing Circle Editors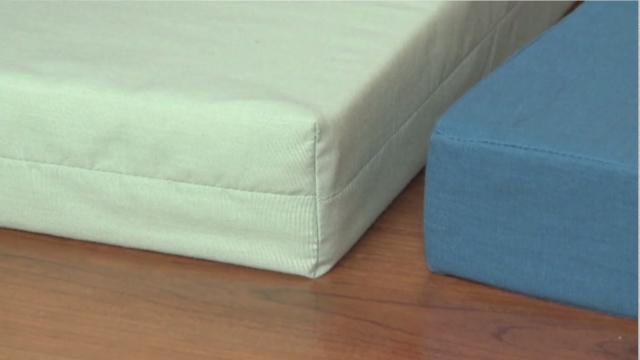
Video Player is loading.
Nicole LaFoille teaches you how to sew a pillow, discusses different types of pillows and shows you how to perfect the corners. You can make a knife edge pillow by stitching two fabric panels together along the edge, and a box edge pillow by joining a front and back panel with a continuous side panel strip.
Pillows are one of the easiest and quickest ways to update your home decor. There are tons of different pillow types you can make. One of which is the knife edge pillow, which is made simply by stitching two fabric panels together along the edge. And this is a great, quick, easy pillow type to make. But sometimes you get these floppy dog ear corners and that's because the pillow form fills up the pillow center first and leaves the corners empty.
And you can fix that by stuffing the corners with fiber fill or you can easily just taper those corners down. You can do that, before stitching anything take your panels one at a time and just fold them in half, one way and then the other. Matching all of your edges and matching these four raw corners together at one edge. And then you'll want to mark halfway along this edge and that edge. Halfway between the folded edges and those raw corners.
You'll also want to mark at this corner a half inch in from this edge and that edge. So a half inch was right there. And then just connect those marks from the edge to the corner, back to this edge, and then trim that corner off. And that will just taper those corners down so that it's not such a stark 90 degree corner. You'll do the same thing to your other panel and then just stitch them together along this edge.
So you get this sort of curved corner, which when it stitched we'll end up like this. So the form fills up those corners a lot nicer. Now another pillow type you can create is the box edge pillow, which is created with a front and a back panel and this side panel strip. And you'll see a lot of times, box edge pillows made with one long continuous strip around the side edge. And it'll just, the form will fit better if you create separate side panels for each of these edges.
So when you're making any type of pillow you want to measure the actual pillow form instead of relying on the measurements given on the packaging. So you'll want to cut a panel for your front and back and then separate side panels to these measurements. So you'll have your front and back and for these short side panels, you'll want to stitch them together along the side the short edges like this. And I have one more to stitch. You can see I've already marked my stitching lines.
So we're actually going to start and finish stitching a half inch from the long edges. We'll stitch that. And you'll press your seam open so that everything is stitched together in this continuous strip. And then on your front and back panels, you'll also want to mark a half inch from each of these edges. So I've already marked them.
So you can see it's a half inch in from those edges marked right at that corner. And those marks are just to align our strips. So you want to align that half inch mark with the point where we stopped sewing, which will let your raw edges align as well. So we'll get everything aligned along this long edge. And you can see when you're pivoting these side panels around the corners the way we've stopped stitching a half inch from that edge just makes it a little bit easier for us to pivot that around.
We're going to and when we stitch these side panels we're not going to stitch it all in one go you want to start stitching right at this point where we stopped stitching and where we've matched that half inch mark. Stitch one long edge and then end stitching in that point again. So that when you go to stitch the next edge it's easier to sort of manipulate that other corner around and so that you can make sure, when you begin stitching on this edge, you get your needle exactly where you need it. So we will stitch one corner to demonstrate. We're going to end with our needle down right in that point.
Then you can lower your or shorten your stitch length, if you need to, when you approach the corner to get everything right in the exact place you need it to go. So that when you've stitched this corner and you turn it right side out, you get that nice edge there, where everything is nice and matching. And these seams actually also help give your corners a little bit of stability too. So you're going to do the same thing around all of these edges and do the same thing to stitch your back panel on. And then it'll turn out looking like this.
So you can see your nice corners, your nice side panel. It fits this form perfectly. Now another way to get the box edge look without that side strip is by boxing the corners of a knife edge form, or a knife edge cover. So you start out the same way as if you're making a knife edge pillow form, just by stitching two square or rectangular panels together around the edge. And then you want to take your corners and open them up and flatten them, so that the seams are matching.
And you can put a pin in one side to make sure everything is perfectly matched. And then you want to stitch across this corner. However wide your side panel is when the measurement across the corner matches your side panel measurement, draw a line and just stitch across the corner. You wanna back stitch all the way to that edge. There we go.
Then you'll just trim that corner off to about a quarter to an eighth inch seam allowance. Then when you turn that corner right side out, you get that nice boxed edge look. And when you get a form in it, it looks like this. You have your seen along each edge in your corner, nice and boxed. Now, when you're cutting your fabric to box the corners for a form like this you want to take the front panel measurement and then add the width of the side panel, plus your seam allowances.
Because when it stitched and curved around this form you have half the distance here and half a distance on the other side. You want to do that for the width and the length And there's no end to the pillow types you can create just by changing up the fabric, the trim, the pillow type, and the material that you stuffed the pillow with. So you can stuff your pillows with fiber fill, which is good for pillows that are sort of oddly shaped and that don't have standard pillow forms for. So this is stuffed with fiber fill, you can see it's kind of squishy and you can stuff it to be fuller or less full. Or you can use a standard form, which is what's inside this pillow and this one.
Or you can use foam pillow forms, which are these guys. So you can see how the look has changed just by changing up the pillow form material. So take these pillow tips and create some perfect pillows for your personal style.

Share tips, start a discussion or ask other students a question. If you have a question for an expert, please click here.
Already a member? Sign in
No Responses to “How to Sew a Pillow and Sewing Perfect Corners”