E
How to Use a Seam Ripper
National Sewing Circle Editors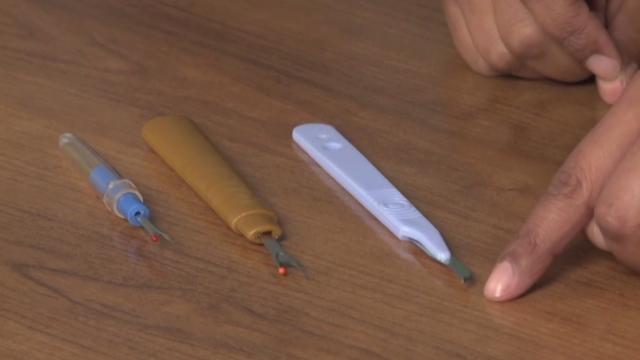
Video Player is loading.
Megan Smith teaches you how to use a seam ripper properly without creating holes or tears in your fabrics. Learn the most efficient ways to use your seam ripper as well as see what seam rippers work best for specific projects.
Related Article: Essential Sewing Tools and Supplies
No matter what your skill level, I find that the handiest tool in your sewing room is your seam ripper. Over time, I have found that using your seam ripper isn't as easy as just putting the seam ripper to the thread. I often found that when I was using my seam ripper I had holes, pulled fabric, you name it, and I really just had a bigger mess than I had anticipated. Over time and with a lot of practice, I came to realize that there actually is an efficient way to use your seam ripper so that you can move on with your project fast, quickly. I will show you now how to best use your seam ripper.
What you'll want to do is push the long sharp edge of your seam ripper through every other stitch. Depending on how long your stitches, you may be able to actually do every third stitch, every fourth stitch, and sometimes even every fifth stitch. Now the stitch length doesn't have to be exact. I'm doing probably every fourth or every fifth on this example here. And you'll see, we'll get to the end here.
Probably every fifth stitch. We'll show you that that should work out for you. Okay. So once you've done that, can turn your fabric over and you'll see that there's actually a long piece of thread that was holding your seam together. If you gently pull that piece of thread and it really doesn't take much effort, it shouldn't, you'll see that your stitch easily comes apart.
You can take your fabric apart here now and you'll see that you have your fabric separated but you have these straggling pieces of thread here that can easily be removed by brushing them away. But I find that sometimes it actually takes longer to do that than just using my tape lint roller. So I'll take my tape lint roller and gently roll it over the leftover thread there, and you'll see that it's been removed. I left a couple pieces there because I can actually show you, if you don't have a tape roller handy, you can actually just use regular household tape to take those threads up as well. And you'll see, takes any leftovers.
I'm just going to check to see if there's any stragglers there. Nope, we're actually good to go. We can start our project again. Now there are actually a lot of seam rippers on the market that you can choose from, depending on the project that you'll be doing. I actually use this seam ripper today.
It's a really basic seam ripper. You can find it mostly in beginner sewing kits anywhere. I actually love it because it's fits comfortably in my hand, it's really easy to use, and I find that it really works on most of my sewing projects. We also have this seam ripper here. As you can see it has a very basic ripping edge just like the first, but it has a longer, heavier handle.
I sometimes find that depending on the project, especially for my heavier projects, longer projects, I need this bigger handle for a better grip. There's sometimes heavier threads and just a lot of seam removal that I might need to do. So this heavier handle really helps me to get a good grip on my seam ripper so that I can really get in there and get it done. Lastly, we have this seam ripper here. As you can see it's very different from the first two.
It's longer, it's thinner and it has a different ripping head here. I'll show you how to use this seam ripper. It's actually sometimes called a surgical ripper, and the reason being is because it works really well on serged seams. You can see this is serged here, this seam in this heavy denim, and this ripper, you actually just take along, that you put in between your fabric and run along your stitch there, and that'll remove your stitch. And the curved edge actually prevents from holes being put in the fabric since you're between fabric there with the ripper.
And I will demonstrate on this fabric here. And this is a lighter fabric than that denim so it's, it'll be a little bit harder to get the stitch out. But as you can see, just this motion here. You put the seam ripper through the fabric there and then just pull. And you can see that that's coming out nice and easy, actually.
Let's see. And there's a little snag there, there we go. I'll pull this here and pull your fabric apart, gently and easily. And again, you can see that we have our stragglers here, so I'll use my lint roller to remove those little pieces there. And again, I will show you you can also use basic household tape to get those out.
Okay. So I hope that going forward, you can use these simple solutions and have fun with your projects and keep sewing.
Share tips, start a discussion or ask other students a question. If you have a question for an expert, please click here.
Already a member? Sign in
No Responses to “How to Use a Seam Ripper”