E
Scrabble Board DIY Throw Pillow
National Sewing Circle Editors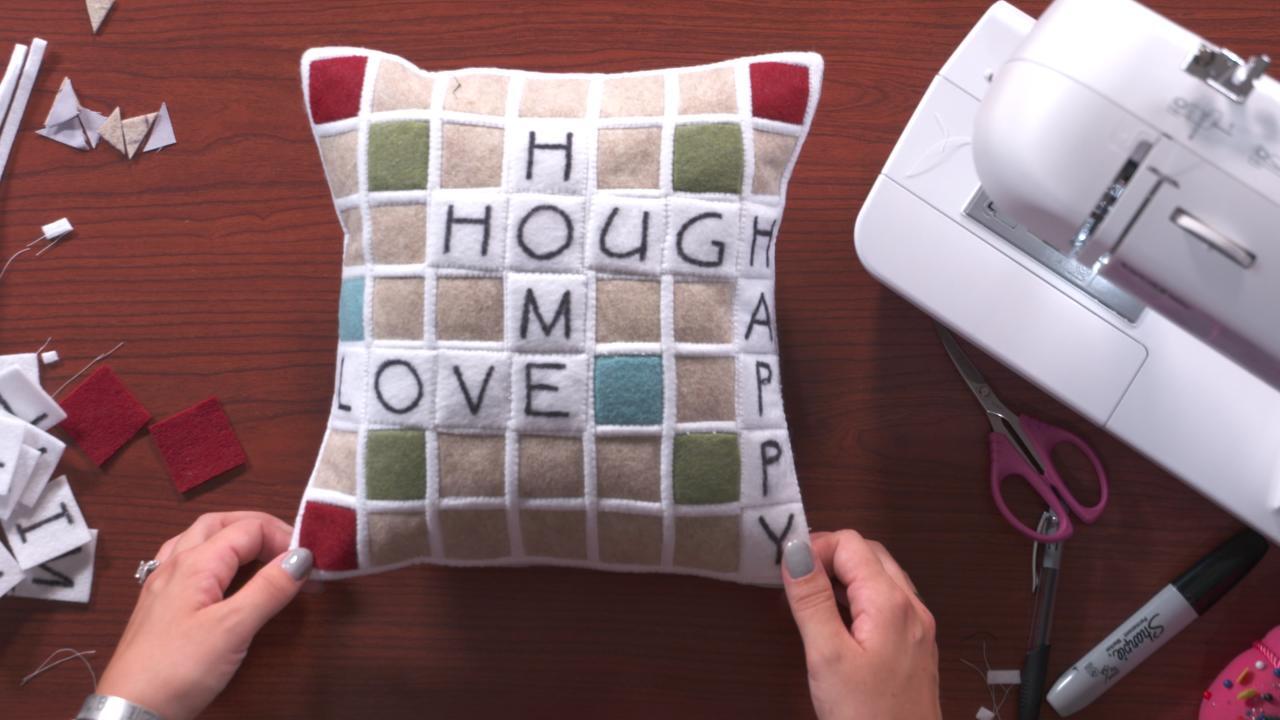
Video Player is loading.
DIY throw pillows are great ways to either add to your decor or someone else’s by giving them as a gift. Learn how to make a fun pillow in the shape of a Scrabble game board that you can personalize and customize to fit any room.
Plan Ahead
The trickiest part of this DIY throw pillow is planning out the tile layout of your pillow front. Ashley Hough begins by explaining how to draw a tile board and plan out your words so that everything fits on the pillow and intersects the way you want it to. She then explains what size if letter tile she uses for the pillow front and how to determine what size of pillow needs to be made in order to fit the desired words on the board. Ashley shows an example pillow using her last name but explains how you can customize the pillow to fit any name or you can make the generic pillow she demonstrates using the words ‘happy’, ‘family’ and ‘love’. You can also get more ideas for creative projects to make once you’ve mastered your DIY throw pillow.
Fabric and Construction
After the pillow front has been planned out Ashley shows how to construct the pillow front from felt to look like a Scrabble game board by first placing several colored squares in the background and then placing white strips to form the tile squares. She explains how to stitch the strips in place using either a blanket stitch or a zig-zag stitch and shows how securing those strips holds the background squares in place. She then explains how the letter tiles are stitched in place as well. Once the pillow front has been completed Ashley shows how to finish the pillow by creating an easy overlapping back that allows you to insert a pillow form. Once you’ve mastered this fun DIY throw pillow try another throw pillow project!
A scrabble pillow is not only a fun way to sort of add an accent pillow to your room, but you can also personalize it with what you put on it, whether that's for yourself or if you're gonna to give it to somebody as a gift. So you can see, I have my Scrabble pillow here. I have my last name, which is the main word yours why I have it sort of centered and going this direction and I have just some other small words going around building off of it just as you would in the game of Scrabble and so this is really easy sewing. I've done the whole front of the pillow using felt, the back of the pillow is made using just a simple cotton fabric. So construction-wise, it's pretty easy.
The hard part, I guess, comes in the planning of how you want your words and letters to all fit together. So before you do any cutting or any sewing, I recommend getting just a piece of paper and a pen and trying to figure out what it is you want on the front of your pillow. So obviously with mine, I did, my last name was the main word, but of course, not everyone's gonna to be able to look at this pillow and make it exactly like I did, unless your last name is also Hough. So for one that is a little bit more generic, we're gonna to start with the word family as being our main word that we use. And then I still want to use happy because I use that on my other pillow.
And I think that describes family as well. So I used happy and I'm also gonna to use the word love. And so this is the way that I have laid out the words that I'm gonna to put on my next pillow. Now, this is obviously something where you can customize this to whatever it is you want it to say, whether you're adding your own personal last name into it, the name of somebody you're giving it to, but this is the first step in making this project is to plan out how you want your letters to go. Because this is gonna to decide how big the front of your pillow is going to be because each one of these letters has to be a tile on your Scrabble board.
So if it's easier for you to plan it out, getting using some graph paper, you can do that as well. This was just a little bit larger scale. So for me, I know that I need at least six tiles going across, going this way and five tiles going this way. Now I wanted to have a little bit of space on either end, on the top and bottom, because I didn't want my board to be so small. So I actually did seven by seven tiles on this pillow here.
So you see, I have one, two, three, four, five, six, seven going across this way, seven gonna across this way. My tiles are 1 1/2 inch squares. So that means the front of my pillow needs to be 10 1/2 inches. So that's 1 1/2 times seven, that's how many I need across, gives me 10 1/2 inches. So if your design that you came up with for whatever you're putting on the front of your pillow has more or less tiles.
You just need to multiply that number by 1 1/2 inches for your actual letter tile piece. 10 1/2 inches is your finished board. We also need a seam allowance added. I did half inch seam allowances. It makes the math really easy, which means I need an 11 1/2 inch square to start with.
So I have an 11 1/2 inch square here. And what I've done is I've gone ahead and marked all of my lines. These are just essentially drew a grid on my piece of felt and marked out seven going one way, seven going the other, and I have my half inch seam allowances all the way around. So it's very easy to just draw your lines straight on your fabric. I just use my regular pen.
I'm not worried about using anything that needs to be removed 'cause all of this is gonna to get covered up when we sew. All these little colors here, I just sort of add added randomly. If you look at an actual Scrabble board you have all sorts of different color tiles for double word, double letter, triple word, all sorts of things, and they're all different colors. And so you can make these blue, red and green, sort of traditional Scrabble board colors or you can make them the color of your decor if you want to sort of change it up that way. But they are just added in there at random in the background of the letters that actually spell out what you want.
So again, if you look here on mine, they are just sort of randomly placed around and it wouldn't make sense to put one underneath one of our tile pieces, 'cause you wouldn't see it anyway. So if we go back to our original design here, this is where all of our letters are going to be. So we want to randomly place our other colors around so they're not underneath any of those letters. Now, when it comes to the letters, these are our tiles. So these are 1 1/2 inch squares.
And I find that it's much easier to use some sort of pen or marker or even some paint to do our letters, rather than trying to stitch them just because it is such a small piece. So for me, I just took, and I found stencils that have letters that are approximately one inch because I have 1/2 inch squares. And then I just used, you can use a Sharpie marker, you can use a fabric marker. Definitely if you plan on laundering this pillow at any point, you'll want to use a permanent fabric marker or some sort of paint, and you just draw on it on your felt through the stencil. So I've already done some of my letters here and this spells out my happy family and love.
And again, I've already done those here and what I wanna do before I do any sewing is make sure everything fits on my board because I don't want to have to rearrange anything later. So I'm just gonna to lay these out on here, spelling out my words, and I've just randomly placed my different colors. So I may find that I need to move some. So you can see, I have happy family and love. I have them spaced out, so I have some extra space on the top and bottom, but you can see that a couple of 'em are being covered up of our colors are being covered up.
So I'll wanna actually move them and I can put them anywhere I want. I can just move it over one. On an actual Scrabble board, I think there are places where they're supposed to be, but for your pillow, it doesn't really matter. And then I'll take a move this blue one over here, just like that. And now I would have all of my words on there, and nothing is covered up as far as my color placement goes.
So before you're actually going to to place your tiles, it's the last thing you're actually gonna to sew on there, we need to add all of the white divider lines. So now that I know that this is how my board is going to to be laid out, I know I have all my colors in the right position. I can remove my letters and actually sew my white strips in place. But before I do that, because I know this is the way my board goes, I need to put in a couple of pins. So I just remember what the top and bottom is.
Or honestly, you could take your your marker and maybe just put an X. So you know that this is the top. That way, once you remove all of these tiles, if your thing gets turned while you're stitching it on, you don't forget what the top is because obviously the way your tiles laid out, need to fit within all your different colored pieces. So make sure you know what the top and bottom is and go ahead and remove your tiles. So here's our final product again, you can see we're adding all of these white strips to cover up that grid line that we drew on our main pillow front.
And I want to add them in a way that they obviously get stitched in place, but they also hold down our colored sections as well because there's no reason to stitch things twice. So I've already gone and precut a bunch of white strips. These are just quarter inch strips by the length of a piece of craft felt, which is usually about 12 inches. So that works out perfectly because we have 11 1/2 inches is our pillow front. So I don't need to worry about trimming any or having to piece together something that's too short.
I know they're going to be plenty long enough and even have a little bit of overhang. It does not matter where you start and it comes to placing these. If you wanna start in the middle and work your way out, that's totally fine. I personally like to place all of my vertical lines first and then do all of my horizontal lines. And so I'll just show you how I stitch these in place.
First thing I'm gonna to do is just pick a line to start and I'm gonna to make sure that it lines up over the line that I've drawn. Because I have a little bit of extra wiggle room between the length of the pillow-top and the length of my strip. I just know that I can overhang a little bit and be just fine. If you have 'em cut exactly the same length, make sure that you have it lined up to where you have enough white that goes into the seam allowance on both sides. I'm going to stitch this on using a blanket stitch, which means it's going to be stitches that come along the side of my white strip and then take a bite into the white.
Come along the side, take a bite into the white. That's the stitch that I prefer to use. You could also use a zigzag stitch, but I'm gonna show you the blanket stitch. So I've already got my machine set to a blanket stitch. I'm gonna to take this over to my machine and do some stitching.
I can get this in place underneath my presser foot and I didn't bother to put any pins in place simply because the strip is only a quarter inch, and it'd be very hard to try and put any pins in place. So I have my white quarter inch strip of felt lined up over the top of the line that I've drawn and I'm simply going to do a blanket stitch all the way along this edge because the square, colored square is 1 1/2 inches, which is exactly the size of the square that I've drawn. And the fact that our strip that we're sewing on is a quarter inch wide, it overlaps, which is how our colored squares get attached while we sew these white strips in place. So I'm just stitching about every square, lifting up my little strip here to make sure I'm still in line right over the top of the grid line that I've drawn. Stitch about another square's length or just to my finger, I can pick it up and check.
and keep going. Because it's so easy to pick it up and check and also because we're using felt, which sort of sticks to itself while we're sewing, those are the reasons why we don't have to worry about putting any pins in place. And again, I'll make sure my colored square is lined up within the grid lines drawn, overlap the edge with my white strip and sew right along. And I'm not worrying about back stitching at all. I'm just stitching right off the edge because I've stitched into the seam allowance.
So those edges will further get stitched in place when our actual pillow gets assembled. So I'll take this off the machine here and you can see I've stitched a nice blankets stitch all along one side. My little color squares are getting attached because they're underneath and I'm gonna take it back over to the machine and stitch my next one. I'm gonna to do the next one right on this side here because I want you to see how a couple, there's a couple of different ways that you can attach your next strips. You can either work your way across and stitch on this side here, 'cause this is the way that our blanket stitch goes, it's stitching and then taking a bite over.
But what I do want to recommend is that you stitch a colored square down entirely first, meaning that I need to stitch on this other side of this white strip, so I, I secure this this blue piece down entirely before I move on. So because of that, I need to just flip my piece around, like so, and now I can take it back to my machine and start stitching right along here, so I can secure this blue square entirely. Now, while I'm stitching, I'm going to be stitching right along the edge of this white strip on this side. It's not actually going to to catch this green square yet, so I don't have to worry about him. So we'll stitch one more long white piece in place, and you'll see how our board is going to start coming together quite nicely.
Let me make sure everything is lined up as you go. Because you had that grid mark or grid lines drawn on there, it's really easy to be able to just sew for a little ways, make sure things are lined up and then keep going. Now, if, while you're stitching this and you're going along, if at any point your lines get off just a little bit, it's entirely up to you as to whether or not you, you know, rip it out or start over or try to fix that. Or if that's just gonna to sort of add another decorative element to it, sort of make it your own, knowing that there might be some small imperfections that just help make it more personal. Again, I wanna make sure my colored square is laying nice and flat.
I have overlapped my white strip. And I'm gonna go ahead and stitch right off the edge. And you see just like that, our board is starting to come together with all of our divider squares. And this is really the most time consuming part, because you're going to stitch all of your vertical, white pieces in place, and you're going to stitch on one side, go back and stitch on the other, so it's gonna be completely secured down. Go ahead and rotate your board, and then do all of the strips in the other direction.
Again, this is what it would look like when you have all of your white strips sewn in place. Not gonna make you watch me do all of those, 'cause that would get a little bit tedious. But we are gonna pretend that we have all of our white strips sewn in place. We would then go around and if your strips were longer, like mine were, trim off all of these extra little ends, like so, and now it's time to place our letters back on. So this is where in sewing this, you can see I've, I've twisted and turned it multiple times.
I need to make sure that I write my board back up, which we marked with our X, which is why it's important to put that mark there. So I know that's the top so that I can then put my, my letters back in place. So my first word that I put across the middle, I have to find my letter was family. I was gonna move this pin here. So if all of our white strips were sewn in place, we would simply just take our letter and put it on whatever square it is that it needs to go on for our words to fit.
And we would stitch it in the exact same manner that we just did with a simple blanket stitch. So I'll just go ahead and take it over and just show how you can do a blanket stitch around this tile, pivoting of the corners to help make a nice, finished look. So I like to start in about the middle of one of the sides of my squares. I'm going to stitch down to the corner of my tile and I want to stop when my needle is right at the intersection of what would be those white cross lines on our board. Stop with my needle down, lift up my presser foot and simply rotate my board.
I can put my presser foot back down and go ahead and continue stitching, all the way along to the next corner. I kind of slow down as I get to the corner, 'cause I wanna make sure I stop right at that intersection. My needle is down and lift my presser foot pivot my work and continue sewing. One more corner up top here. And I will stop at that intersection, pivot, stitch along the top.
Last corner. And because I started in the center side of this square, all I'm going to do is stitch right down to where I started. You kind of see where the thread tail is. That's where I started. And I'm gonna go ahead and go just a couple of stitches past it.
And I'm sort of just stitching over where I started and that secures my letter in place. Take this off and trim the threads. And this is how you would attach all of your, your little Scrabble letter pieces. Wherever they lined up on your board, go ahead and place one, stitch it, place one, stitch it. Now this is the part where if you want things to be a hundred percent straight, you definitely should probably use some pins.
Maybe even use some basting spray, something like that. But I noticed personally, even playing the game of Scrabble, I have never had all of my tiles lineup perfectly straight. So having them a little bit tilted on some of these squares I think just made it look a little bit more realistic and that that's how they would probably look on your Scrabble board. They'd have a little bit of a tilt to 'em. That's gonna to bother you again, use a lot more pins or some basting spray or something to hold it in place.
Once you have your entire pillow front constructed, it's time to actually make the back of your pillow. So you can insert a pillow form. I've just done an overlapping pillow back. I find those are really easy on small pillows like this, on decorative pillows that aren't gonna get a whole lot of use. They're really easy to construct and really keep that pillow form in place nicely.
So to do this, you need two pieces of your backing fabric or back of the pillow fabric as you will. They need to be the same width as your pillow front. So this is 11 1/2 inches wide and they need to total 11 1/2 inches in height as well, but they need to overlap. So I've cut two pieces that were 11 1/2 inches this way. And eight inches this way, what I've done is taken and done a double fold hem along one raw edge, which means I just folded it twice and stitched it.
And now I have two nice finished edges. These will overlap to become our pillow back. What we need to do is stitch with right sides together. So we can go ahead and take our completed pillow front, our two pillow back pieces with right sides together. And I simply need to line up the outer edges, all the way along here.
I'm not necessarily worried about where these are in the middle, as long as they just overlap. So I've got my outside edges all matched up and I can just take this over to my machine and stitch the perimeter. Again, I'm using that 1/2 inch seam allowance because that's what I accounted for in the initial design of my project. So I'm gonna to take this over to my machine and sew it. Now, I've just put my presser foot down and remember we haven't been stitching all of our other previous stitching that we have done has been that blanket stitch.
You wanna make sure you remember to put your machine back to just your normal straight stitch with your 1/2 inch seam allowance before you start stitching, 'cause that blanket stitch is not something you wanna use to sit your perimeter. So now that we have our machine back to our regular straight stitch, we can go ahead and stitch the perimeter. And once we get, as we sort of approach this corner here, on my presser foot, I know where to stop so that I stop exactly a quarter inch from the edge. If your foot doesn't have something like that you can mark your one quarter inch seam allowance. When you get to the corner, just like when you were stitching around those tiles on the pillow front, you wanna stop with your needle down, lift up your presser foot and pivot, and then continue stitching.
This will help ensure you get nice crisp corners when you actually turn your pillow right side out. So we'll just continue stitching all along the pillow perimeter. And I'm gonna stop a quarter inch away. My needle's down. I can pick it up and pivot.
And then I'm just going to stitch the remainder of the perimeter of this pillow. As they get towards the end of stitching the perimeter of my pillow, you can see where I began my stitching. All I'm going to do is take and overlap my end stitching just a couple of stitches and that's gonna go ahead and secure that, just like we did when we were stitching our tiles in place. Once we have this stitched, what I wanna do is in all of the corners, I'm going to take my scissors and I'm going to clip diagonally right across this corner here, clip that away, and what that's going to do is when I actually take my pillow and turn it right side out, because I'm using that felt and it is kind of thick. It's going to help those corners push out much nicer than if I didn't clip those corners.
So with all four corners clipped, you can turn your pillow right side out, like so. And obviously yours would have a completed Scrabble board front, like the one I've been showing, like so. And when you get to your corners, you can either use your finger, if you have a turning tool, you can use that. You can use the tip of your scissors, if you're very careful. But just like that, you have a very nice pillow back.
You can very simply insert your pillow form. These overlap enough that your pillow form is not going to come out and you have your little Scrabble pillow. So again, we have our finished product here. We have our completed Scrabble board front and we have our pillow back and see, I've just inserted a pillow form. You can either get a store-bought pillow form depending on the size that you made.
Or if after you've done the math to figure out what size of board front you need to make, you may have to make your own actual pillow form, which is just as simple as putting together two pieces of fabric the size that you need, putting some stuffing in there and then inserting that into your pillow. So whether you make your own pillow form or use a store-bought one, you can insert it and just like that, you have a really cute personal touch to add to either your home or to give as a gift.

I would find it helpful to know the kind of fabric used.
It would be helpful if the camera was angled at the front and of the presser foot so as to see the piece being stitched. When you were using the blanket stitch it was not possible to know exactly where the needle was. Thank you