xx
Sewing Sleeves for a Better Fit
Sydney Franklin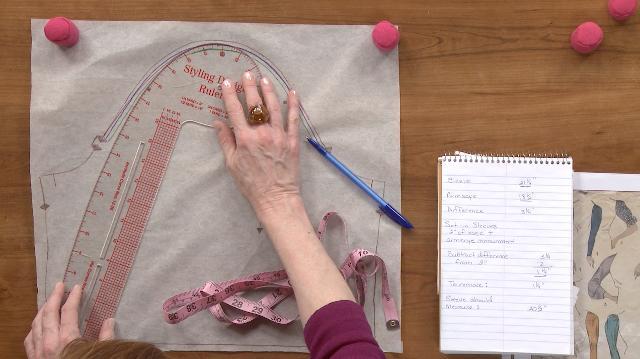
Video Player is loading.
When it comes to garment construction, sewing sleeves can be one of the most intimidating parts. Jill Case shows you how to achieve a better fit and get a smoother sleeve cap when sewing sleeves by removing some of the excess ease built into patterns.
Different Types of Sleeves
Whether you are making a shirt or a dress it is important to understand the different kinds of sleeves that can be used and how they are constructed or inserted. Jill shows many different kinds of sleeves that can be found on garment patterns and explains how they can be grouped into two different categories. When learning how to alter sewing patterns it is good to know what the end product looks like as well as what the pattern pieces look like that make up a garment section. This can give you a better idea of where to start your alterations. While most of the sleeves shown in this video were for sewing projects for women, sleeve adjustments can be made on mens’ sewing projects as well.
Pattern Alterations
When making alterations to pattern pieces before sewing sleeves, it is important to know what the markings on the pattern pieces are for. Jill shows where the important dots and notches are on the pattern pieces and explains what they are used for. Jill then explains the math behind how much ease you can remove from a sleeve cap and why. She shows how to measure both the sleeve pattern piece as well as the front and back sleeve opening sections. After those measurements are recorded she explains how to determine the maximum amount of ease you would want to remove from the sleeve cap to achieve a smooth look but still get a comfortable fit. Once that has been determined she demonstrates how to use a curved ruler to create a new cutting line for the pattern piece. She explains where to start and stop the new line as well as how far away from the old cutting line it should be.
Today I'm gonna talk about sleeves and how to reduce the ease in the sleeve cap to get pucker-free sleeves in your bodice and dresses. But first I wanna talk a little bit about sleeves. There are two classifications of sleeves. There are the set-in or mounted sleeves, which are the most common, and there are sleeves that extend from the waist. So set-in sleeves are almost an infinite variety.
You can have cap sleeves. Raglan sleeves are considered part of the set-in sleeve. You can have bell-shaped sleeves, tulip sleeves, bishops sleeves, leg-of-mutton sleeves. And the type of sleeves are almost whatever you can think of you can do. For the sleeves that extend from the waist, that's exactly what they do.
So it would be like a kimono sleeve or the dolman or bat wing sleeve. And then this is a great example of a sleeve that just extends from the waist and into the sleeve. And what was popular in the 30s and 40s for pattern manufacturers is they would create sleeve patterns once or twice a year. And you could buy these individually and then you could use the different types of sleeves to dress up your other Simplicity patterns, your bodice, or dresses. You could just add a different sleeve and change the dress.
And that was a really kind of a neat idea. They don't do that anymore. But to reduce the sleeve ease, it's really easy. First thing you wanna do. You wanna make a copy of your pattern.
Well, first lemme tell you about just the sleeve itself. Most of you probably know that the single notch is for the front of the sleeve and it would match with the front of the bodice. And then the two notches would be for the back. And so if you put those in wrong, then you're gonna have a wonky sleeve. So you wanna be careful to note those.
And then this, of course, is your top of the seam. This would meet the shoulder seam on the bodice. And then these are usually where you gather. And then we're going to measure the armscye. And we're going to add in our seam allowance on the shoulder.
So that would be about, that would be five eighths usually. Just gonna mark it. There, put these here. Secure it. And then we're gonna measure from the seam allowance.
So I mark that in green. And make sure. There. And then you would measure the entire armscye. Making sure you're on your right pattern line.
So I got 18. So I'm gonna write that measurement down and that's 18 and a half inches. And we can move that off. And then I'm gonna measure my sleeve, a copy of my sleeve. And, again, I'm gonna measure from the seam allowance and I'm gonna measure on the cutting line.
Just walk it all the way down. And yeah, that's 21 and a quarter. So I've got that measurement right here. That's the length of my sleeve. And then the difference between those two is three and a quarter inches.
So the general rule for set-in or mounted sleeves is that you want two inches of ease in the sleeve cap. So when we do a little more math, we take that three and a quarter measurement and subtract two inches and then we get one and a quarter inch. And that's what we want to safely able to remove without distorting the sleeve and making it look really flat and ugly. So we need to get rid of one and a quarter inch from the sleeve cap. So what we do there is, I'm only gonna be working in increments of a quarter of an inch from the cutting line.
So I've drawn my first quarter of an inch in blue. And you want to be sure the adjustment is made either before or to the notches. And you kinda just go from your cutting line and drop it down to your quarter-inch mark. And then you would. It kinda takes a little bit to be able to blend it nice and get a nice smooth line.
You can kind of see. There. And now I'm gonna take a different colored pen. Marker. And then you do the other side.
And, again, just kind of going to that quarter mark and then shifting the ruler to hit your cutting line. And then we just try to secure that. Then we're gonna see if we're on track. And we would, again, measure from the seam allowance line that I have there in red. Then we're gonna walk it along the pink line and see how much that removed.
And almost there. And I have 20 and a half. And I write that measurement down. And then we want to make sure that we've. Well, when you look at the sleeve cap, you'll notice that the pink line goes all the way down to the notches and then this pink line, it hasn't even reached that single notch.
And that's exactly what you want because there is more ease in the backside of the sleeve than there is in the front. So that worked out perfectly. And the new length following the pink line and then blending into the original line is 20 and a half. And that means that we've removed exactly a quarter of an inch out of the ease. Then what you would do is you would try your new sleeve out.
Either in your muslin or whatever fabric you have and mount it into your sleeve or to your bodice and check for fit. If you find that you need to remove a little more, it would be best to just work in an eighth of an inch increments, because if you take out too much, it just, it won't look good. The other thing to remember is that natural fibers tend to ease a little better. You know, that two inch of ease will most likely work well with natural fabrics and wools. Whereas synthetics kind of are a little more difficult to ease in.
And so you might need to take out a little more. And that, again, I would use just an eighth of an increment after you use your initial quarter of an inch increment. And that's how easy it is to remove ease from your sleeve cap. You just, I think the important thing to remember is to start with quarter of an inch increments from the top. And you just bring your curve down, your ruler, and you blend it back into the original stitching line and redraw it and blend it in, you know, nice to the original line.
And then cut it out and see how it works. And it's one of these measurements that I always do. Every time I get a new bodice or dress pattern, I always take these measurements, see how much ease I have in my sleeve and then remove it. And I almost always get a really nice looking sleeve and I hope you give it a try.
Share tips, start a discussion or ask other students a question. If you have a question for an expert, please click here.
Already a member? Sign in
No Responses to “Sewing Sleeves for a Better Fit”