Make a Fun and Easy Tooth Fairy Pillow
Stacy Grissom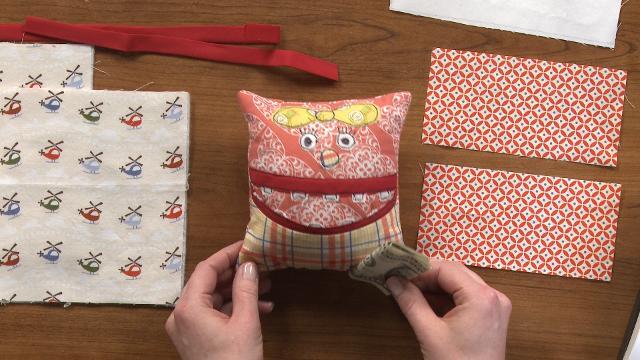
Video Player is loading.
When it comes to losing teeth, most kids are excited to leave the tooth under their pillow and see what the tooth fairy brings them. Whether your child is a light sleeper, or you just have difficulty finding the tooth under their pillow- a tooth fairy pillow is the perfect solution. Stacy Grissom takes you step-by- step through how to make this fun project.

Supplies
This tooth fairy pillow can be made in any size, which makes it a great fabric scrap project. Stacy takes you through all of the pieces of fabric you will need for this project as well as what other materials you will need, like fusible fleece and bias tape. Other supplies you will need for this project include tear-away stabilizer and fusible web. The tear-away stabilizer is used to give the teeth on the pillow more structure. If you do not have any, you can substitute the stabilizer for a fusible interfacing, just know that it will be permanent. Fusible web is a permanent iron on adhesive that is used to create the fun details on the tooth fairy pillow, like the eyes. Some find it to be much easier to use than a fabric glue and Stacy shows how to use the product.
Construction
In this sewing tutorial, Stacy shows you how to construct the tooth fairy pillow from start to finish. She begins by showing how to shape the mouth of the pillow, which will then be turned into the front pocket complete with teeth. Once the pocket sections have been made, Stacy moves on to show how to construct the rest of the pillow and gives tips on how to easily and accurately cut out the small detail pieces like bow-ties. This tooth fairy pillow can also be personalized depending on who you are making it for, with little boys getting bow-ties and little girls getting hair bows.
