Taking In a Shirt
Aurora Sisneros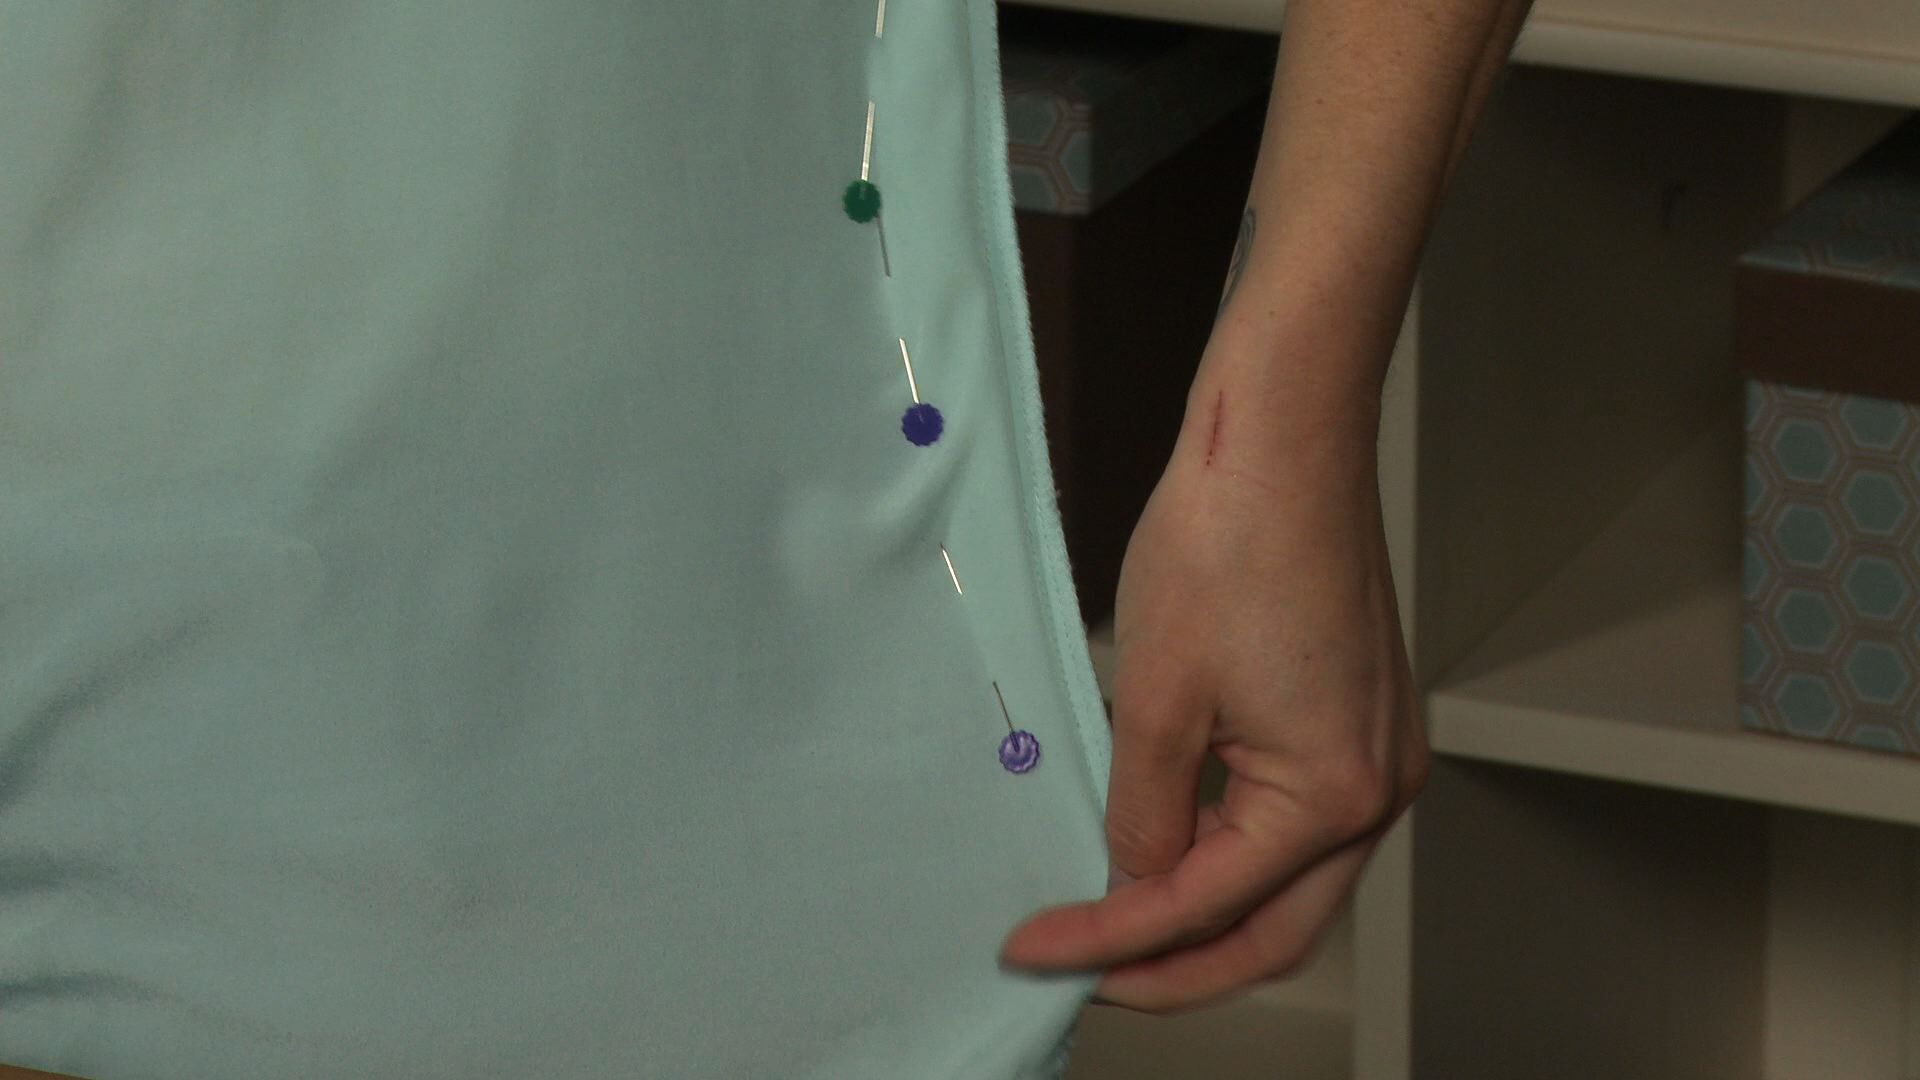
Video Player is loading.
Taking in a shirt doesn’t have to be a lengthy process. Aurora Sisneros shows you a quick and easy way to take in a shirt by yourself without having to use a dress form.

Try It On
The first step to taking in a shirt is obviously trying it on, not just relying on the size on the tag. This allows you to see how much larger the fit is for a big shirt and to also determine if different areas of the shirt fit better than others. Aurora shows you how she recommends trying the shirt on inside out, making the shirt ready to pin for the needed alterations.
Pinning
With your shirt on inside out it should be easy to see where any alterations need to be made. As shown in the video, one of the most common places for taking in a shirt is along a side seam. Aurora shows how to start pinning at the center of your alteration, or where the shirt needs to be taken in the most, and then how to work your way out towards existing seams. Beginning and ending the alteration at existing seams allows you to backstitch along the seam to ensure your stitching is secure.
Related videos: Tips for Choosing Sewing Pins and Sewing Over Pins: Tips and Techniques
Stitching
Once you’ve pinned your shirt it’s time to stitch. Aurora explains how to use the pins as ‘dots’ to connect in order to draw a stitching line onto your shirt. After you have stitched along the drawn line it is important to try the shirt on another time to ensure it fits before cutting away any of the excess fabric. Once you know your shirt fits the way you would like it to you can cut away the excess fabric and serge or zig-zag finish the raw edges.
Fitting
While this tip is great for taking in a shirt that’s too big it’s also a great sewing shortcut for other garments as well. For example, this same technique could be used on a dress to either take it in if it’s too big or turn a boxy dress into one that’s more form fitting.
Interested in other shirt alteration ideas? Check out some of our other videos: Upcycle T-Shirt Project: Sew a Beaded Neckline, T-Shirt Upcycle: Adding Lace to a Shirt, Reverse Applique and T-Shirt Applique Ideas
There's nothing worse than pulling your favorite outfit out of a closet or finding the perfect thing off the rack, and right before you put it on to go out with your friends or to attend the wedding, you realize it doesn't quite fit. It's a little too big and it needs to be taken in. Now there's no time to go to a tailor. Dress forms can be expensive. And if you don't have one, it can make tailoring an outfit to your form a little bit difficult.
So I have a quick trick for you. Notice I'm wearing my shirt inside out. Yes, this is on purpose. The reason is that if I am in a hurry to fix something, and I don't have a dress form, I like to try it on inside out, that way I can see my raw seams and then I'm going to just do what I call a quick and dirty pin to try to get it to fit. Okay, so let's say I want to take this shirt in a little bit on the sides because it's too baggy.
I would prefer that it be a little bit more fitted. Okay, instead of guessing where I would like it to be pinned I'm actually just gonna try it on inside out. I'm gonna stand in front of a full length mirror, and I'm gonna pin it. I'm gonna start with this side here. I'm gonna make sure this is nice and flat.
And I just wanna bring it in a little bit on the side, just like that. Okay. Now the easiest way to do this is to start when you do this, make sure your seam comes from an existing seam and ends on an existing seam. That way you can back stitch on the existing seam, sew across where you want to sew, and then end. So let's finish doing this.
So I want to kind of aim my pins back toward this seem like this. Okay. Now, even though I have all of this extra fabric sticking out, once you pin both sides and you stand in the mirror, you can really see the change that it makes. So I'm gonna finish pinning the bottom here. Okay.
Go like this. And we want it to flare a little bit at the end. So I'm gonna put my last pin here so that it kind of ends on a seam. See that, okay. Now if I pin this other side, I'm just gonna hold it.
Look how much better that line looks along my waistline. So now it actually fits my form just a little bit better, just like that, okay. So you can see when I hold this out, these pins are kind of jaggedy. Because I'm not really paying attention to what I'm doing, it's not going to be a perfect line. So what I'm gonna do is being very careful not to stick yourself, You're going to take the shirt off.
You're going to lie it on a flat surface. I have an iron off pen here. I'm going to use my pins, almost like a dot to dot. And you might have to sketch several different times, but you're basically just going to sketch a nice curved line right on the outside of those pins so that you have a nice smooth line to sew from. So what you would do is you would back stitch on the existing seam, sew up the existing seam, veer off onto your very nice sketched line.
Sew all the way along your sketched line. End on the original seam, do a little back stitch. And then if you have a surger, you can surge the end of it if you wanna cut it. I like to turn it right side out first after I've sewn my first seam before I cut anything, try it on and make sure it looks nice before I trim off the inside edges and finish my seam.
This topic and those like it is extremely interesting to me- i am not a quilter, i joined this site entirely to learn tricks and tips to tailor clothes to fit for me and my family. I know this is just a quick video, but i would LOVE to view one of these which is more detailed and informative. This is EXACTLY the kind of content i am looking for.
I like to make a paper template of the seam I marked on the first side and then transfer the line to the second side so they are the same. (Body is mostly symmetrical so this will work, if body is not the same on both sides, then the pinning would have to be done with the shirt worn right side out.)
Very helpful! I don't know why I never thought about turning the garment inside out to try on. That is something I will remember to do! And I like using the pen too! I don't like the criticisms on this thread, too! EVERYBODY can have a great idea.
This is helpful. I haven't sewed too muchmuch, but I grew up with handing my mom pins as she sewed and I've made my fair share of pillows as a kid and hemmed a few pairs of pants as seams come undone. I always had to buy bigger shirts because my hips/bust is wider, so I buy for that. I've always wanted to take in a shirt, but was always apprehensive about doing it myself. I think I can manage now because of your short video. Thanks!
I'm a beginner at sewing and even I understood what this lady was trying to get across...... I've disregarded the criticisms....😉 Thank you for the video, it is really helpful.....!
Do you have any ideas to take in a health uniform top to a smaller size?
The problem with pinning alterations with the garment inside out is that if you have any differences in your body shape from side to side, your alterations will be incorrect.
I don't understand why the sample was not sewn so that that beginners could see how its done, some people wouldn't try. I am now wondering if she has even done this alteration.
Why didn't you finish, I Have done this type of alteration hundreds of times as a sewing professional, I would not pin like that on myself. I would face the pins sharp end down, or use small safety pins. I just have someone pin the garment rather than do it one my own. I can't understand why you didn't finish the video. Most beginners need to see the sewing process to feel confident to try their own. Another point is you pinned quite a bit of fabric out of the sides. To make it look right, you should slant back to the seam gradually and be prepared to stitch all the way to the underarm seam, and open the hem if you need to if you pinched out a lot at the waist. And I agree with Ann And Anne's points as well. What were you thinking? Just sayin.
as a sewing teacher you really needed to have had another exact shirt and shown how to actually drawn the curved lines and then sewn them. Its very unclear how you blend one end of the graded seam into the other. you only taught half a lesson. If I was a beginner following your lesson I know I would have made a mess of it. Great idea, but you should re shoot this video and complete the lesson.